


So, you’ve made it to VMware Cloud Foundation 9, and you’re dreaming of a production-grade, highly available Kubernetes setup. You want Supervisor spread across three fault domains like a proper cloud-native boss.
Well… buckle up, because this ain’t your usual click-click-done setup.
Why? Because the vCenter GUI forgot something important (again 😅). But fear not—I’m here to walk you through how to actually deploy a Three-Zone Supervisor in VCF 9, even if it means getting your hands a little dirty with the API.
Wait, Why Three Zones?
Short version: Kubernetes expects three zones for fault tolerance.
Long version: If you only have two AZs (like with a vSAN stretched cluster), Kubernetes sees that as a single zone, and that doesn’t cut it for high availability.
So yeah -> three zones > single stretched zone.
Let’s get started.
Build the Foundation
Deploy a Dedicated Workload Domain
Could you deploy the Supervisor into the Mgmt Domain? Sure.
Should you? Probably not.
Instead, deploy a brand-new Workload Domain. It keeps things clean, separated, and aligned with best practices. Your future self will thank you.
Deploy Three vSAN-Backed Clusters
Inside that WLD, deploy three clusters – each with at least three ESXi hosts, and all with vSAN enabled.
Why vSAN? Because the Supervisor loves it, and your storage policies depend on it. Each cluster = one AZ. Simple.
Also see: How to Add a Cluster to a Workload Domain in VCF 9.0.0 (Yes, It’s Weird Right Now)
Create Three vSphere Zones
Now map those clusters to zones so vSphere knows how to spread things out.
- Go to: vCenter → Configure → Security → vSphere Zones
- Create three zones, one for each cluster.
This is what tells Supervisor “Hey, these are separate Zones – spread your stuff smartly
Create the Supervisor Content Library
You need a content library to pull down the Kubernetes images for Supervisor.
Subscribe to this VMware-hosted library:
https://wp-content.vmware.com/supervisor/v1/latest/lib.json
Make sure it syncs up before you continue, or the whole thing might fall apart faster than a home lab upgrade on a Friday night.
Deploy NSX Edges
If you’re using NSX VPC (the cool new way) or NSX Classic, you’ll need NSX Edge Nodes.
Here’s what to do:
- Deploy at least two Edge Nodes.
- Using vCenter vCenter → Network Connectivity → Add Edge Cluster.
Also add some IP Information for you VPCs if you want to use VPC. (Network Configuration -> Edit)
My lab setup is nested, so I dropped the Edges in a single cluster. You should totally spread them out across zones for real-world availability.
Configure the Supervisor Management Network
Each cluster needs a network for the Supervisor control plane.
I reused the VM management network and added it to all VDS’s so every cluster could talk to the control plane.
Kicking Off the Multi-AZ Supervisor Deployment (With the GUI… Until It Quits)
At this point, you might be feeling confident and head into the vCenter GUI thinking,
“Alright, time to enable the Supervisor—let’s do this!”
But then… boom. Roadblock.
You suddenly realize you can’t select the three separate management networks you carefully set up across your clusters. The GUI just kind of… gives up.
Why?
Because it’s expecting a single network or VDS stretched across all three zones which, if you’re using VCF, isn’t even possible.
So yeah, the GUI is missing a piece here (literally and figuratively).
And that, my friend, is where we call in Plan B: the API.
Enter Plan B: The API Way
Go to:
vCenter → Developer Center → API Explorer
Search for: supervisor
You’ll want to look at this endpoint:
namespace_management/supervisors
With a single POST call, you can enable Supervisor on a single zone or across multiple zones.

But wait – you don’t want to craft that JSON mess by hand, do you?
There’s a Script for That
One of our engineers wrote a neat little script to do exactly this:
👉 https://github.com/papivot/bash-wcpcli9-multi-az
Let’s use it.
Deploying Your Three-Zone Supervisor with the Script
Download the Script + JSON
You’ll need:
- enable-wcp.sh (the main script)
- A config file (e.g. json for VPC deployments)
Yes, the script supports VPC, NSX Classic, and more.
Update the enable-wcp.sh with Your Info
Fill in your Details in enable-wcp.sh – no need to modify the other json.
###################################################
# Enter Infrastructure variables here
###################################################
VCENTER_VERSION=9
VCENTER_HOSTNAME=10.21.10.130
VCENTER_USERNAME=administrator@lax-w01.local
VCENTER_PASSWORD='Steffenl0v3sK8s'
NSX_MANAGER=10.21.10.131
NSX_USERNAME='admin'
NSX_PASSWORD='VMw@re1!VMw@re1!'
K8S_SUP_ZONE1='az1'
K8S_SUP_ZONE2='az2'
K8S_SUP_ZONE3='az3'

DEPLOYMENT_TYPE='VPC' # Allowed values are VPC, NSX, AVI, FLB
#####################################################
# Common variables
#####################################################
export DNS_SERVER='10.21.10.5'
export NTP_SERVER='ntp0.lax.rainpole.io'
export DNS_SEARCHDOMAIN='lax.rainpole.io'
export MGMT_STARTING_IP='10.23.10.151'
export MGMT_GATEWAY_CIDR='10.23.10.1/24'
export K8S_SERVICE_SUBNET='10.96.0.0'
export K8S_SERVICE_SUBNET_COUNT=512 # Allowed values are 256, 512, 1024, 2048, 4096...
export SUPERVISOR_NAME='supervisor01'
export SUPERVISOR_SIZE=TINY # Allowed values are TINY, SMALL, MEDIUM, LARGE
export SUPERVISOR_VM_COUNT=3 # Allowed values are 1, 3
K8S_CONTENT_LIBRARY='vks' #That's the Content Lib we created
K8S_MGMT_PORTGROUP1='lax-w01-cl01-vds01-pg-vm-mgmt' #add the network you created
K8S_MGMT_PORTGROUP2='lax-w01-cl04-vds01-pg-vm-mgmt'
K8S_MGMT_PORTGROUP3='lax-w01-cl05-vds01-pg-vm-mgmt'
K8S_WKD0_PORTGROUP='Workload0-VDS-PG' # Not needed for NSX
K8S_STORAGE_POLICY='vSAN Default Storage Policy'
And for the VPC specific:
#############################################################
# VPC specific variables
#############################################################
export VPC_ORG='default'
export VPC_PROJECT='default'
export VPC_CONNECTIVITY_PROFILE='default'
export VPC_DEFAULT_PRIVATE_CIDRS_ADDRESS='172.26.0.0'
export VPC_DEFAULT_PRIVATE_CIDRS_PREFIX=16
Copy the Files to a Linux Box
If you don’t have a Linux system handy, just SSH into the SDDC Manager.
Login as vcf, switch user to root su root and drop the files in /tmp.
Run the Script
Since /tmp isn’t executable by default, I just renamed the file to enable-wcp (dropped the .sh) and ran it like this using bash:
bash enable-wcpGrab a coffee . Maybe two.
Wait ~30 Minutes
Let vCenter do its thing. It’s setting up the control plane across three zones – give it time.
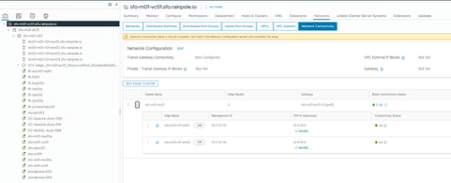
Success! Your Supervisor Is Now Multi-AZ
You did it! You now have a cloud-native, highly available, three-zone Supervisor ready to run production-grade K8s workloads.


Final Thoughts
- This process will get smoother and par of the GUI in future VCF versions.
- For now, API + script is the way.
- The three-zone setup is worth the effort for serious Kubernetes workloads.
TL;DR
Step
What to Do
1)
Deploy new WLD + 3 vSAN clusters
2)
Set up content library + NSX Edges
3)
Prepare Supervisor Mgmt networks
4)
Use the API or script to enable WCP
5)
Celebrate your new three-zone setup
Shoutout
Thanks to Navneet Verma who wrote the script – seriously, you saved us all from handcrafting API JSON.

- Help! I Joined the Wrong Identity Broker… (How to Unjoin an Identity Broker in VCF 9) - 15. September 2025
- Deploying a Three-Zone Supervisor in VCF 9.0.0 (Or: How I Learned to Stop Worrying and Love the API) - 31. July 2025
- How to Add a Cluster to a Workload Domain in VCF 9.0.0 (Yes, It’s Weird Right Now) - 30. July 2025