Starting with NSX-T 3.2 its now possible to act as central security control plane for Antrea enabled k8s clusters. This post shows how to set up and gives a short introduction how it works.
Prerequisites:
have NSX-T 3.2 up and running
Prepare 3 Ubuntu 18.04 VMs (4 CPU, 4GB RAM, 25GB Storage), minimum install with OpenSSH Server. VMs need network access to NSX-T Manager – not necessary to run within NSX environment or even within vSphere
setup VMs without SWAP (oder disable later in /etc/fstab and reboot)
download ‘VMware Container Networking with Antrea (Advanced) 1.3.1-1.2.3’ and ‘antrea-interworking-0.2.0.zip’ from my.vmware.com Antrea Download Page
Linux Setup
Follow the “Linux Setup” steps from this post until “This finishes the common Tasks for all VM“. Please ensure you’re installing k8s Version 1.21
Create k8s Cluster
login to your master node and run
vm@k8s2-master:~$: sudo kubeadm init --pod-network-cidr=10.11.0.0/16
Note the output after successful run. Now you can join the nodes by running the command from the output of your (!) “init” command on each of your nodes. My example:
vm@k8s2-node1:~$ sudo kubeadm join 192.168.110.80:6443 --token cgddsr.e9276hxkkds12dr1 --discovery-token-ca-cert-hash sha256:7548767f814c02230d9722d12345678c57043e0a9feb9aaffd30d77ae7b9d145
On k8s2-master allow your regular user to access the cluster:
vm@k8s2-master:~$ mkdir -p $HOME/.kube
vm@k8s2-master:~$ sudo cp -i /etc/kubernetes/admin.conf $HOME/.kube/config
vm@k8s2-master:~$ sudo chown $(id -u):$(id -g) $HOME/.kube/config
Check your Cluster. (“NotReady” can be okay, we haven’t configured CNI right now)
vm@k8s2-master:~$ kubectl get nodes
NAME STATUS ROLES AGE VERSION
k8s2-master NotReady master 5m48s v1.21.8
k8s2-node1 NotReady 2m48s v1.21.8
k8s2-node2 NotReady 2m30s v1.21.8
Antrea Setup
on master node extract ‘antrea-advanced-1.2.3+vmware.3.19009828.zip’ file
change into folder ‘antrea-advanced-1.2.3+vmware.3.19009828/images/’ and tag/push ‘antrea-advanced-debian-*.tar.gz’ into your container registry [or store on each(!) VM locally using ‘docker load -i’]
change into folder ‘./manifests/’ to edit ‘antrea-advanced-*.yml’ and update all ‘image:’ references with the proper container registry locations from previous step
When finished, run
vm@k8s2-master:~$ kubectl apply -f antrea-advanced-v1.2.3+vmware.3.yml
Some seconds later all pods should be up and running
vmw@k8s2-master:~$ kubectl get pods -A
NAMESPACE NAME READY STATUS RESTARTS AGE
kube-system antrea-agent-bg4wf 2/2 Running 0 111s
kube-system antrea-agent-wjhfr 2/2 Running 0 111s
kube-system antrea-agent-wtbjz 2/2 Running 0 111s
kube-system antrea-controller-7cbdf8d887-c5klv 1/1 Running 0 111s
kube-system coredns-558bd4d5db-2f6ql 1/1 Running 4 2m30s
kube-system coredns-558bd4d5db-62xgk 1/1 Running 4 2m30s
kube-system etcd-k8s2-master 1/1 Running 0 2m30s
kube-system kube-apiserver-k8s2-master 1/1 Running 0 2m30s
kube-system kube-controller-manager-k8s2-master 1/1 Running 0 2m30s
kube-system kube-proxy-4gh9f 1/1 Running 0 2m30s
kube-system kube-proxy-c44zb 1/1 Running 0 2m30s
kube-system kube-proxy-h7jqw 1/1 Running 0 2m30s
kube-system kube-scheduler-k8s2-master 1/1 Running 0 2m30
NSX Setup
The following steps require to name your k8s cluster for identification. I’ll use cluster name k8s-cluster2.
On k8s master node create a self-signed security certificate
vm@k8s2-master:~$ openssl genrsa -out k8s-cluster2-private.key 2048
vm@k8s2-master:~$ openssl req -new -key k8s-cluster2-private.key -out k8s-cluster2.csr -subj "/C=US/ST=CA/L=Palo Alto/O=VMware/OU=Antrea Cluster/CN=k8s-cluster2"
In case you’re getting error message “Can't load /home/vm/.rnd into RNG” run “openssl rand -writerand .rnd” and re-run previously failed step.
vm@k8s2-master:~$ openssl x509 -req -days 3650 -in k8s-cluster2.csr -signkey k8s-cluster2-private.key -out k8s-cluster2.crt
Now login to NSX Manager and go to “System” -> “User Management” -> “User Role Assignment” -> “Add” -> “Principal Identity With Role”
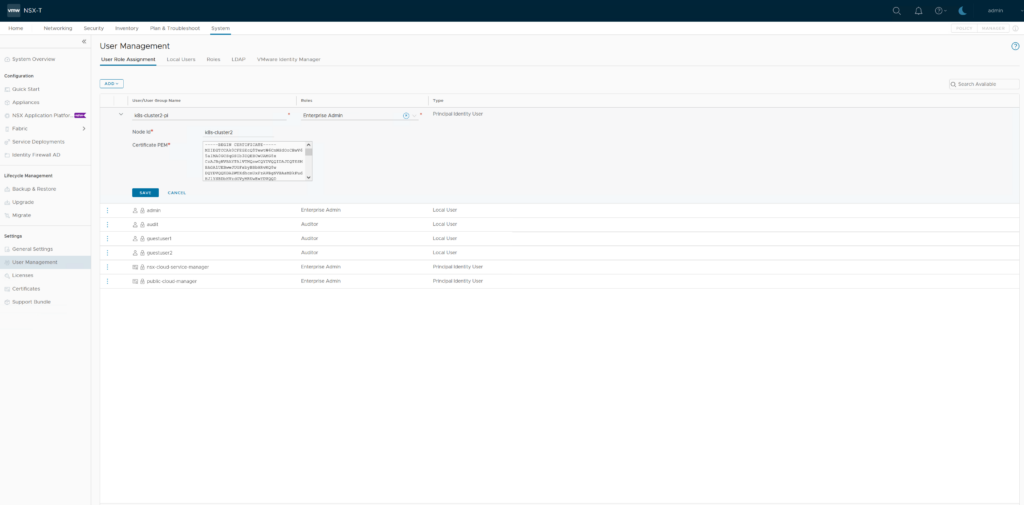
User Name: k8s-cluster2-pi
Role: Enterprise Admin
Node ID: k8s-cluster2
Certificate PEM: paste full content of k8s-cluster2.crt file
Antrea-Interworking setup
on k8s master node unzip ‘antrea-interworking-v0.2.0.zip’ and change into folder
edit ‘bootstrap-config.yaml’ to set ‘clusterName:’ and ‘NSXManagers:’ settings
clusterName: k8s-cluster2
NSXManagers: [NSXMGr IP1, NSXMGR IP2, NSXMGR IP3]
Get base64 encoded format of your previously created k8s-cluster2.crt / k8s-cluster2.key and apply output to ‘tls.crt:’ / ‘tls.key:’ setting in ‘bootstrap-config.yaml’
vm@k8s2-master:~$
vm@k8s2-master:~$
Example version of ‘bootstrap-config.yaml’
apiVersion: v1
kind: Namespace
metadata:
  name: vmware-system-antrea
  labels:
    app: antrea-interworking
    openshift.io/run-level: '0'
---
# NOTE: In production the bootstrap config and secret should be filled by admin
# manually or external automation mechanism.
apiVersion: v1
kind: ConfigMap
metadata:
  name: bootstrap-config
  namespace: vmware-system-antrea
data:
  bootstrap.conf: |
    # Fill in the cluster name. It should be unique among the clusters managed by the NSX-T.
    clusterName: k8s-cluster2
    # Fill in the NSX manager IPs. If there is only one IP, the value should be like [dummyNSXIP1]
    NSXManagers: [192.168.123.101, 192.168.123.102, 192.168.123.103]
    # vhcPath is optional. By default it's empty. If need to inventory data isolation between     clusters, create VHC in NSX-T and fill the vhc path here.
    vhcPath: ""
---
apiVersion: v1
kind: Secret
metadata:
  name: nsx-cert
  namespace: vmware-system-antrea
type: kubernetes.io/tls
data:
  # One line base64 encoded data. Can be generated by command: cat tls.crt | base64 -w 0
  tls.crt: LS0tLS1CRUdJTiBDRVJUSUZ[---omitted---]WRCBDRVJUSUZJQ0FURS0tLS0tCg==
  # One line base64 encoded data. Can be generated by command: cat tls.key | base64 -w 0
  tls.key: LS0tLS1TiBSU0EgUJRvL21z[---omitted---]iFJTQSBQUklWQVRFIEtFWS0tLS0tCg==
In file ‘interworking.yaml’ you should set all ‘image:’ sources to ‘projects.registry.vmware.com/antreainterworking/interworking-ubuntu:0.2.0’
Now apply antrea-interworking setup
vm@k8s2-master:~$ kubectl apply -f bootstrap-config.yaml -f interworking.yaml
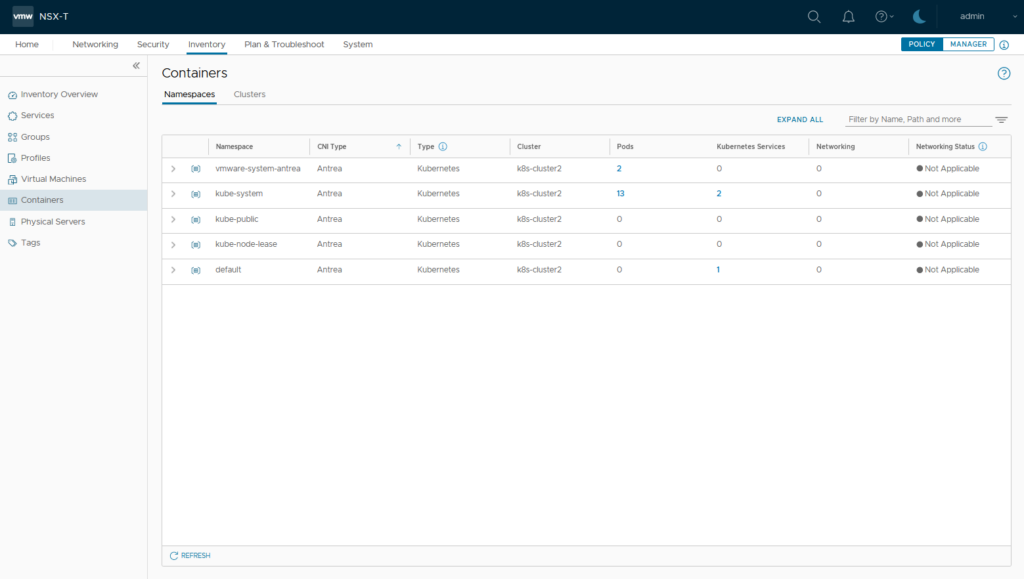
As soon as register job is completed and interworking pod is running your k8s-cluster2 should appear in NSX Manager inventory
vm@k8s2-master:~$ kubectl get pods -n vmware-system-antrea
NAME READY STATUS RESTARTS AGE
interworking-6bfc8d657d-5c4qv 4/4 Running 0 77s
register-nx2dg 0/1 Completed 0 77s

Testing NSX-T / Antrea
on master node create namespace, deployment and example K8S Network policy.
vm@k8s2-master:~$ kubectl create namespace antrea-nsx-demo
namespace/antrea-nsx-demo created
vm@k8s2-master:~$ kubectl apply -f https://raw.githubusercontent.com/danpaul81/nsx-demo/master/k8s-demo-yaml/01-deployment.yaml -n antrea-nsx-demo
deployment.apps/depl-nsx-demo created
vm@k8s2-master:~$ kubectl apply -f https://raw.githubusercontent.com/danpaul81/nsx-demo/master/k8s-demo-yaml/05-policy.yaml -n antrea-nsx-demo
networkpolicy.networking.k8s.io/nsx-demo-app-policy created
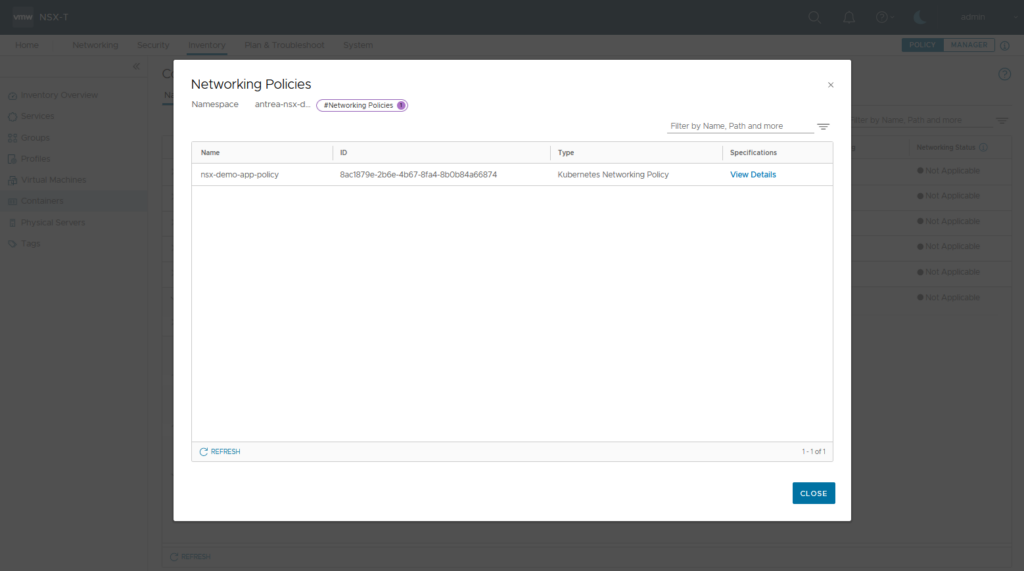
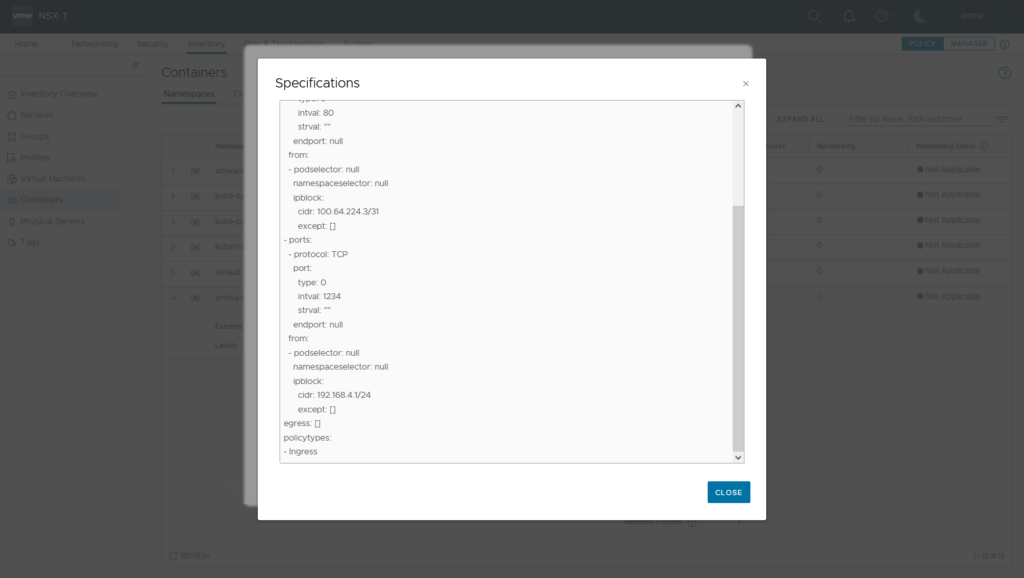
NSX Inventory now should show newly created namespace / pods and the user-applied K8S network policy on namespace level.


Now lets apply a NSX generated Security Policy (Antrea Network Policy) on K8S cluster level. Create a NSX DFW Policy and apply it to Antrea Cluster k8s-cluster2
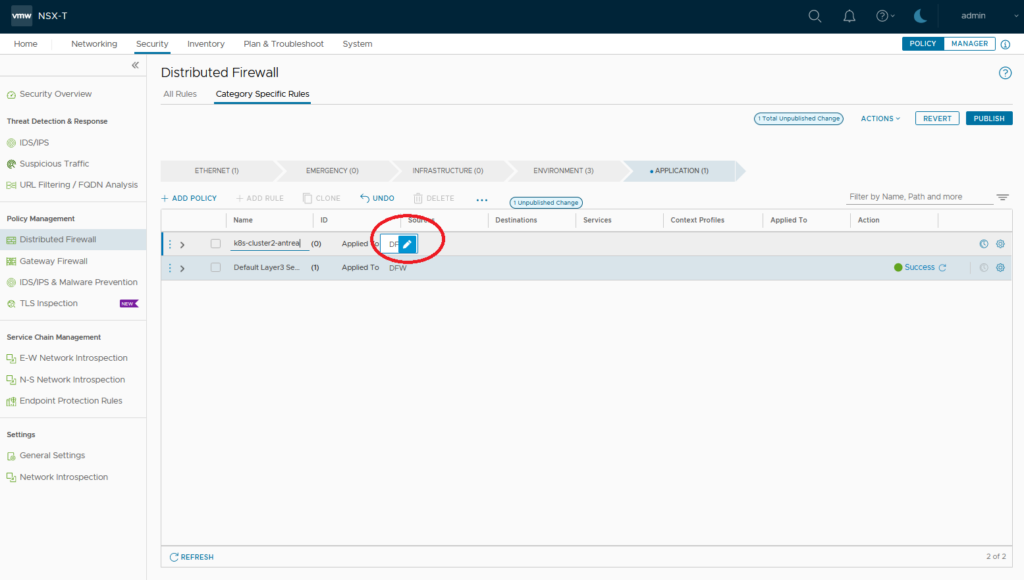
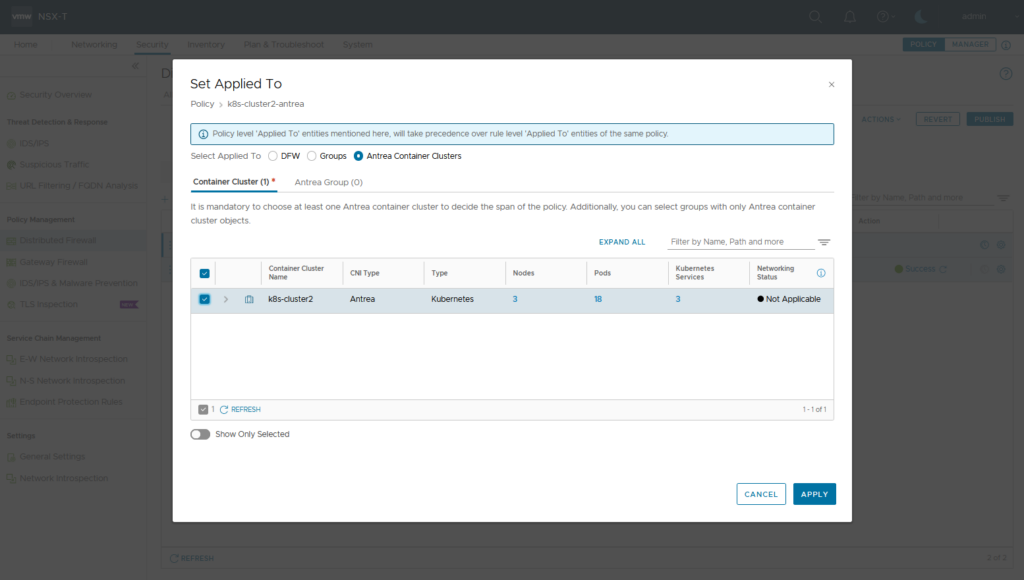
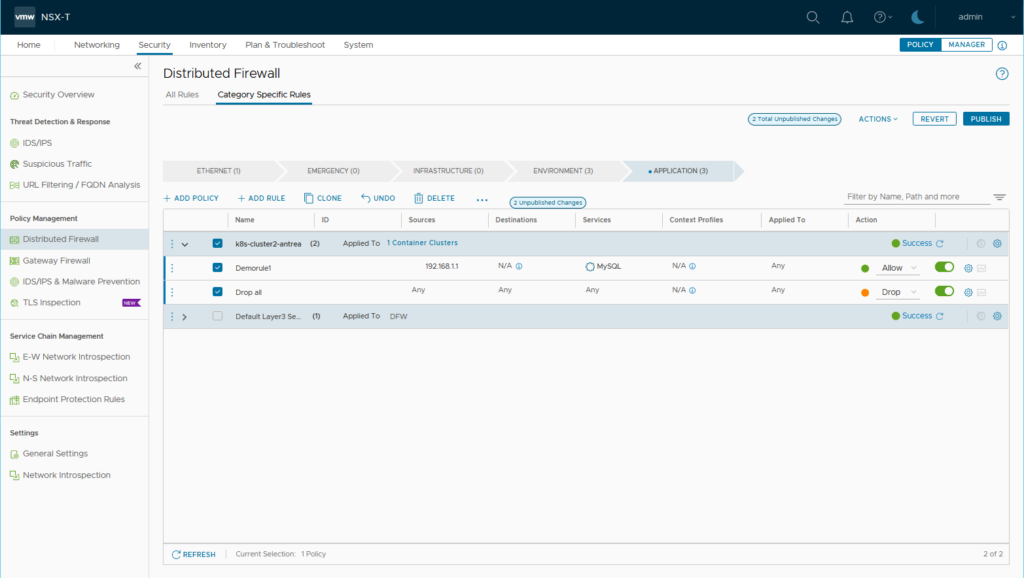
Create some sample rules (here: 1st rule: Source IP 192.168.1.1 Service mysql 2nd Rule: Any/Any/Deny) and publish
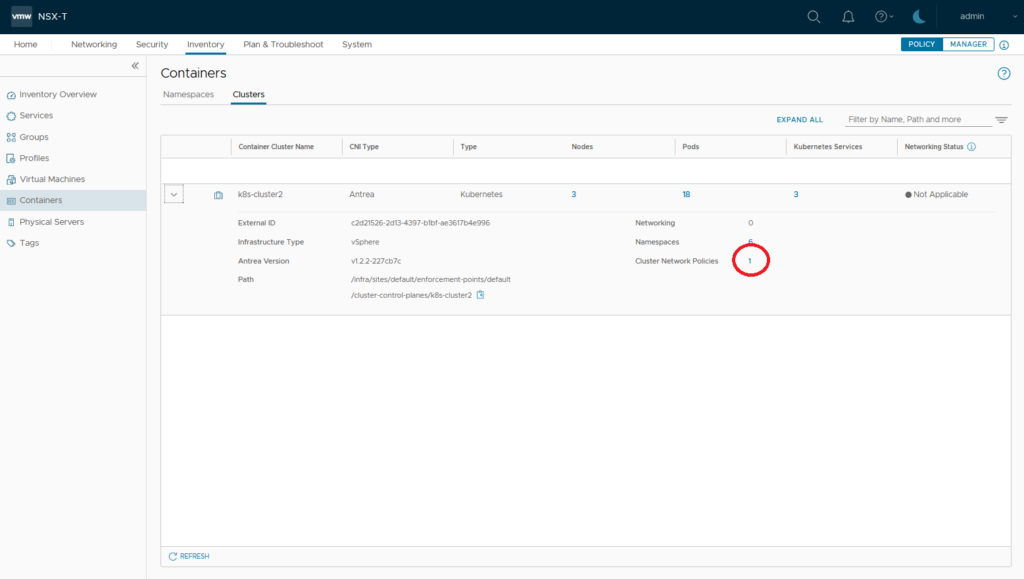
NSX Inventory now will show Cluster Network Policies
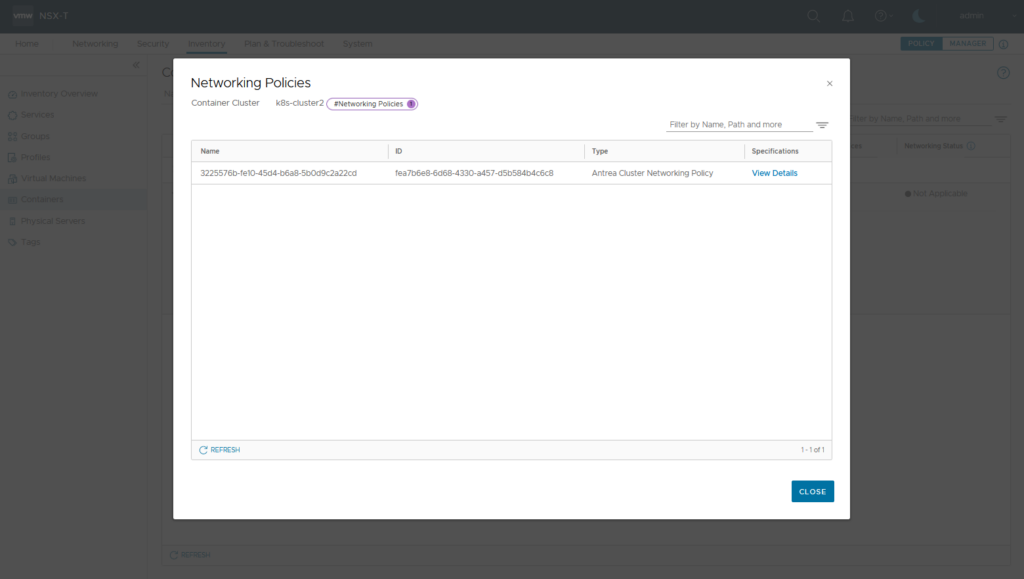
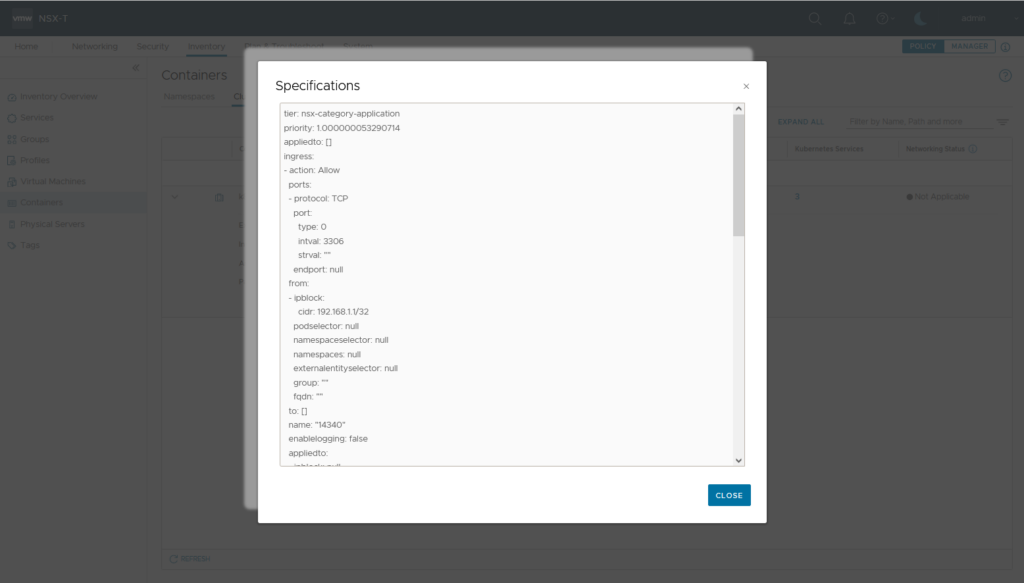
To display NSX generated Antrea Network Policy on cli type following
vm@k8s2-master:~$ kubectl get acnpNAME TIER PRIORITY DESIRED NODES CURRENT NODES AGE
3225576b-fe10-45d4-b6a8-5b0d9c2a22cd nsx-category-application 1.000000053290714 3 3 4m28s
vm@k8s2-master:~$ kubectl describe acnp 3225576b-fe10-45d4-b6a8-5b0d9c2a22cd
Name: 3225576b-fe10-45d4-b6a8-5b0d9c2a22cd
Namespace:
Labels: ccp-adapter.antrea.tanzu.vmware.com/managedBy=ccp-adapter
Annotations: ccp-adapter.antrea.tanzu.vmware.com/display-name: k8s-cluster2-antrea
API Version: crd.antrea.io/v1alpha1
Kind: ClusterNetworkPolicy
Metadata:
Creation Timestamp: 2021-12-20T09:17:07Z
Generation: 1
Managed Fields:
API Version: crd.antrea.io/v1alpha1
Fields Type: FieldsV1
fieldsV1:
f:status:
.:
f:currentNodesRealized:
f:desiredNodesRealized:
f:observedGeneration:
f:phase:
Manager: antrea-controller
Operation: Update
Time: 2021-12-20T09:17:07Z
API Version: crd.antrea.io/v1alpha1
Fields Type: FieldsV1
fieldsV1:
f:metadata:
f:annotations:
.:
f:ccp-adapter.antrea.tanzu.vmware.com/display-name:
f:labels:
.:
f:ccp-adapter.antrea.tanzu.vmware.com/managedBy:
f:spec:
.:
f:egress:
f:ingress:
f:priority:
f:tier:
Manager: ccp-adapter
Operation: Update
Time: 2021-12-20T09:17:07Z
Resource Version: 119342
UID: fea7b6e8-6d68-4330-a457-d5b584b4c6c8
Spec:
Egress:
Action: Drop
Applied To:
Pod Selector:
Enable Logging: false
Name: egress:14341
To:
Ingress:
Action: Allow
Applied To:
Pod Selector:
Enable Logging: false
From:
Ip Block:
Cidr: 192.168.1.1/32
Name: 14340
Ports:
Port: 3306
Protocol: TCP
Action: Drop
Applied To:
Pod Selector:
Enable Logging: false
From:
Name: ingress:14341
Priority: 1.000000053290714
Tier: nsx-category-application
Status:
Current Nodes Realized: 3
Desired Nodes Realized: 3
Observed Generation: 1
Phase: Realized
Events:
Remove Antrea Cluster from NSX Inventory
To remove the k8s-cluster2 Cluster from NSX Inventory edit ‘deregisterjob.yaml’ on master node. Set ‘image:’ sources to ‘projects.registry.vmware.com/antreainterworking/interworking-ubuntu:0.2.0’ (as you did for interworking.yaml)
vm@k8s2-master:~$ kubectl apply -f deregisterjob.yaml
clusterrole.rbac.authorization.k8s.io/antrea-interworking-deregister unchanged
clusterrolebinding.rbac.authorization.k8s.io/antrea-interworking-deregister unchanged
job.batch/deregister created
Check for completion:
vm@k8s2-master:~$ kubectl get job -o wide deregister -n vmware-system-antrea
Then remove interworking namespace and RBAC resources:
vm@k8s2-master:~$ kubectl delete -f interworking.yaml --ignore-not-foundcustomresourcedefinition.apiextensions.k8s.io "antreaccpadapterinfos.clusterinformation.antrea-interworking.tanzu.vmware.com" deleted
customresourcedefinition.apiextensions.k8s.io "antreampadapterinfos.clusterinformation.antrea-interworking.tanzu.vmware.com" deleted
namespace "vmware-system-antrea" deleted
configmap "antrea-interworking-config" deleted
serviceaccount "register" deleted
role.rbac.authorization.k8s.io "register" deleted
rolebinding.rbac.authorization.k8s.io "register" deleted
serviceaccount "interworking" deleted
clusterrole.rbac.authorization.k8s.io "antrea-interworking" deleted
clusterrolebinding.rbac.authorization.k8s.io "antrea-interworking" deleted
clusterrole.rbac.authorization.k8s.io "antrea-interworking-supportbundle" deleted
clusterrolebinding.rbac.authorization.k8s.io "antrea-interworking-supportbundle" deleted
Finally you can delete the principle identity user role from NSX Manager.

Hi Daniel, can you post the direct link to antrea-interworking-0.2.0.zip as I cannot find this file.
Also, I am using Tanzu for VSphere 7u3 and my TKC is running 1.21.6. Is this the correct version of interworking connector?
Thanks
Hi, you can find the download when searching for “All Products” -> “Networking & Security” -> “VMware Antrea”. I’ll update blog post soon.
I haven’t tested TKC integration yet, but version looks okay.
Hello did it work with vsphere with tanzu and tkgs ?
And if yes in that case when we enable tanzu do i have to choose nsx-t or vsphere networking stack ?
regards
Hi, I’ve only tried it with upstream kubernetes. Technically it should work on each k8s distribution supported by Antrea. tkgs supervisor cluster uses nsx-t or vsphere networking; so no antrea. Guest clusters should work; but -as always- check compatibility first.
i was thinking the same but i just saw that vsphere 7u3 with nsx-t networking stack is only supported with nsx-t 3.1 Or we need nsx-t 3.2 for antrea integration.
So it means that it should work with tkgm and tkgs on vsphere networking
youre right, NSX-T 3.2 is required to integrate with Antrea. Please check with your VMware Team on when this will be supported on vSphere.