


DNS entries are a critical component when provisioning virtual machines. To simplify this process, this blog post demonstrates how to leverage the ExternalDNS Service within the VCF 9 Supervisor to automate the creation of DNS records directly in Microsoft DNS.
Where in VM-Apps-Org this usually has been done by an extensibility workflow (e.g. Orchestrator), in All-Apps-Org this can be handled by a supervisor service like ExtDNS.
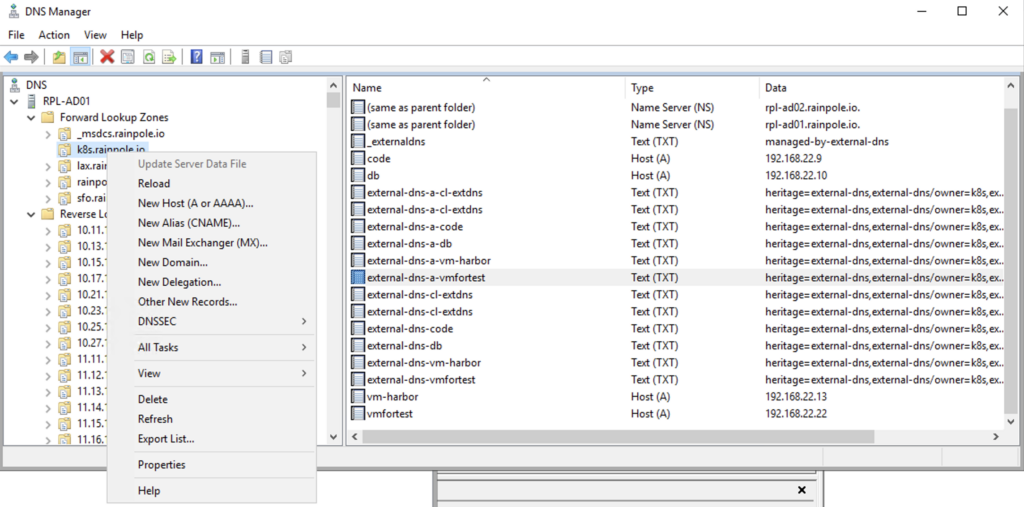
Prepare the Microsoft DNS Server:
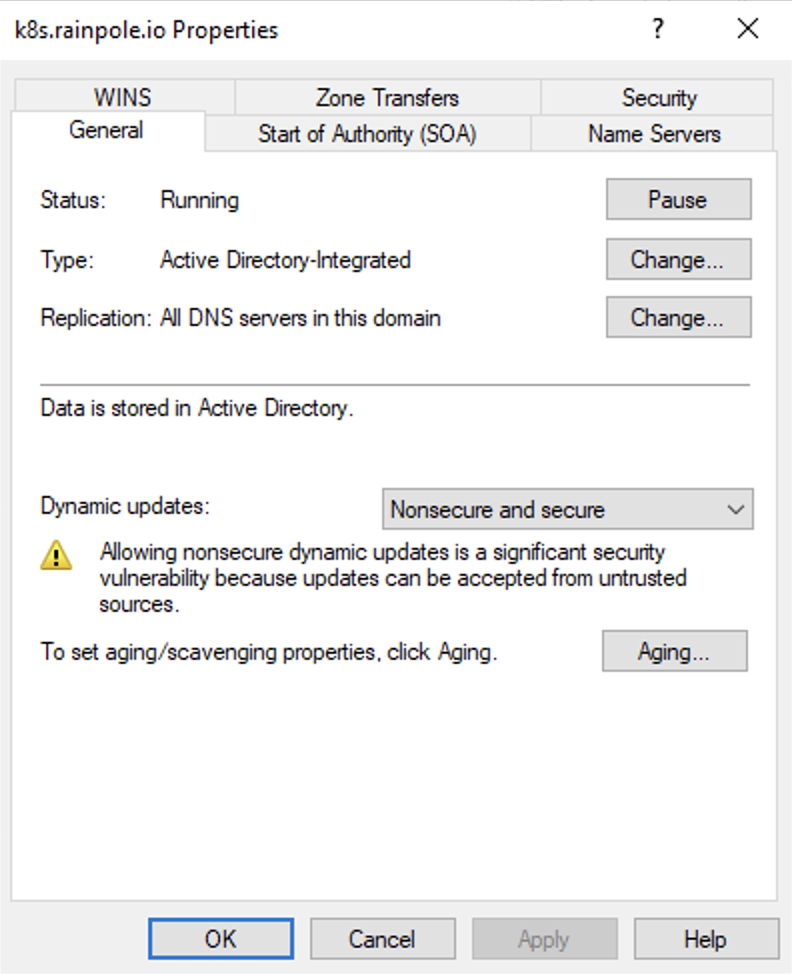
Right-click on the zone to be used by ExternalDNS and select Properties
On the General tab, set Dynamic updates to Nonsecure and secure
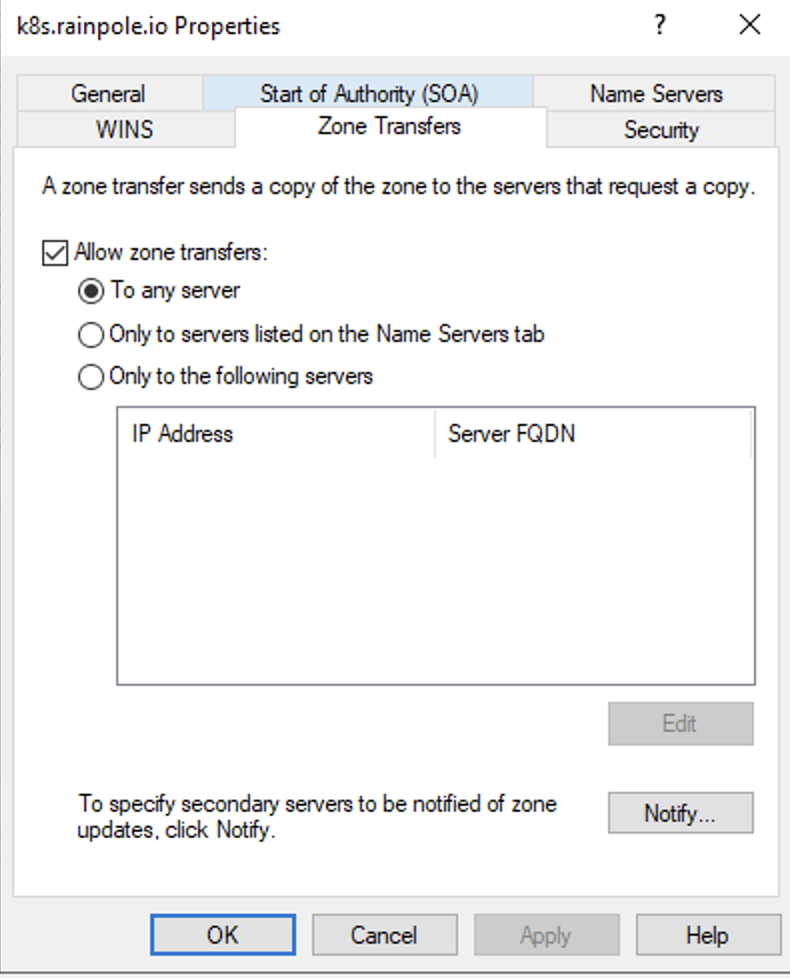
On the Zone Transfers tab, check the box next to Allow zone transfers
Create the ExternalDNS Service in Supervisor:
In vCenter go to Supervisor Management > Services and click ADD

Follow the description on this web page, download the right ExternalDNS Supervisor Service and click
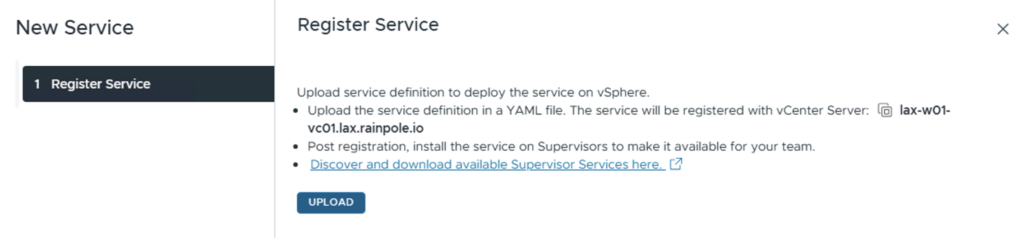
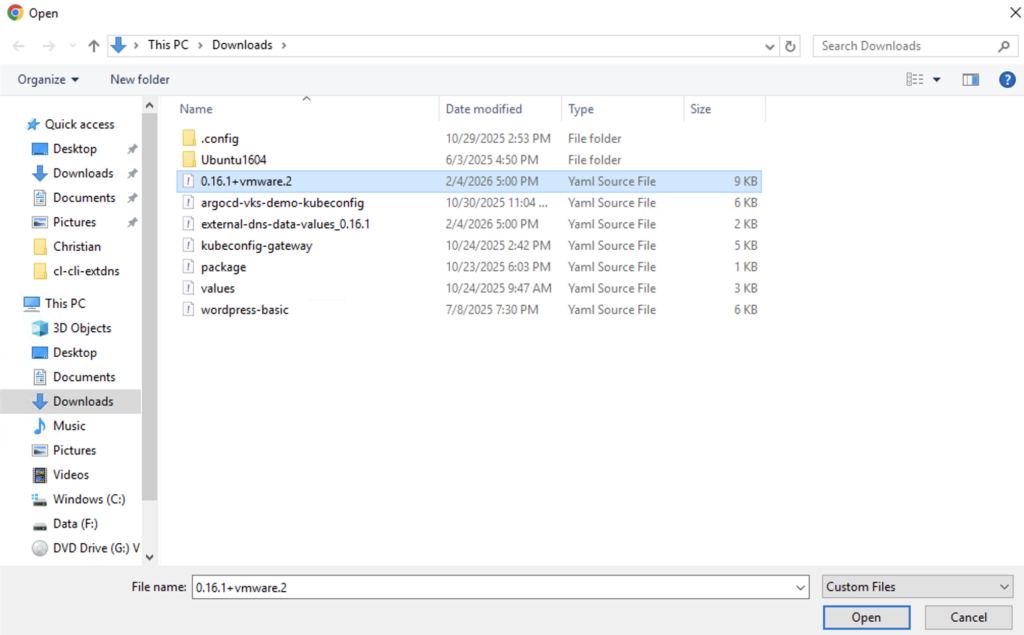
Choose the downloaded Service YAML and click Open
Check the Service Details and click FINISH

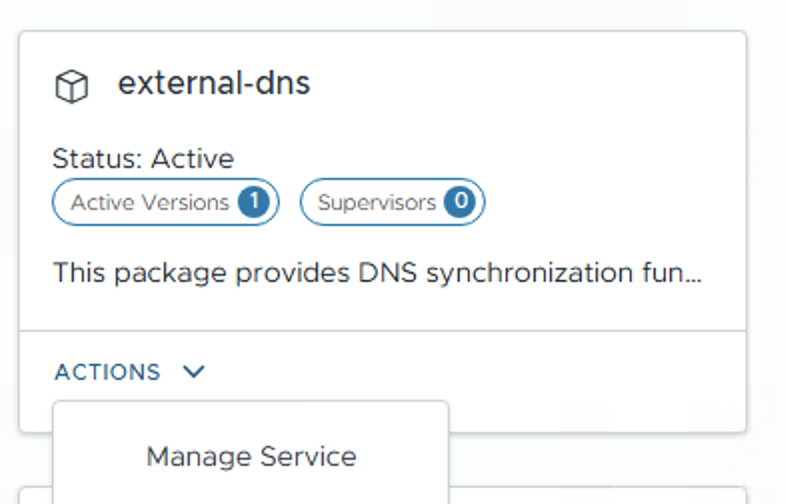
On the new created Service click on ACTIONS and choose Manage Service
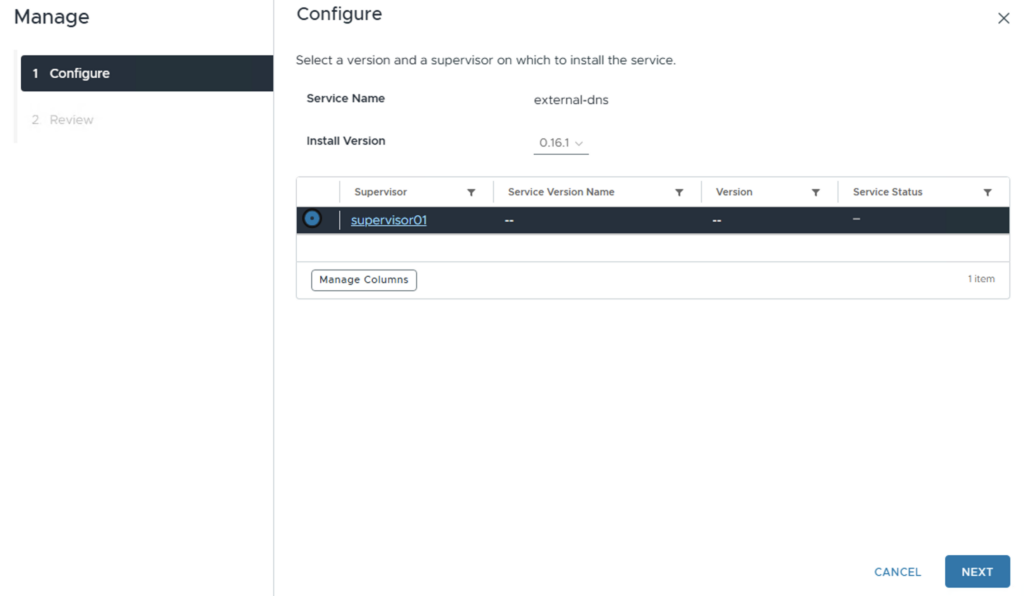
Choose the Supervisor and click NEXT
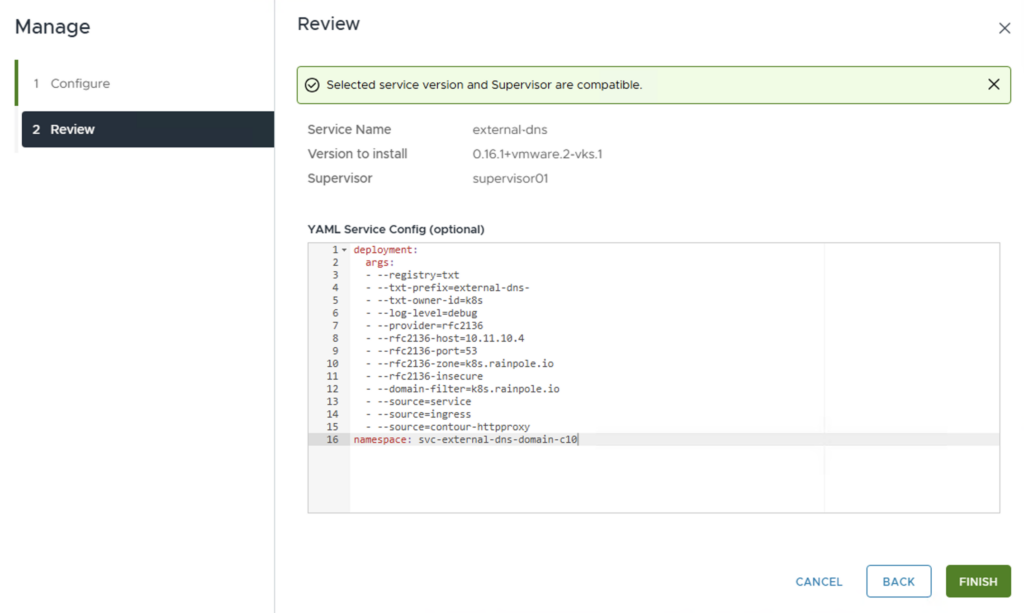
Define the Config for the ExternalDNS Service. Here is an example of a default configuration (the arguments must be adapted to your environment, e.g. the zone and filter must match the DNS zone in the Windows DNS server)
deployment:
  args:
  - --registry=txt
  - --txt-prefix=external-dns-
  - --txt-owner-id=k8s
  - --log-level=debug
  - --provider=rfc2136
  - --rfc2136-host=10.11.10.4
  - --rfc2136-port=53
  - --rfc2136-zone=k8s.rainpole.io
  - --rfc2136-insecure
  - --domain-filter=k8s.rainpole.io
  - --source=service
  - --source=ingress
  - --source=contour-httpproxy
namespace: svc-external-dns-domain-c10
Click FINISH
Note: With this configuration, DNS entries are only created. If you also want to update and delete them, you must add the following arguments:
– –rfc2136-tsig-axfr
– –policy=sync
Create a VM with a LoadBalancer and the Annotation for using ExternalDNS:
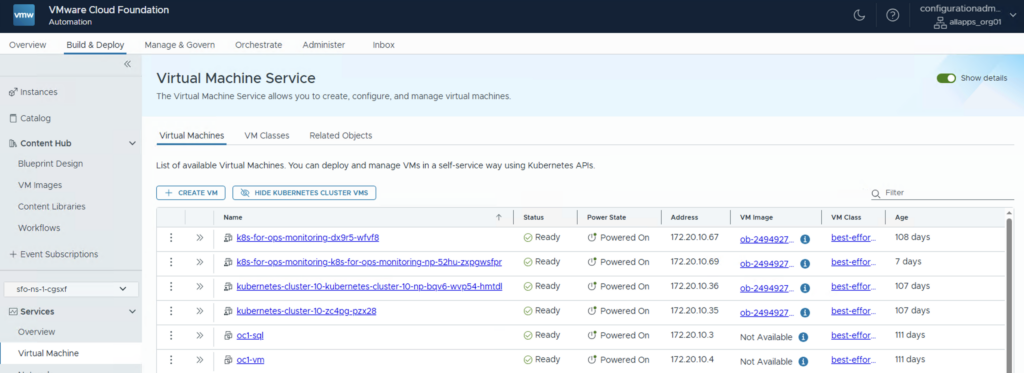
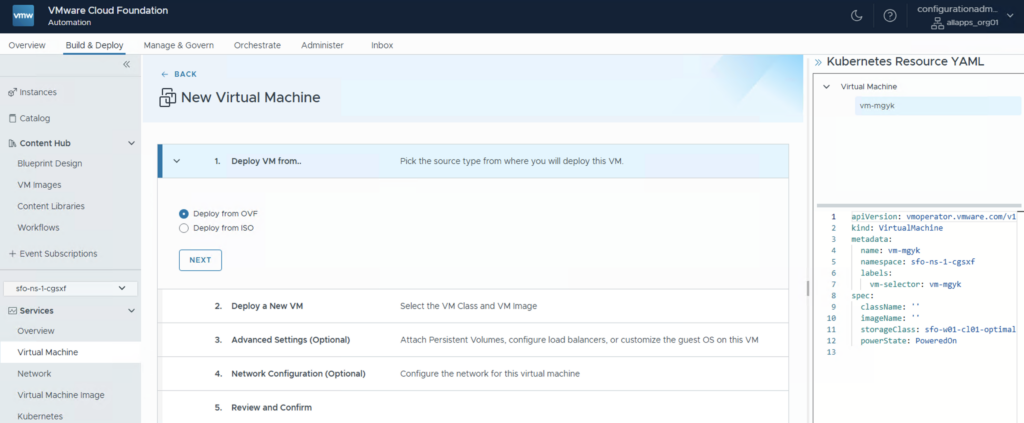
I use the Automation GUI to create the VM files. Log in to the All Apps Organisation and select the Build & Deploy tab. Select the Virtual Machine Service and click + CREATE VM
Choose Deploy from OVF und click NEXT
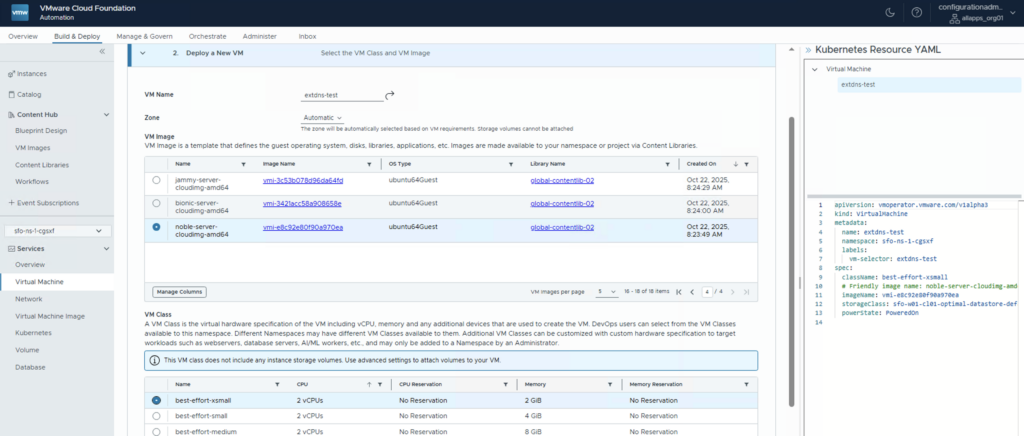
Define the VM Name, the VM Image and the VM Class and click NEXT
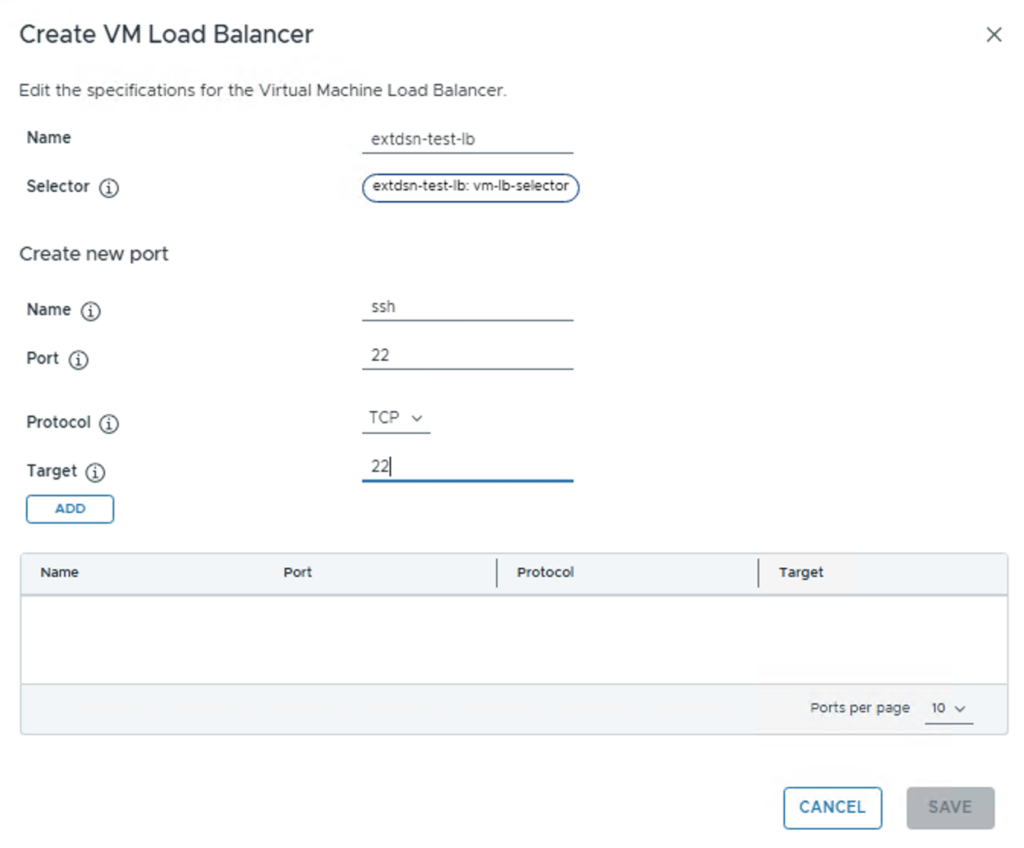
On the Advanced Settings go to the Load Balancer section an click ADD and choose New
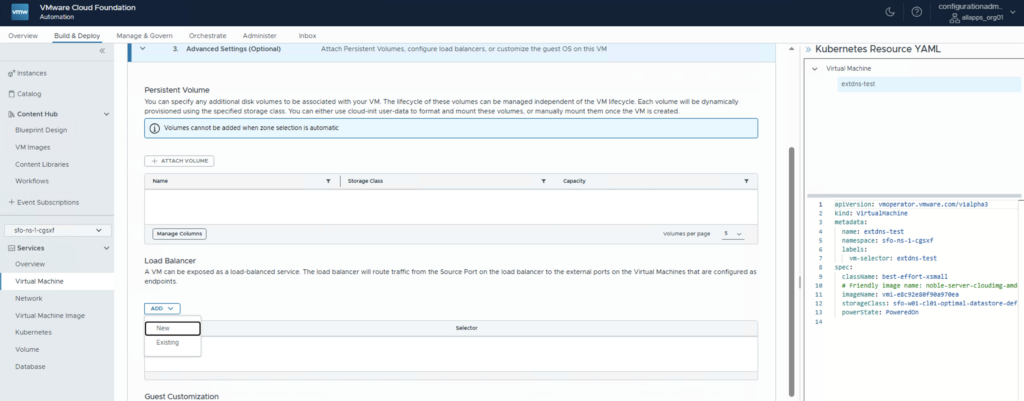
Define a Name for the Load Balancer and create a new port (i choosed ssh). Click ADD and SAVE
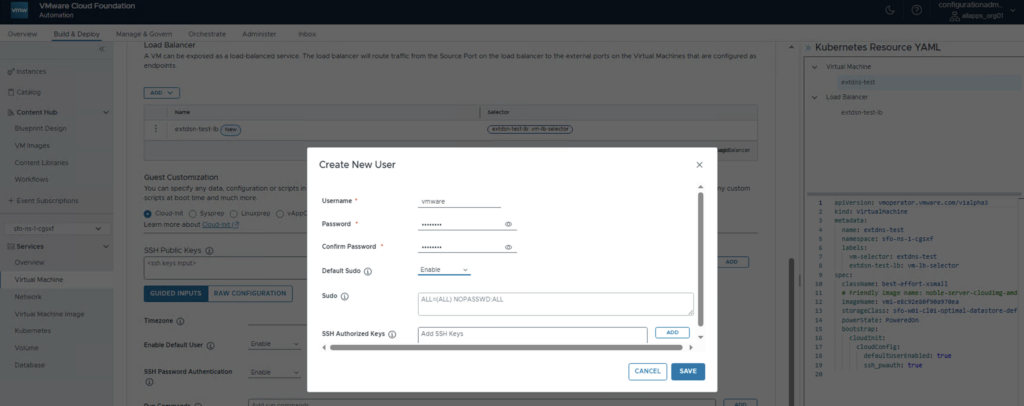
On the Advanced Settings go to the Guest Customization section and click CREATE NEW USER. Define a Username / Password and enable Default Sudo. Click SAVE
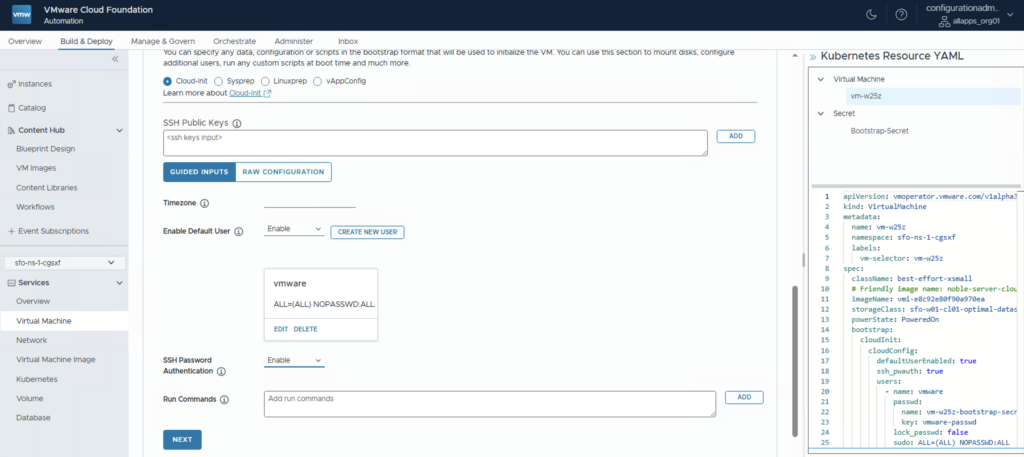
Set the Enable Default User ans SSH Password Authentication to Enable and click NEXT
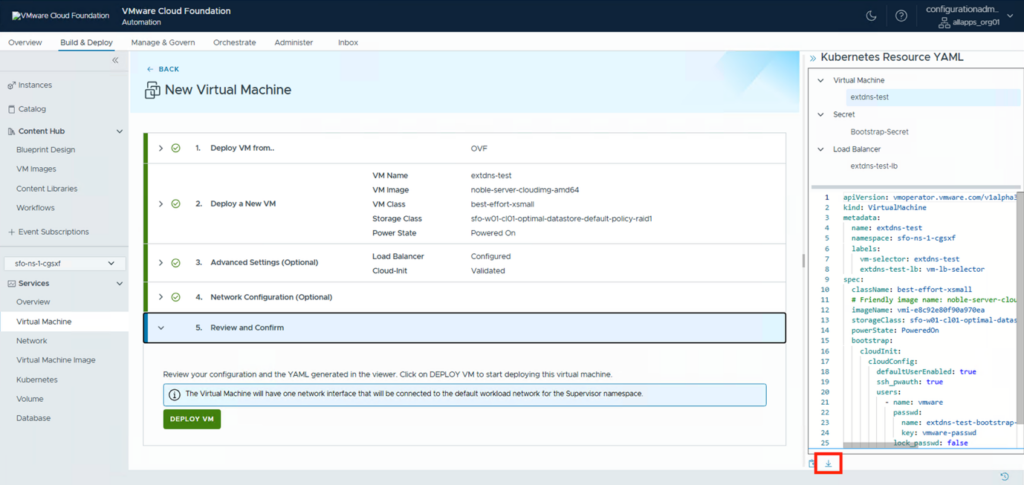
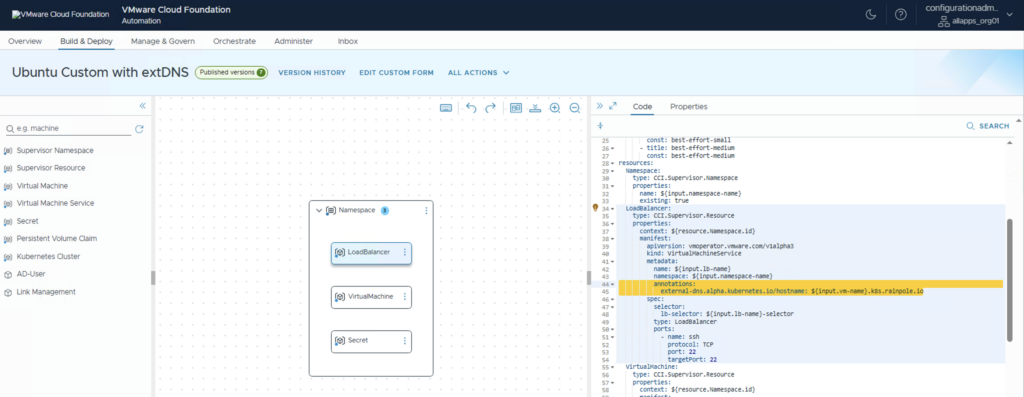
On the Network Configuration click NEXT but NOT DEPLOY VM, because we need an additional Annotation for ExternalDNS in the LoadBalancer config.
Since we cannot edit the YAML here, we have to download it. Click on the ARROW below the YAML to start the download
Extract the downloaded Zip file

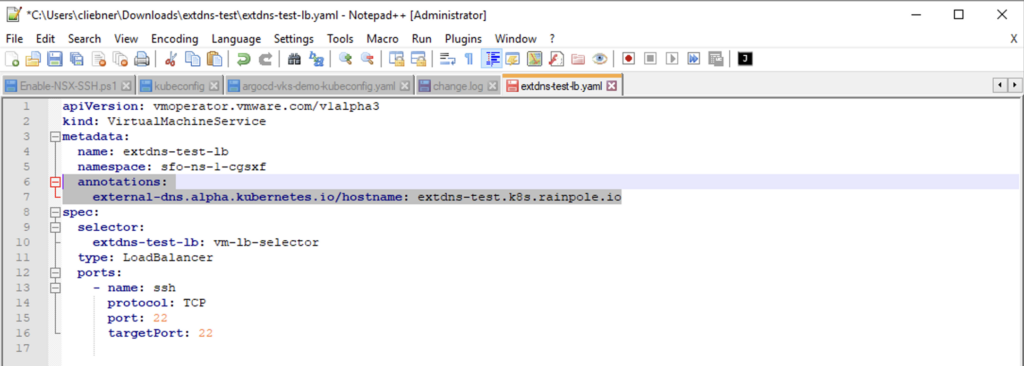
Edit the Load Balancer YAML and add the Annotation with the hostname (FQDN). The DNS zone needs to match the rfc2136-zone and domain-filter parameter from the ExtDNS configuration file.
Deploy VM over CLI (kubectl apply):
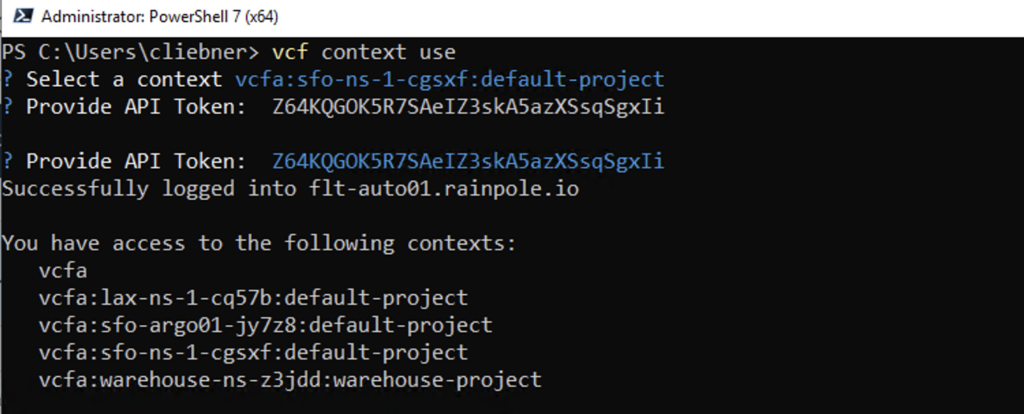
Change to the CLI and use the vcf context use to switch to the right cluster and namespace (if you have not created a context yet you can have a look at this Blog under adding automation namespace context)
Use the kubectl apply to deploy the VM from the YAML files
kubectl apply -f <secret yaml> -f <vm yaml> -f <lb yaml>

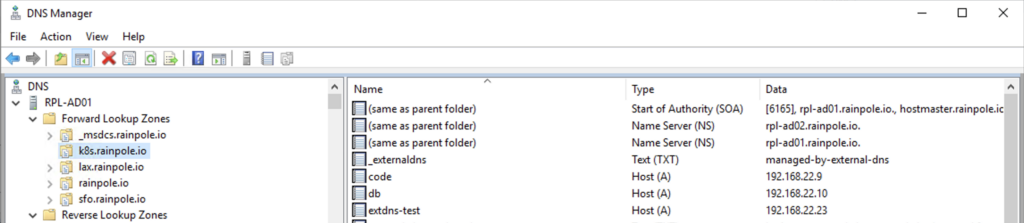
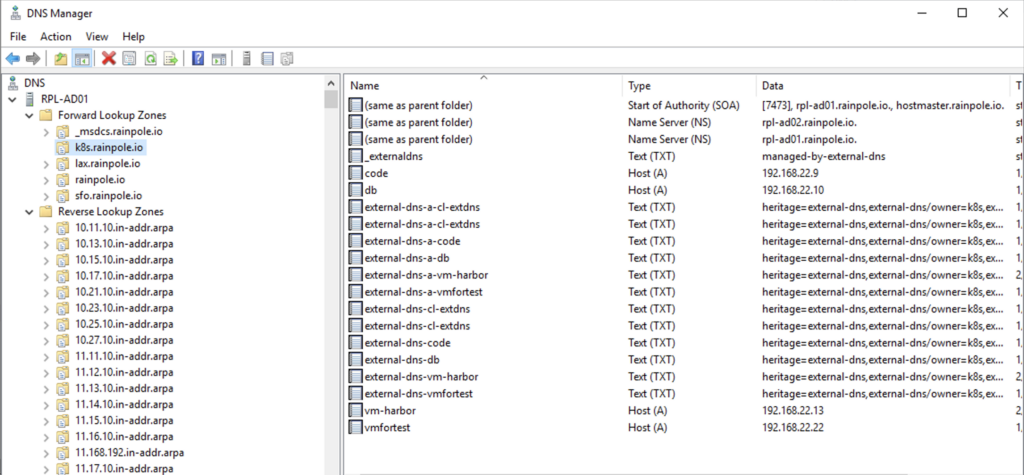
There should now be a corresponding DNS entry in Microsoft DNS (extdns-test)
We can now also try to start an ssh connection via the DNS name
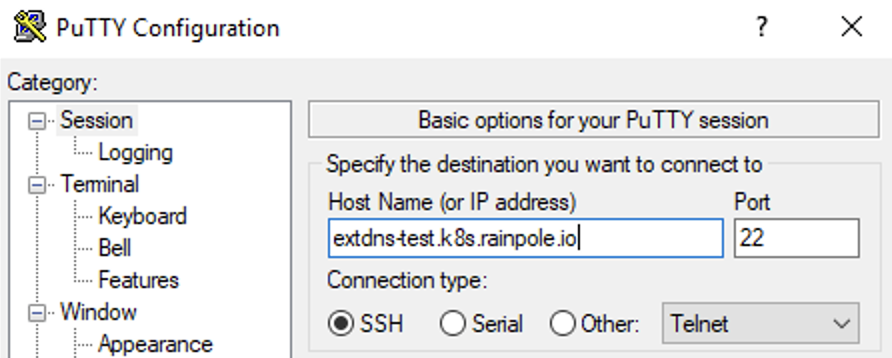
Click Accept on the Security Alert
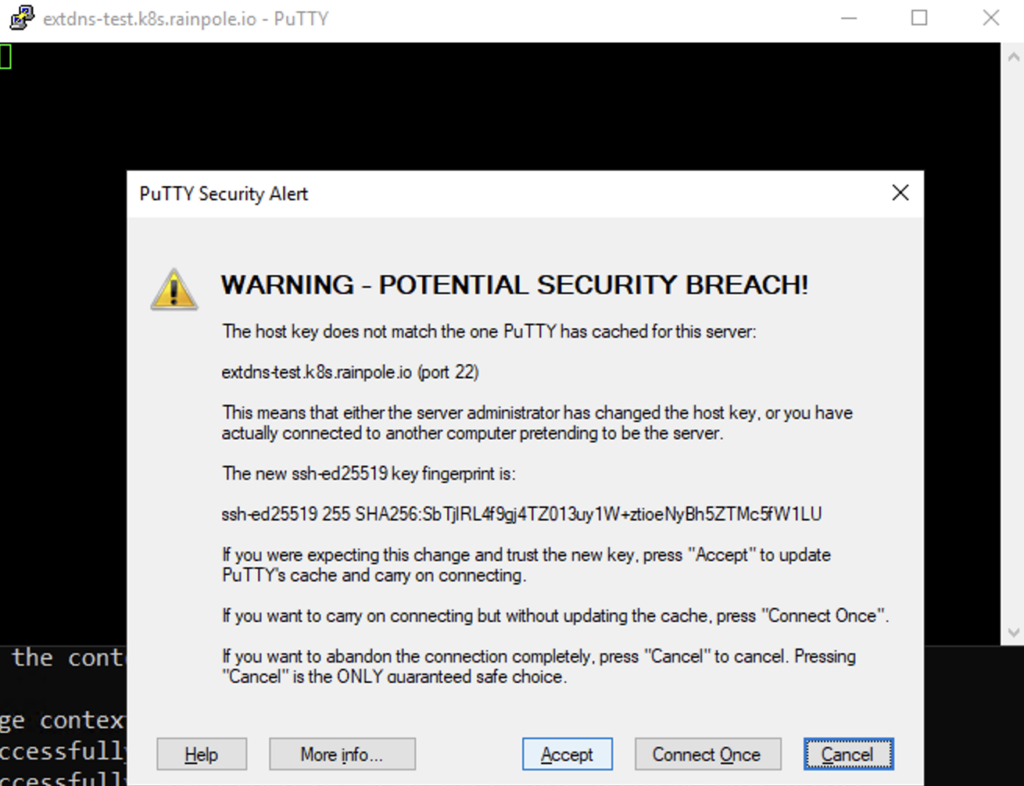
Use the defined New User to log in

Delete VM over CLI (kubectl delete):
As outlined in the Service creation section, you can use additional arguments to ensure the DNS entry is automatically removed when the resource is deleted. I have updated my configuration as follows:
deployment:
  args:
  - --registry=txt
  - --txt-prefix=external-dns-
  - --txt-owner-id=k8s
  - --log-level=debug
  - --provider=rfc2136
  - --rfc2136-host=10.11.10.4
  - --rfc2136-port=53
  - --rfc2136-zone=k8s.rainpole.io
  - --rfc2136-insecure
  - --rfc2136-tsig-axfr
  - --domain-filter=k8s.rainpole.io
  - --policy=sync
  - --source=service
  - --source=ingress
  - --source=contour-httpproxy
namespace: svc-external-dns-domain-c10
It is also crucial to include the --txt-owner-id argument. This ID allows ExternalDNS to identify which records it ‘owns.’ By checking this ID, the service ensures it only manages and deletes its own entries, preventing accidental interference with DNS records created by other processes or administrators.
Use the kubectl delete to deploy the VM from the YAML files
kubectl delete -f <secret yaml> -f <vm yaml> -f <lb yaml>

The DNS entry should now be automatically deleted in Microsoft DNS
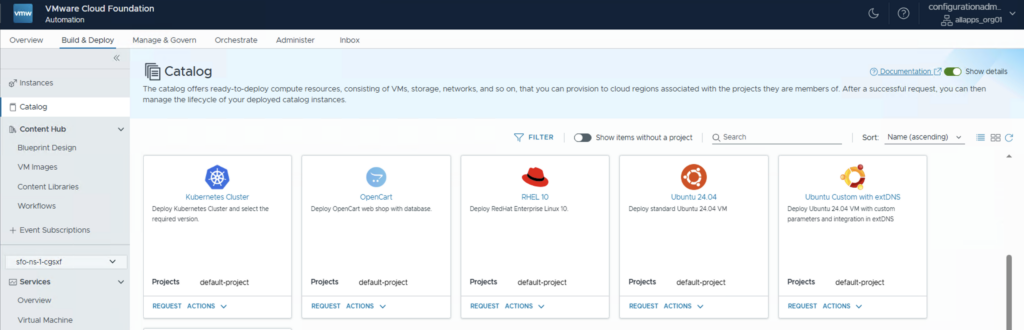
Deploy VM over Catalog in VCF Automation:
To deploy the VM from the VCF Automation GUI, we can create a Blueprint and make it available in the Catalog
In Automation change to the tab Build & Deploy and create a Blueprint under ContentHub > Blueprint Design. You can use the downloaded YAMLs as metadata for the Resources (with the Annotation)
After creating a Version and publish it you can find it under Build & Deploy > Catalog
Have Fun!

- VCF Automation 9 – Automating Microsoft DNS Entries for VMs via ExternalDNS Service in Supervisor - 6. February 2026
- Installing and Configuring VMware Data Services Manager 9.0.1 on VMware Cloud Foundation 9.0.1 with VCF Automation Integration. - 31. October 2025
- VCF9 – VCF Operations and VCF Operations for Logs installation/configuration without VCF Installer - 6. August 2025
Pingback: VCF 9 – VKS Clusters with External-DNS » vrealize.it - TechBlog VMware SDDC
Nicely explained. Was external-dns able to create PTR records ?
Yes, you have to modify the ExternalDNS config slightly. See an example here:
deployment:
args:
– –managed-record-types=A
– –managed-record-types=PTR
– –registry=txt
– –txt-prefix=external-dns-
– –txt-owner-id=k8s
– –log-level=debug
– –provider=rfc2136
– –rfc2136-host=10.11.10.4
– –rfc2136-port=53
– –rfc2136-zone=k8s.rainpole.io
– –rfc2136-zone=22.168.192.in-addr.arpa
– –rfc2136-insecure
– –rfc2136-tsig-axfr
– –rfc2136-create-ptr
– –domain-filter=k8s.rainpole.io
– –domain-filter=22.168.192.in-addr.arpa
– –policy=sync
– –source=service
– –source=ingress
– –source=contour-httpproxy
namespace: svc-external-dns-domain-c10
In addition an annotation must be added to the load balancer:
external-dns.alpha.kubernetes.io/record-type: ptr