


Thanks to Thomas Kopton for his help on this topic!
Aria Automation has a high number of out-of-the-box resource types reaching from virtual machines, over volumes up to security groups. Customers however in many cases would like to add their own resources as well and manage them. To do this you need to have what we call a “custom resource” that stores the state of the resource provisioned and knows about the parameters required. It’s not only about the creation and deletion of a custom resource, but also about running day-2 actions on it. In Aria Automation there are 2 ways to create a custom resource: ABX based or dynamic type / Orchestrator based. As most customers are using dynamic types I would like to dig deeper into that part in this blog. When I tried to understand how to implement dynamic types I couldn’t find one straightforward documentation that explained how to do that in the most simple way. All needed information was spread through documentation and different blogs and some explanations required 3rd party systems which might not be present in every installation. It’s also important to note that dynamic types are challenging to understand if you haven’t worked with them before – and I wouldn’t claim I have understood all parts of it as well.
The main intent of this blog is to show a very simple example how to create a custom resource using dynamic types. No additional tools are needed – everything is part of the Aria Automation appliance. It’s not about implementing a real-life use case, but to take the simplest example that will hopefully help you to replicate for the purpose you have in mind.
If that is what you want to see just keep on reading.
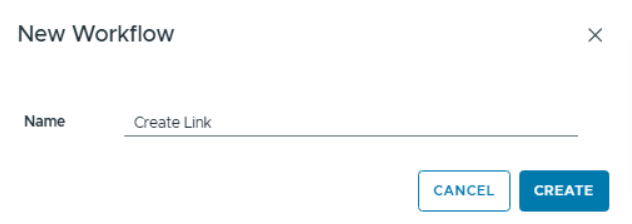
My example – a simple link management tool
The artificial example I am using is a simple manager for a link collection. You should be able to create a new link with a name and its actual URL, store it in a DB, be able to change it and delete it. As DB storage I am using the Aria Orchestrator configuration elements which are built-in and could make sense to use for other use case as well. You will not need any 3rd party tools to build this example, just a working Aria Automation instance (that includes Orchestrator OOTB) is necessary.
Preparation in Aria Orchestrator
As a start we will be building up the “database” in the configuration elements section of Orchestrator.
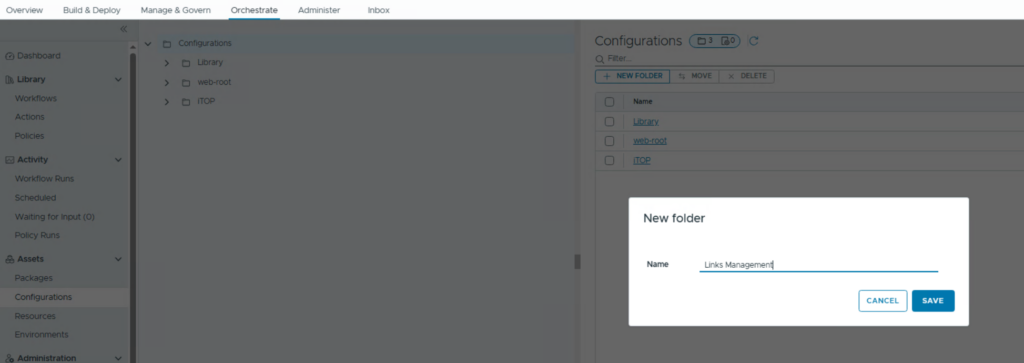
Note: You must create the folder in the “Configurations” section of Orchestrator – not in the library. Switch to the tree view to do this.
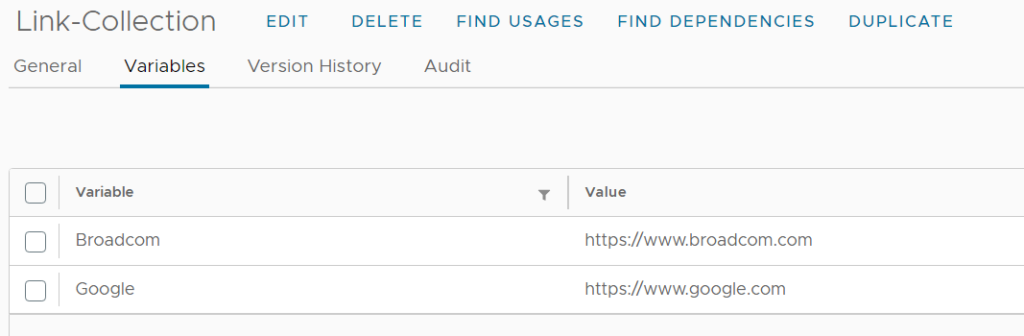
Just create a new folder “Links Management” with a new configuration “Link-Collection”. Next insert some variables where the variable name is the name of the link and its value is the actual https:// link.

Dynamic Types – basic understanding
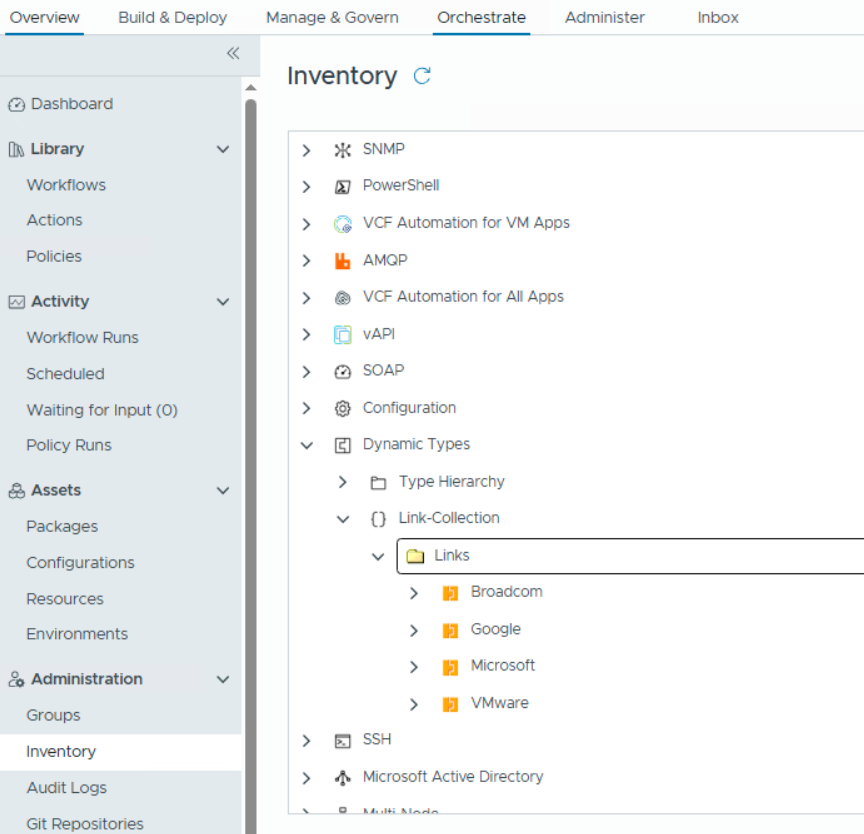
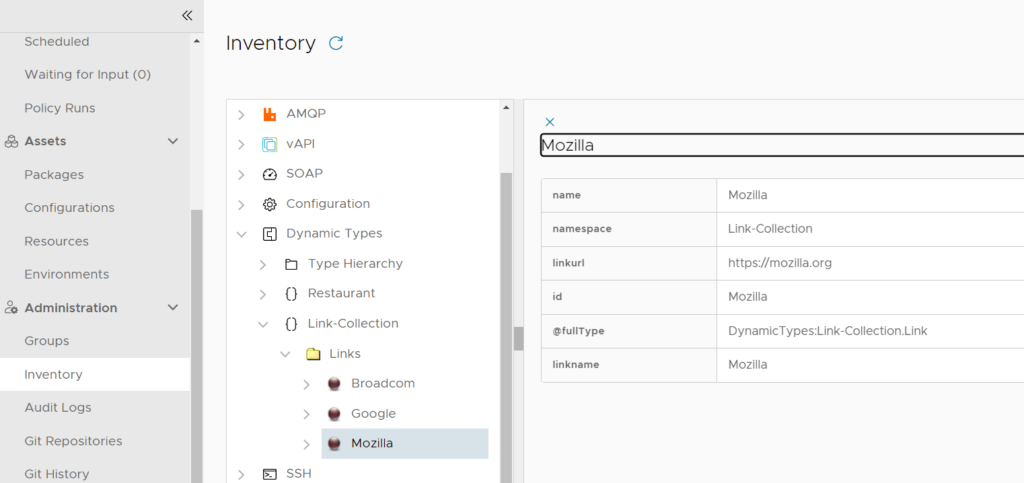
Aria Orchestrator has several plugins which all know object types. One example is the Active Directory plugin. It understands a user object (AD:User), a group object (AD:UserGroup) and others. Dynamic types are there to represent such objects for custom resources. In our example such a link would be a custom resource / dynamic type with the properties being name and URL of the link. Dynamic types are managed in the Orchestrator inventory and as soon as we have finished our configuration you should see the single objects in the inventory tree as shown below.
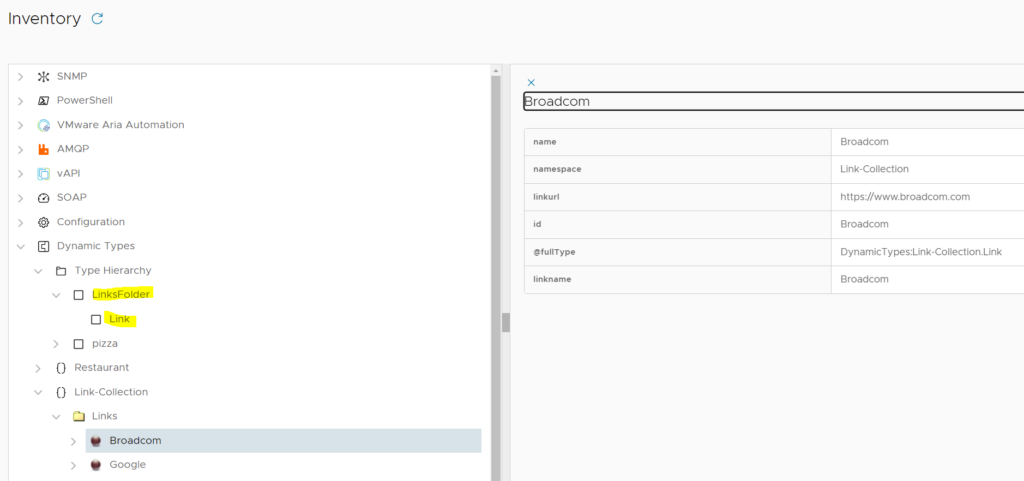
You will notice that there are structures shown in the “Type Hierarchy” sections and there is a separate structure in the actual “Link-Collection” namespace. In general, the structure of the object with Folders and the actual object is defined in the “Type Hierarchy”. The structure under the namespace is created dynamically based on this information and the data from the actual data source. When I talk about data source, I mean a database or an API interface that represents the object (usually 3rd party) we would like to manage. In our example the data source is the configuration element part of Aria Orchestrator.
One important point to understand is that the dynamic type does not store the objects you want to manage itself. So, you always need something like a database as explained above. Every workflow you create later will talk to the data source and not to Orchestrator. Orchestrator pulls information from the data source to populate its inventory.
In theory population of the namespace subsections would not be required, but it makes it easier to follow and manage.
Creation of the dynamic type
First, we must define the hierarchy of the type. In our example this is rather simple. If you are looking for a more complex scenario and explanation of the back grounds, this blog is helpful.
Find here our basic hierarchy
Namespace: Link-Collection
|
Namespace |
Parent Type |
Child Type |
Relation Name |
|
Link-Collection |
LinksFolder |
Link |
Links-Link |
I would highly recommend you follow the above naming concept as the example workflows use that principle as well.
You must define these objects:
- The folder of your object (Parent Type)
- The actual object (Child Type)
- The relation that defines that the Child Type is below the Parent Type
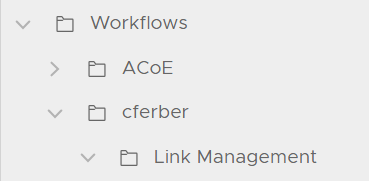
Before creating the objects, you need to create a folder in the Orchestrator workflow library that stores the workflows for the new dynamic type. This can be a sub folder as well.
For the creation of the dynamic type objects there are supporting workflows available that do the task for you. They can create the types, the relation and update as well as delete them.
Creation of the namespace
First you will create the namespace through the “Define Namespace” workflow.

This will show the namespace in the inventory.

Define parent/folder type
Next the 2 types (parent type and child type) will be created.
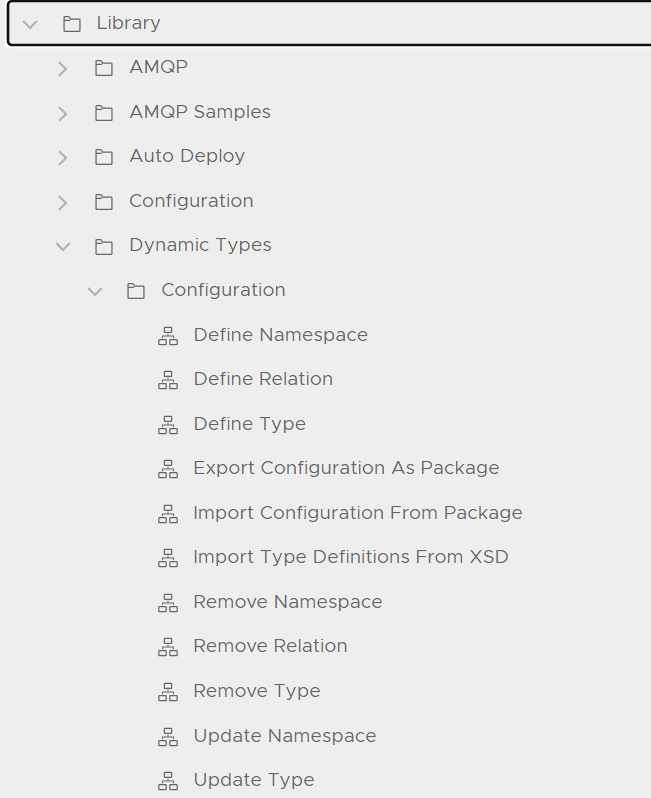
Important note: The “Define Type” workflow by default will create the necessary workflows for populating the dynamic type inventory. Those workflows are only needed ONCE and can be re-used for each type. Therefore, on first run you allow the creation of the workflows and in every following run you just refer to the created ones. For this I’d suggest renaming the workflows making them generic.
See here how to create the LinksFolder type. This is to show you how the workflows will be created. In fact, we will download ready workflows in the next section and replace the created ones. This will also require rerunning the “Define Type” workflow.
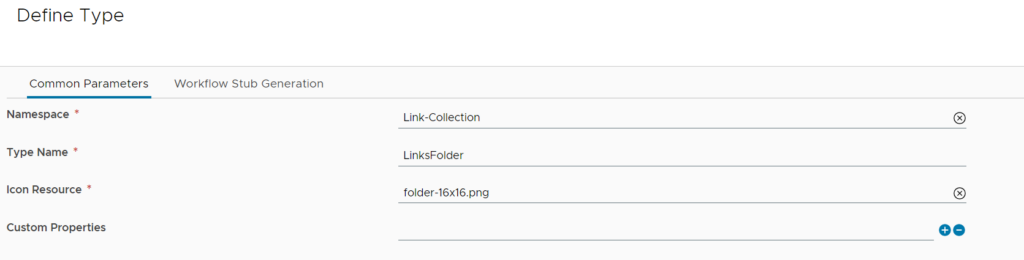
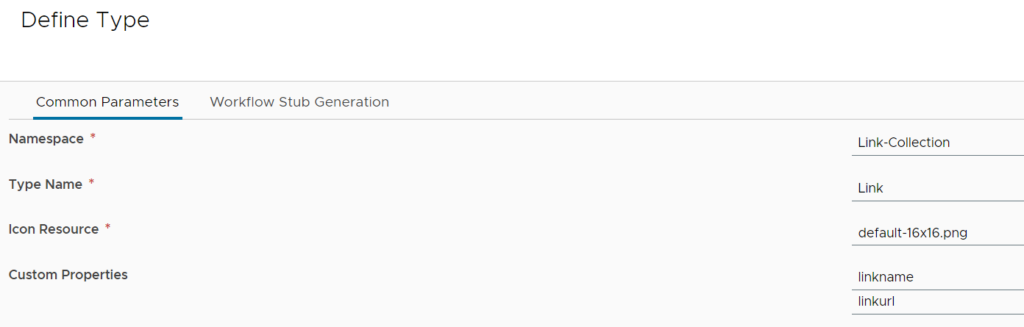
Type Name: Name es defined in the above table
Icon Resource: Icon to show in UI. There is OOTB icons available which can be found by typing “png”. You can also upload custom icons
Custom Properties: Stays empty for the folder type
On the second tab you define if the workflows are auto generated and in which Orchestrator workflow folder (the folder we created in a previous section) they are stored.

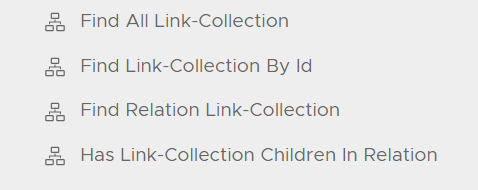
When the workflow has run you should see 4 workflows that have been created in the folder you created before. Rename them as per the screenshot to make them generic.
Modify or import the workflows
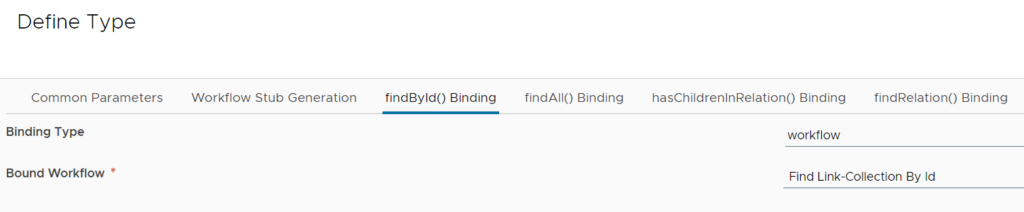
Now you must populate the workflows that are auto created with the proper content. The most important workflow is the “Find Link-Collection By Id”, the others are mostly to populate the inventory. I have prepared the workflow content for you to download. If you would like to understand more what the single workflows are doing, I’d recommend the blog already shared above. In addition, this blog will help you if you want to just focus on the custom resource and reduce the workflows as much as possible.
You can either use the downloaded workflows as reference and recreate each sub task in the previously created workflows manually or you can just replace the auto created workflows by the imported ones.
Note: If you replace/overwrite the existing workflows, you must make sure that the created object is referencing to the correct workflows with the proper ID. If done so you need to delete (“Remove Type” workflow) the previously created type and recreate it now. It’s the same “Define Type” workflow to use but now you uncheck the hook on the second tab which makes additional tabs appear where you can specify the reference to the existing workflow.

Define the child type
Use the same process to create the “Link” child type with reference to the existing workflows. Now for the actual type of the object we want to manage we need to specify the parameter/custom properties needed. In this case it’s just the link name and the link url. If you’d use a more complicated object, it could be way more custom properties. For this type we will reference the same workflows as before.

Define relation
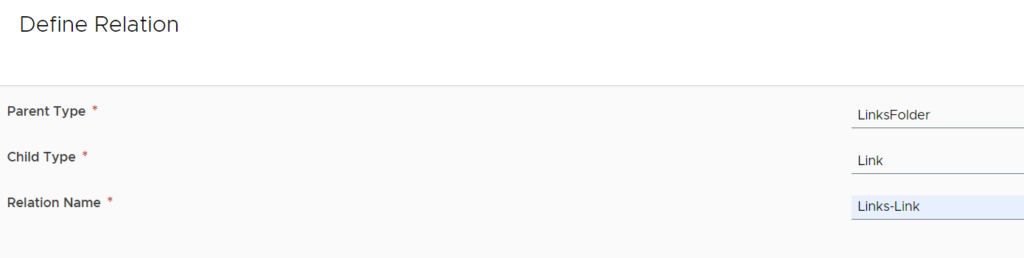
Finally, you need to define the relation between “child type” and “parent type” by running the “define relation” workflow. It’s rather self-explanatory and will make sure that you end up in a tree structure. You specify the Folder and the actual object type from the type hierarchy and define the relation name as per below.
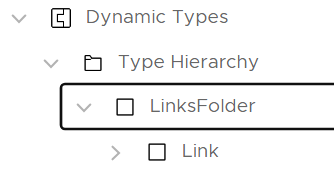
As a result, you will see this structure in the type hierarchy:
Creation of create, update, destroy workflows
These workflows are required for the custom resource itself to create. Depending on what is done with the resource the respective workflows will then be executed automatically.
A custom resource is the element in Aria Automation that provides the capability to leverage an external system and manage objects there. It is an entity that must be created on Aria Automation but leverages Orchestrator workflows to create, update, destroy the object. To store its state and parameters, it leverages a dynamic type object on Aria Orchestrator. In addition to the tasks mentioned there is also the option to add day-2 workflows to it to e.g. modify parameters or scale the object.
Create workflow
When a custom resource object is created by a cloud template, the “create” workflow is run. It has 2 tasks to do:
- Create the actual object in the external system – in our case it creates the attribute in the Orchestrator configuration element
- Run the method to get the dynamic type object (which will in essence run the “Find Link-Collection By Id” workflow)
For the subsequent task create new workflows with the appropriate name (e.g. Create Link) and add one scriptable task with the Scripting content described. Make sure you add the inputs and outputs. Find here how to do it for the “Create Link” workflow:

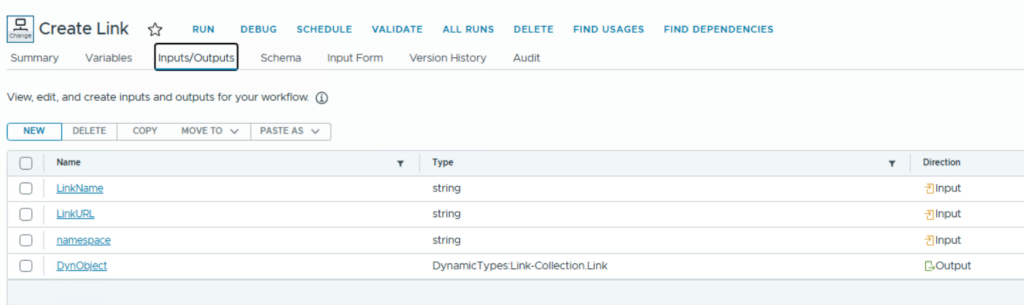
To add the DynamicTypes:Link-Collection.Link Output make sure you click the “refresh” symbol in the form to make it available as selectable entry.

Now under schema add a “scriptable task” and copy the script content into its “Scripting Section”
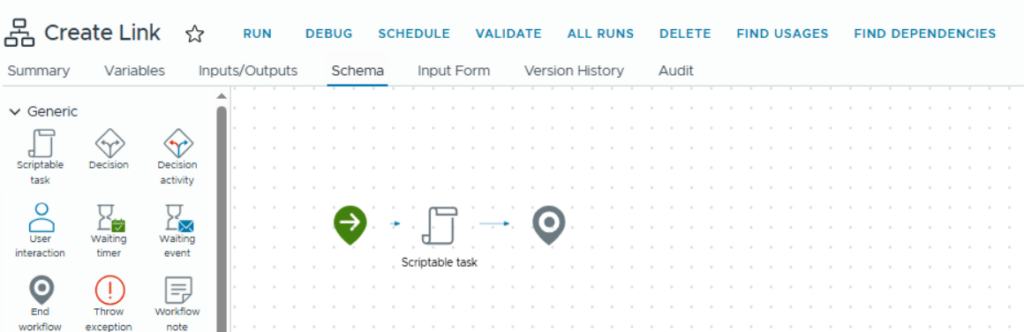
Make sure you add the inputs/outputs to the scriptable task.
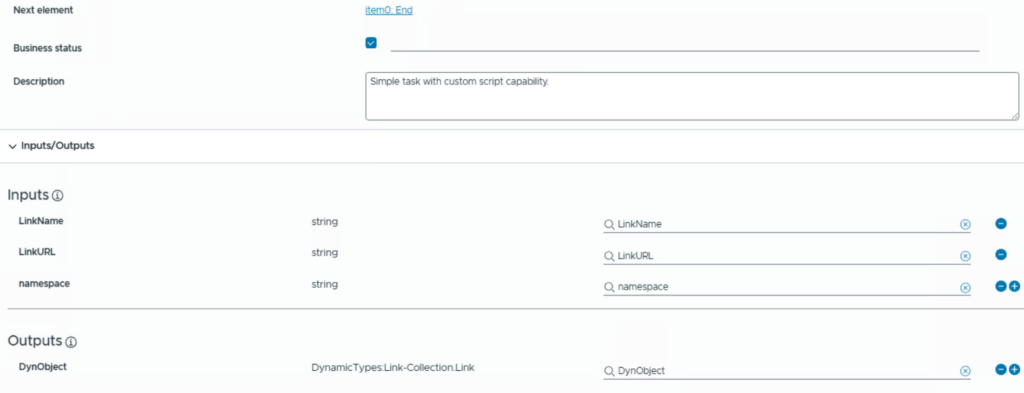
The script element has the namespace and the object parameters as input and the dynamic type object as output.
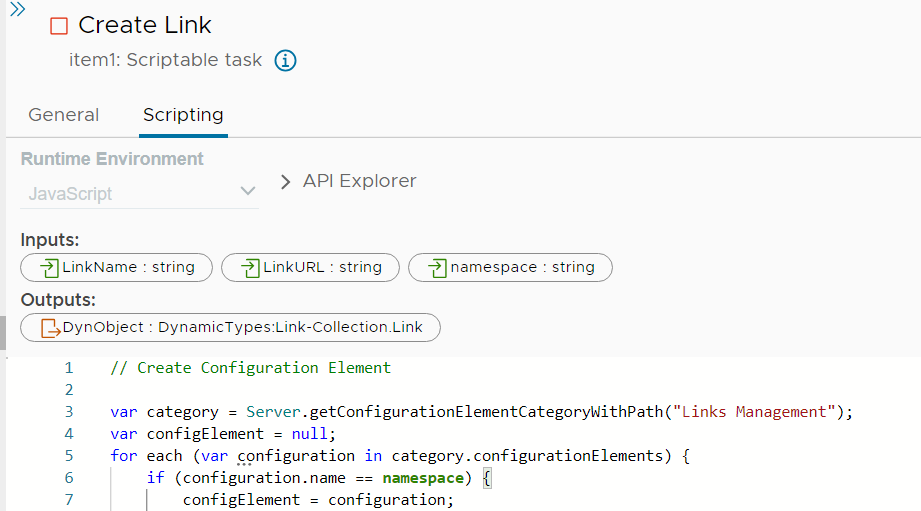
// Create Configuration Element

var category = Server.getConfigurationElementCategoryWithPath("Links Management");
var configElement = null;
for each (var configuration in category.configurationElements) {
    if (configuration.name == namespace) {
        configElement = configuration;
        break;
    }
}

configElement.setAttributeWithKey(LinkName, LinkURL)

DynObject = DynamicTypesManager.getObject(namespace, "Link", LinkName);
Update workflow
This is just used for logging for now. The workflow itself can’t be added or replaced post creation of the custom resource, hence we use it as place holder for potential later usage. It’s an empty workflow with the Dynamic Type object as input and output.
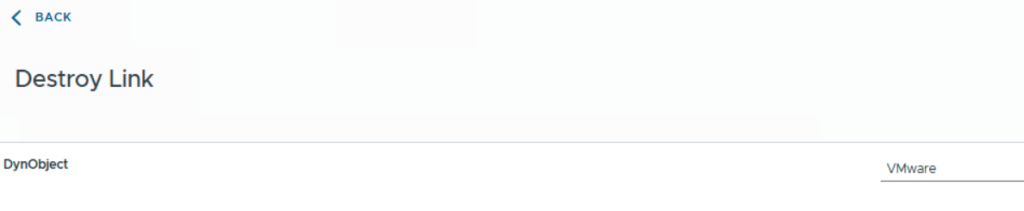
Destroy workflow
The destroy workflow needs to destroy the actual object in the external system (configuration element attribute in our case). It requires the parameter details from the dynamic type object as input.

// Get parameters from Dynamic Type Object

linkname = DynObject.name
namespace = DynObject.namespace

// Delete Configuration Element

var category = Server.getConfigurationElementCategoryWithPath("Links Management");
var configElement = null;
for each (var configuration in category.configurationElements) {
    if (configuration.name == namespace) {
        configElement = configuration;
        break;
    }
}

configElement.removeAttributeWithKey(linkname)
Change link (day-2) workflow
While the create and destroy workflows are mandatory for the custom resource to create, you can optionally add day-2 workflows as well. This can also be done after creation of the custom resource. In my example I am using a very simple day-2 action that just modifies the link and allows for changing the URL.
The “Change Link” workflow is like the destroy workflow. It requires the parameters as input to identify the object and the input parameters needed to do the modification desired. Here we will need the new url as input.

// Get Dynamic Type Object parameters

linkname = DynType.name
namespace = DynType.namespace

// Change Configuration Element

var category = Server.getConfigurationElementCategoryWithPath("Links Management");
var configElement = null;
for each (var configuration in category.configurationElements) {
    if (configuration.name == namespace) {
        configElement = configuration;
        break;
    }
}

configElement.setAttributeWithKey(linkname, newurl)
Testing the dynamic type in Orchestrator
Before you create a custom resource in Aria Automation, you should test the configuration in the Orchestrator directly.
Run the Create Link workflow.
Browse the inventory to check if the new dynamic type object has been created.
Run the “destroy link” workflow and check if the entry has been removed.
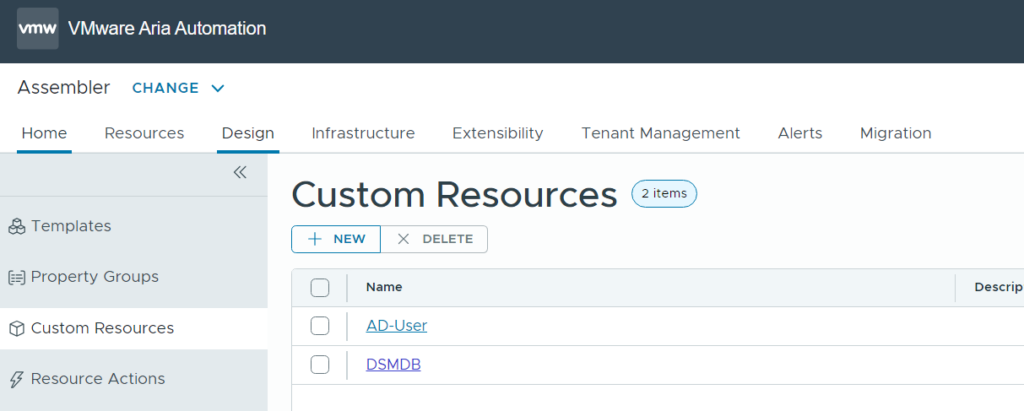
Create the custom resource in Aria Automation
This task is to create the custom resource – basically define it. Once done it can be used from the design canvas.
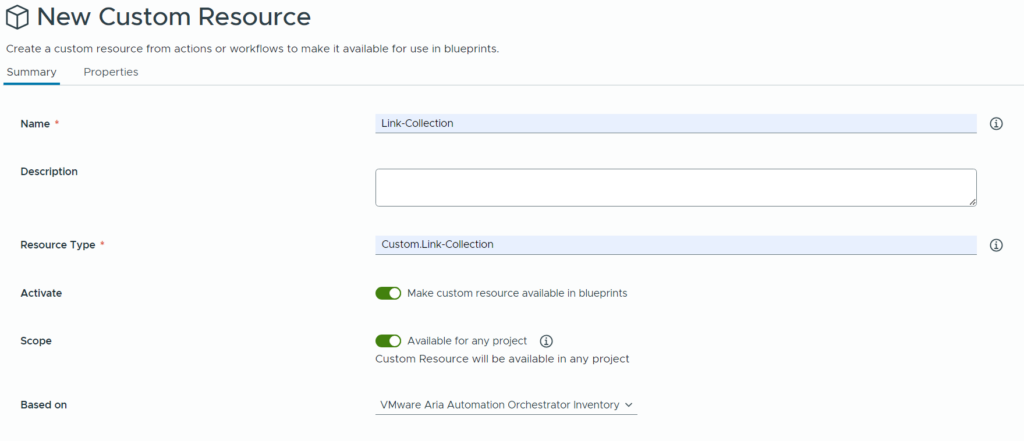
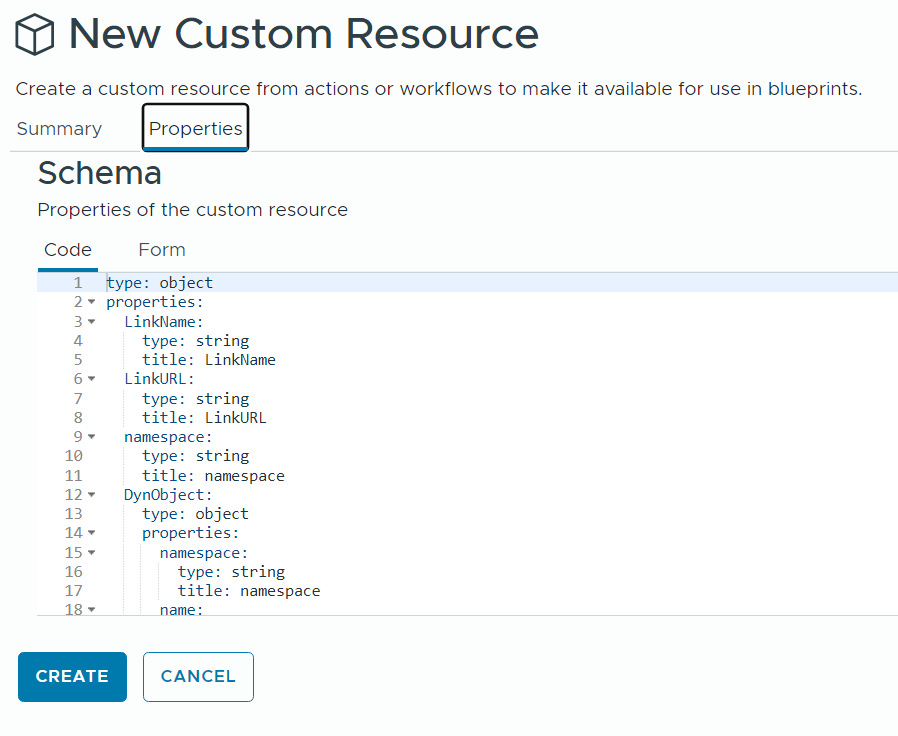
Got to Design -> Custom Resources and add a new one
The name is what will be shown in the design canvas for drag-and-drop. The Resource type is the definition of the underlying type for reference in the yaml code. Make sure to check “Make the custom resource available in blueprints” and to select “VMware Aria Automation Orchestrator inventory” as base.
Next select the workflows we created before. If they don’t appear in the list, make sure that the data collection has run for the Aria Orchestrator integration before.
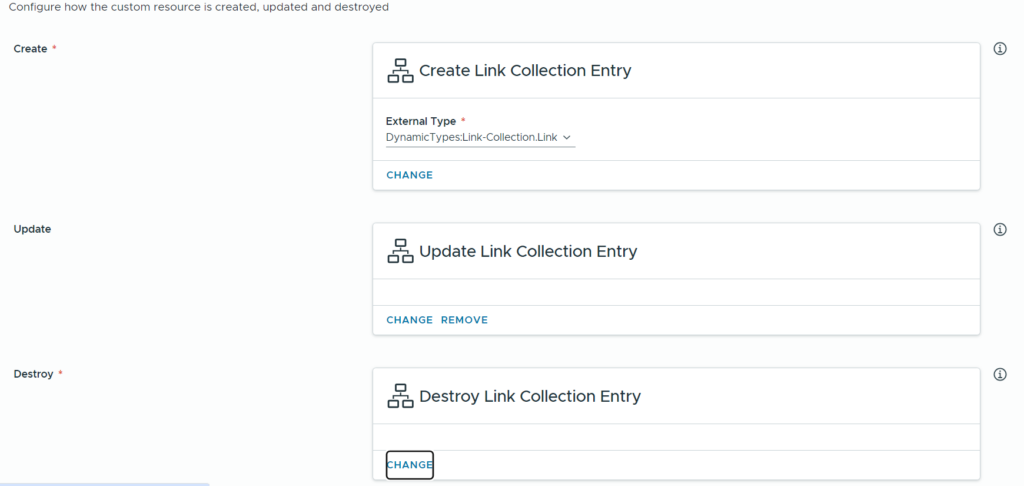
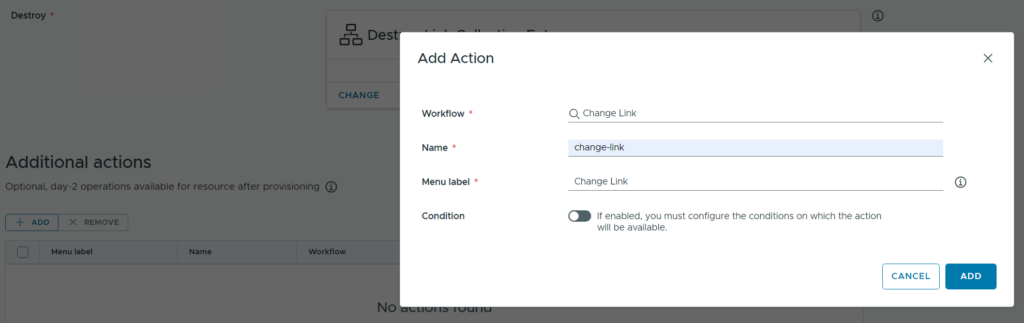
Add the day-2 action workflow we created before. The Menu label is what will be shown to the user when accessing the “Action” menu of the object created.
If all parameters have been specified correctly you should see the “Properties” tab on top populated with the yaml parameters.
You now can click “create” to finalize the configuration.
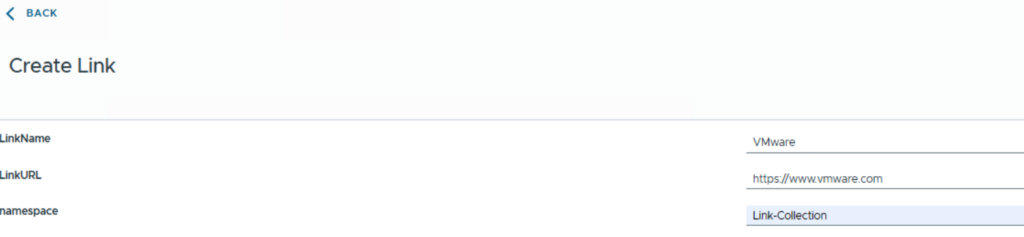
Create a Cloud Template
When creating a new cloud template the Custom Resources is available for drag-and-drop in the left list. You easily can drag it to the canvas. To make it work properly you must add the properties of the custom resource manually and provide them with the information needed. For the dynamic parameters you will need an input which the user can use to provide the necessary information on request of the service.
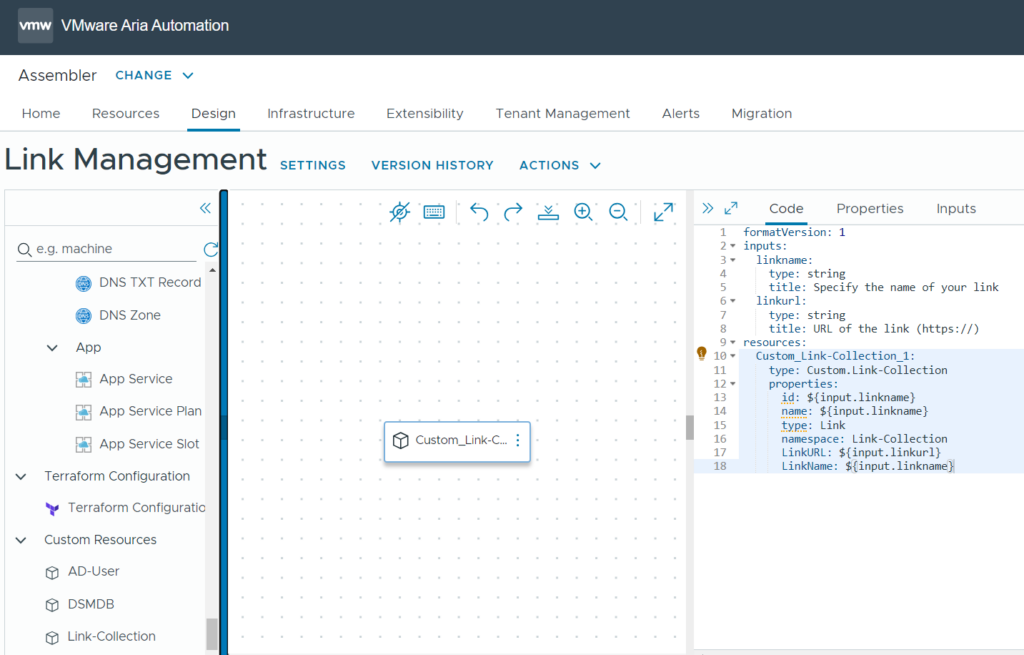
formatVersion: 1
inputs:
  linkname:
    type: string
    title: Specify the name of your link
  linkurl:
    type: string
    title: URL of the link (https://)
resources:
  Custom_Link-Collection_1:
    type: Custom.Link-Collection
    properties:
      id: ${input.linkname}
      name: ${input.linkname}
      type: Link
      namespace: Link-Collection
      LinkURL: ${input.linkurl}
      LinkName: ${input.linkname}
Deploy the Cloud Template
Now the cloud template can be deployed directly from Assembler. It asks you for the deployment name first.
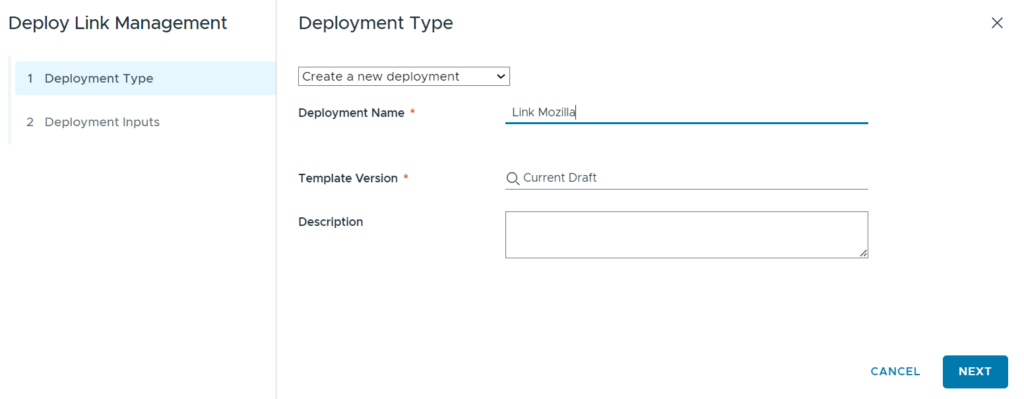
Further you must specify the parameter of the new link like its name and its URL.
The you must provide the input fields as defined in the template.

Once the deployment has finished you can check the details of the parameters provided.
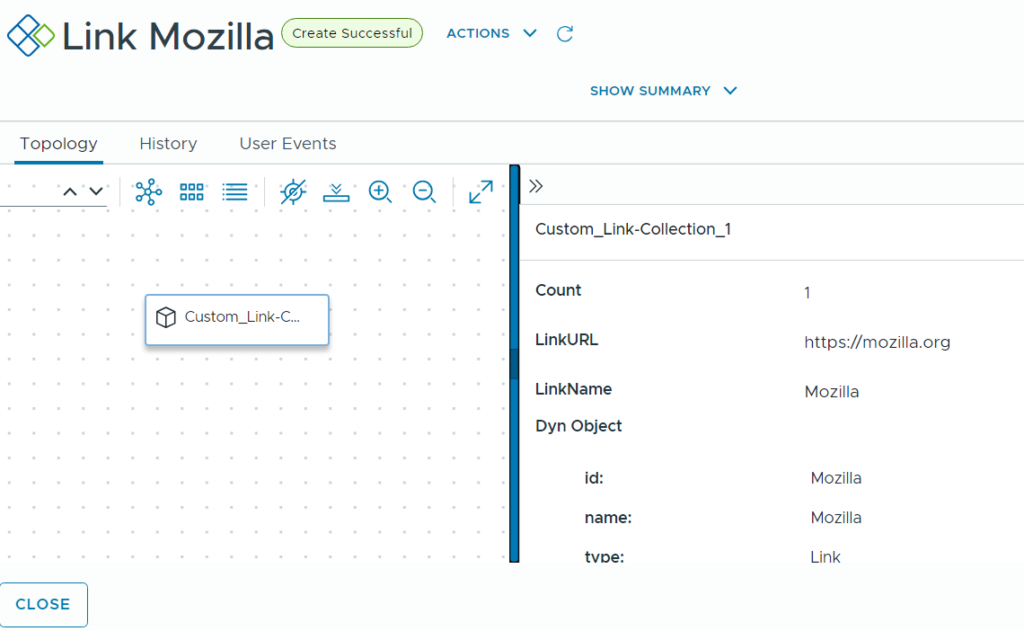
Double-checking in Aria Orchestrator should show the new object in the inventory view. It will also have the appropriate parameters.
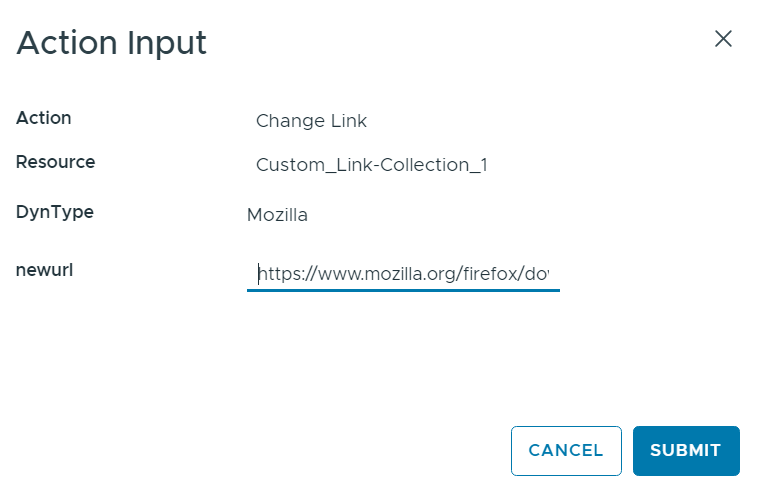
As we provided a day-2 action to change the url, we can invoke it now from the Automation UI.
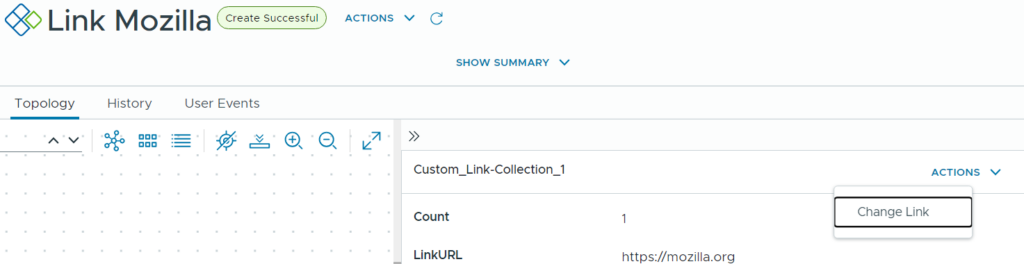
For example, we could change it to the direct download link URL of Firefox.
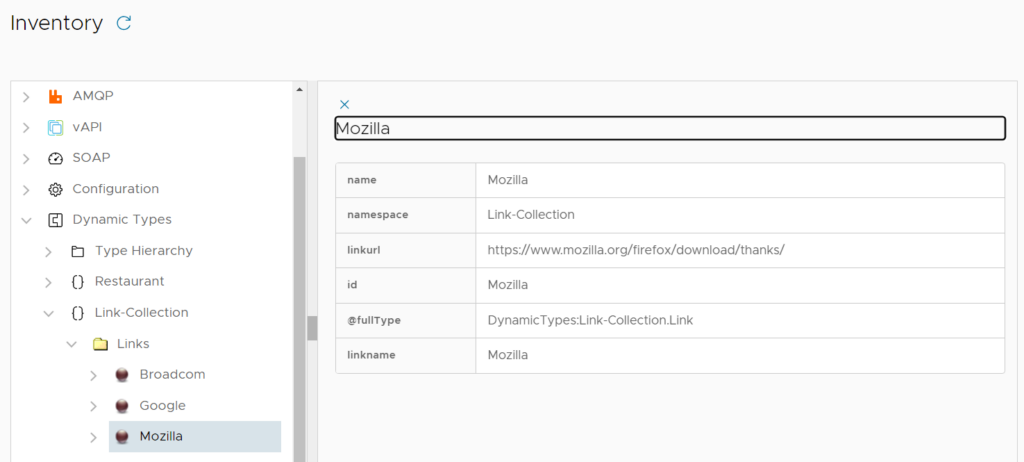
After successful execution, the parameters in the Aria Automation UI have been updated as well as the Orchestrator inventory (for a refresh you might need to close and open the directory structure).

You can delete the resource by deleting the deployment in Aria Automation.
Have fun!

- 1-node Kubernetes Template for CentOS Stream 9 in VCF Automation - 30. September 2024
- Aria Automation custom resources with dynamic types - 9. August 2024
- Database-as-a-Service with Data Services Manager and Aria Automation - 4. July 2024