Aria Automation (aka vRealize Automation) provides a wide variety of supported public cloud services out of the box. Through the design canvas they can be added by drag and drop, configured with the appropriate parameters/inputs and subsequently exposed in the catalog for consumption. Considering the broad services public clouds offer and the high innovation rate, it’s almost impossible to cover all different service types in Aria Automation out of the box. To accommodate that, Aria Automation supports custom resources and literally can support any service that has an API available (which is true for all cloud services) for provisioning and management.
In this blog I would like to show an example of an Azure service that is integrated by a custom resource into Aria Automation. I will be using an Azure Private Endpoint service which will be connected to an Azure SQL Server instance. A Private Endpoint is described as follows:
“A private endpoint is a network interface that uses a private IP address from your virtual network. This network interface connects you privately and securely to a service that’s powered by Azure Private Link. By enabling a private endpoint, you’re bringing the service into your virtual network.”
From a technology perspective we will use custom resources based on ABX actions. This functionality has been introduced a couple of releases ago, while previously vRealize Automation only supported custom resources through Dynamic Types in vRealize Orchestrator. In this blog we will however use vRO actions to populate custom forms in addition.
The workflows and scripts can be taken as an example for other services as well.
Preparational tasks
Azure Cloud Account
As we will deploy an Azure resource, a related cloud account is required. The service can handle multiple cloud accounts, however as minimum 1 is needed. If you haven’t done so you must prepare the permissions on Azure properly and run through a couple of configuration tasks.
Also make sure that there is an existing resource group in the Azure account as this is required for the deployment.
Import of Orchestrator packages
To prepare the backend workflows for the solution, an Orchestrator package must be imported. This consists of 7 Orchestrator actions:
|
getAzureAccountsFromProject |
Retrieves all the azure accounts where cloud zones are configured for the requesting project. |
|
getAzureSubscriptionIdbyCloudAccountURI |
Reads subscription ID from selected cloud account. |
|
getAzureTenantIdbyCloudAccountURI |
Reads tenant ID from selected cloud account. |
|
getAzureClientAppIdbyCloudAccountURI |
Reads client app ID from selected cloud account. |
|
getRestResponseDynamic |
Issues a rest call with a dynamic REST host (used by other actions) |
|
getValuefromConfigItem |
Reads Config Items data to get vRA Host, username and password (used by other actions) |
|
getVraBearerToken |
Reads vRA Bearer Token (used by other actions) |
The actions are used to populate the custom form fields with appropriate values.
In addition to that, configuration items must be created on vRealize Orchestrator to tell the actions which vRA host to use with the related credentials. Make sure you use exactly this structure, otherwise you need to modify the individual actions.

Creation of Aria Automation secrets
For creation of Azure services, the Azure credentials are needed in the related actions. The credentials are stored in the Aria Automation configuration through the cloud account object. Because of security reasons there is no way to retrieve the cloud account secret through the Aria Automation API. Aria Automation however provides a functionality to store secrets and use them in actions by the “Secrets” configuration store. To leverage it we need to create the secret entity for each Azure cloud account that should be used. In order to identify each entry appropriately in the scripts I decided for this naming convention which needs to be followed closely:
<subscription-id>-secret
Create one entry for each cloud account to be used and store the client app key as its value.

Custom Resource
Create Custom Resource
Aria Automation supports custom resources to allow creation of new resource types that can be managed afterwards. In easiest fashion, it creates an object (like a private endpoint) which offers its deletion, plus the subsequent deletion of the underlying resource is invoked.
To create the custom resource for an Azure Private Endpoint, following steps must be performed:
Create a new custom resource in Cloud Assembly Design Tab

Add following parameters
- Name: Azure Private Endpoint
- Resource Type: Custom.AzurePrivateEndpoint
- Activate: true
- Scope: as you like (disable to use for single project)
- Project: select the related project
- Based on: ABX user-defined schema
Keep all other settings as default.

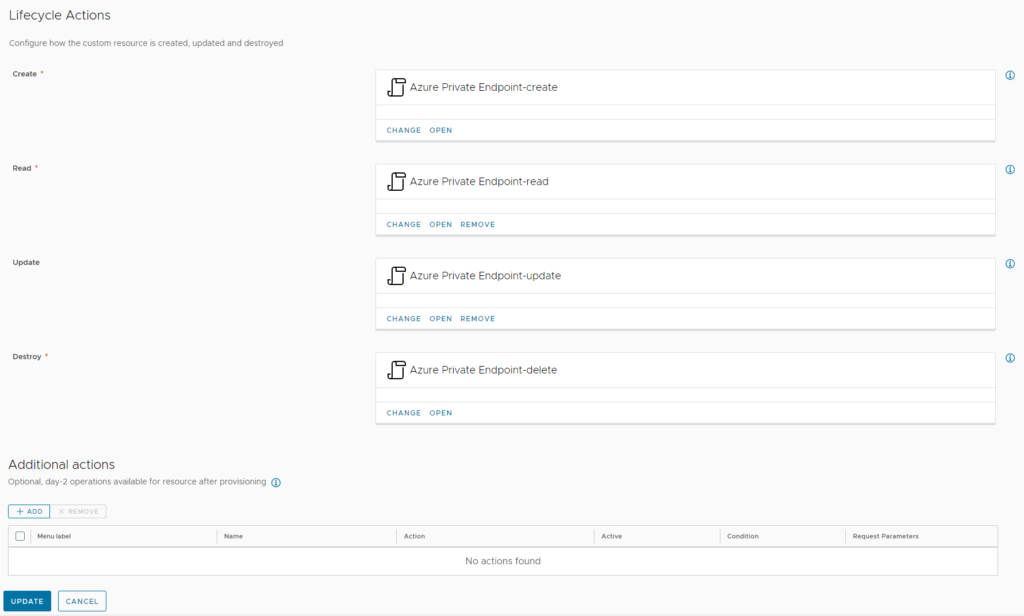
After creation of the new resource, it will automatically create 4 ABX actions. The most important ones are those with “create” and “delete” as postfix as they are responsible for creating the new resource and deleting it (as name suggests). The “read” action will be used to retrieve data from the object – for example when the object is accessed. The “update” action will be run when an update is performed – like a parameter change.
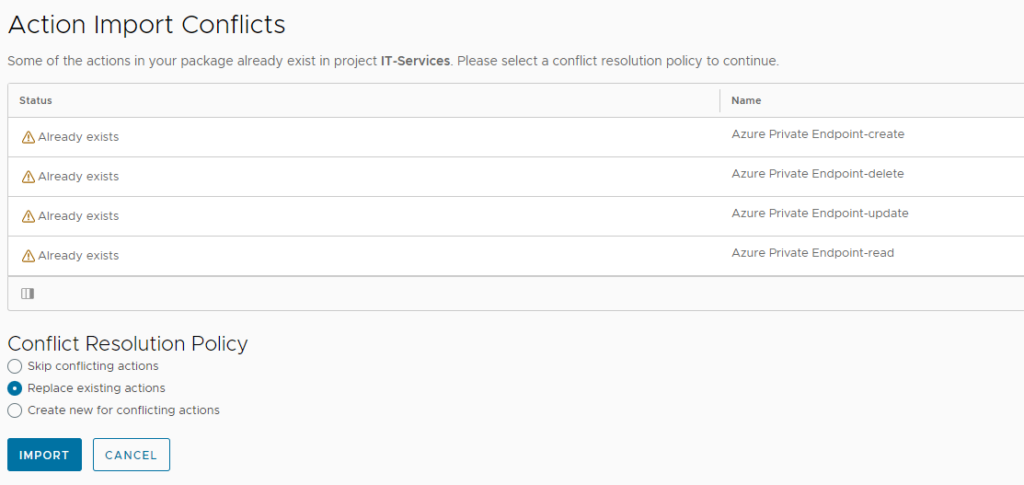
Now download the ABX actions as ZIP file and import them through the Extensibility –> Actions menu. Make sure you import the zip file and don’t extract it before. As the Actions have already been auto-created, select “Replace existing actions” in the upcoming dialogue.

Once the custom resource is created, open it up and add the required properties as per below.

properties: azure_tenant_id: type: string title: Azure Tenant ID recreateOnUpdate: true sql_server_name: type: string title: Name of SQL Server recreateOnUpdate: true azure_subnet_link: type: string title: Azure Network Subnet Link recreateOnUpdate: true azure_client_app_id: type: string title: Azure Client App ID recreateOnUpdate: true resource_group_name: type: string title: Azure Resource Group recreateOnUpdate: true azure_subscription_id: type: string title: Azure Subscription ID recreateOnUpdate: true private_endpoint_name: type: string title: Name of the Private Endpoint recreateOnUpdate: true
Adapt ABX Action inputs
The imported ABX actions do have most inputs in place that are required. The only missing ones are the “secrets” for the client app keys that have been created previously as those are specific to the customer environment. Therefore, you need to add them manually to the “Azure Private Endpoint-create” and “Azure Private Endpoint-delete” action.
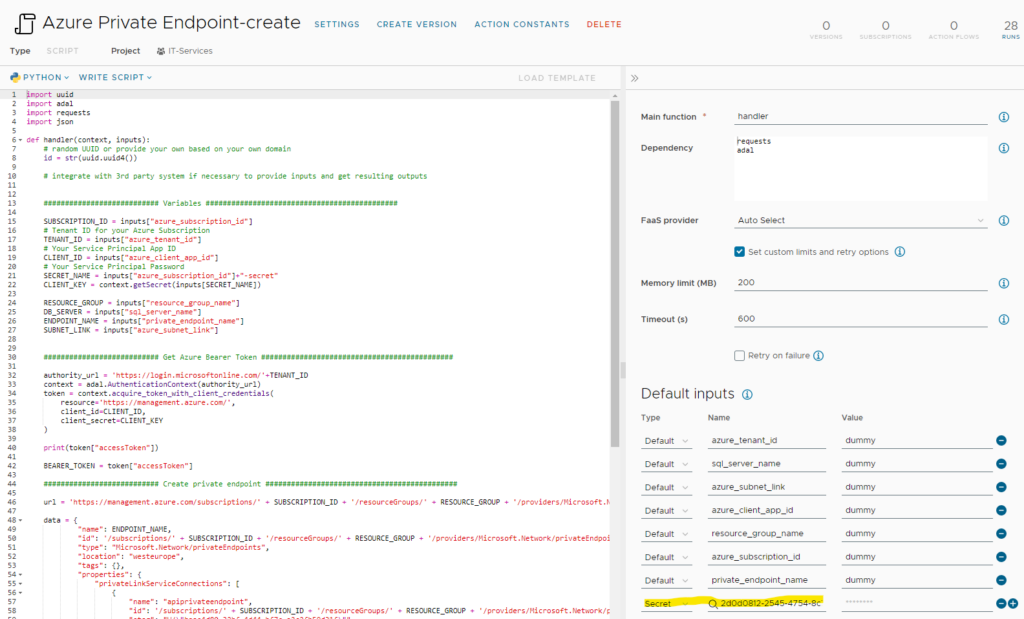
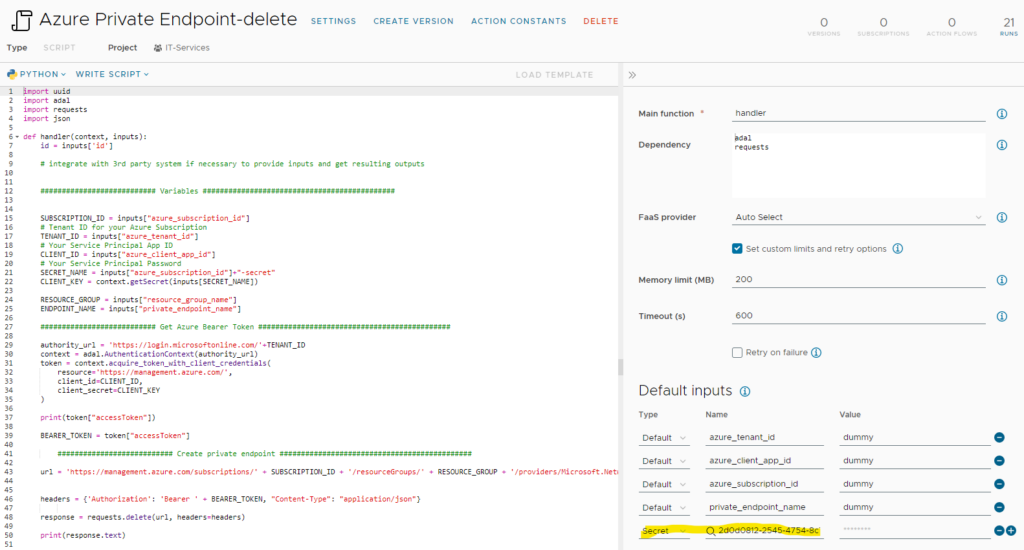
There are no more modifications that need to be done on the actions. The inputs with “dummy” content will automatically get their values once the service is added to the related cloud template and request is run. Both actions have been configured to use “Auto Select” as FaaS provider. It will automatically select the appropriate provider to be used. Feel free to change it if you’d like to force a specific provider. In my experience using the local FaaS provider has been the fastest option, changing it to Azure caused noticeable delays.
Creating necessary actions for an Azure service
The steps outlined in this paragraph are not required by using the existing templates provided. However, some of you might ask yourself how such an action is developed effectively. The template can be used to create custom resources for other Azure services as well.
If you look at the action, you will find a section to get the Azure Bearer Token. This is essential to properly authenticate against Azure. For python there is a library “adal” that helps a lot getting this achieved.
If you want to use adal you muss add “import adal” at the top of the action and add “adal” to the dependency section on the right hand side.

For the Azure call itself usually REST calls are used that leverage the before retrieved bearer token. You can check in my code how REST calls are issued. The easiest way is to use the requests library. From a syntax perspective it should be self-explanatory. The most challenging part is getting the proper payload/body/data that is needed for the REST call against Azure. However, for this Azure provides some help as it exposes the json payload of an existing resource. From a process perspective the easiest way is to provision an Azure resource manually and then retrieve the json payload through the UI. The screenshots below show an example of a private endpoint resource.

Once you click the “JSON View” link, the detailed json code comes up.

If you compare the code with what I used for the REST call payload in the ABX action, you will see the structure is identical. I only removed the non-relevant parts like provisioningState etc. and replaced some values with variables.
This way you should be able to add any Azure service as custom resource in Aria Automation.
Creating the Aria Automation Cloud Template
Now as the custom resource for a private endpoint is available, we would like to create a Cloud Template that provisions a SQL server incl. a private endpoint in Azure. An example can be downloaded from here.
If you want to create the cloud template from scratch, you need 3 elements to drag to the canvas:
- Azure Resource Group
- Azure SQL Server
- Azure Private Endpoint (custom resource)
You need to create dependencies for the SQL server and the Private Endpoint to be dependent on the resource group as well as for the Private Endpoint to be dependent on the SQL Server. Other than that, inputs must be added that relate to the properties required for the individual resources. Find an example below. In my example the private endpoint name will just use the SQL server name and adds “-pip” as postfix. If you would like to encrypt the administrator_login_password you can add it into the Aria Automation secrets store and reference it by ${secret.<secretname>}. To limit dependencies this has not been done for this use case.
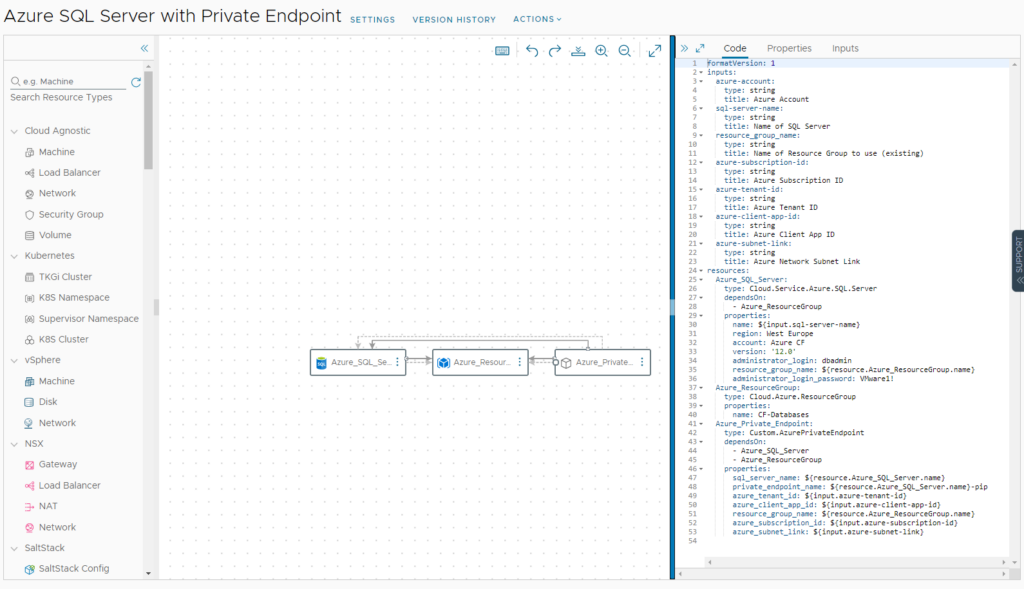
After creation of the cloud template make sure you create a version and release it to the catalog on Service Broker.

Exposing Service in Aria Automation Consumption (Service Broker)
I will not walk through the details how to expose a service from cloud template in Service Broker. In a nutshell you must configure a content source for cloud templates, import the items and create a content sharing policy.
Once the content is available, the custom form must be enabled and modified.

There is a custom forms yaml export you can use to import all details. Make sure you import the yaml and enable the custom form. If the vRO packages (see preparation section) have been imported ahead you don’t need to change a lot. The only parameter which needs to be tailored is the “Azure Network Subnet Link” field value. It refers to the network the private endpoint is created for. The value can e.g. be retrieved from the json data of an existing Azure resource (see section “Creating necessary actions for an Azure Service”). The field itself is hidden from the user and used as parameter for the actions that are executed during the process.
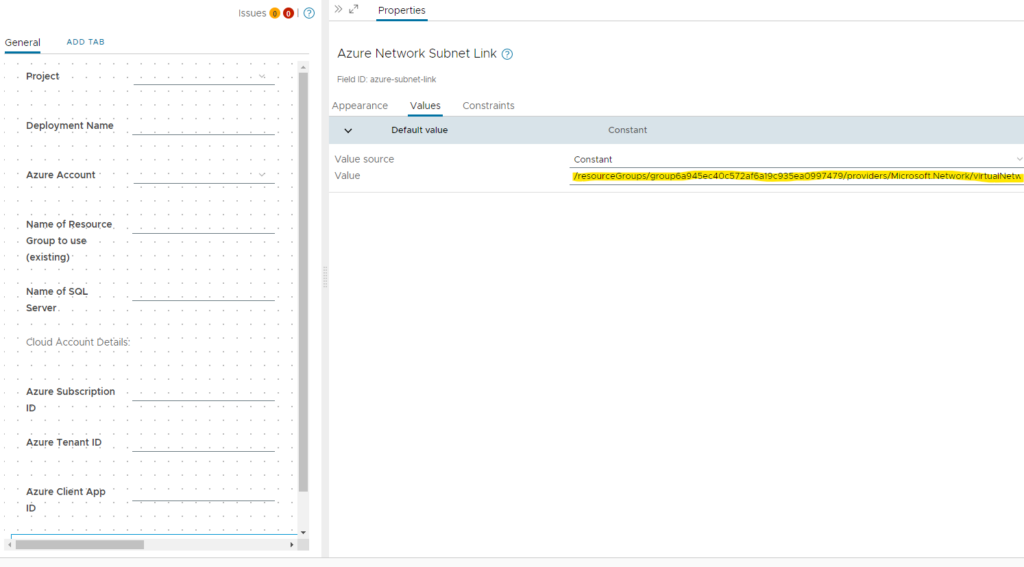
Testing the new service
If all steps have been performed successfully you will see a new catalog item on the catalog page.

On request of the service following values need to be populated:
- Deployment name: <user defined value>
- Azure Account: All available Azure accounts in this project will show up. User can select the needed Azure Account and the Subscription ID, Tenant ID and Client App ID will be populated (retrieved from Aria Automation API). The Client App Key will be retrieved from the secrets store.
- Name of Resource Group to use (existing): The process defines that a resource group is already in place. It will not create a new one. The user must specify the resource group name to be used.
- Name of SQL Server: <sql server name as it appears on Azure> (make sure it’s unique to the azure domain)

After successful provisioning of the service, the related Azure resources are created.
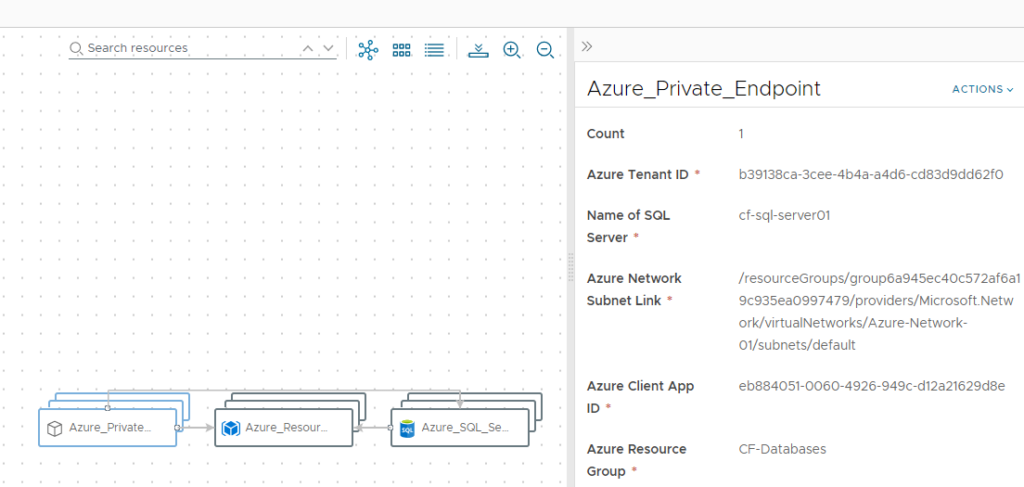
You can verify that in the Azure portal.
SQL Server created:

Private Endpoint created and attached:

Custom day-2 action (optional)
Adding custom day-2 action
Aria Automation not only supports provisioning of custom services, but also allows to add custom actions as day-2 operation. This means that for a provisioned resource the user has capabilities to run actions that modify the resources – e.g. renaming a resource, changing size or adding tags. Basically, everything that provides an api can be supported. In my example I created a custom day-2 action to add a new tag to the provisioned private endpoint resource.
If you’d like to add this capability you must follow below steps. The related abx action “Add tag to Private Endpoint” is already included in the previous import.
Add the client app key secrets as input to the action:

Open the custom resource and add the “Add Tag to Private Endpoint” action. For the name you can use “add-tag-to-private-endpoint”.


Modify the request parameters

Download the custom form yaml and import it into the form designer.

Testing custom day-2 action
On a provisioned resource you will find the Action “Add Tag to Private Endpoint” on the Private Endpoint object.
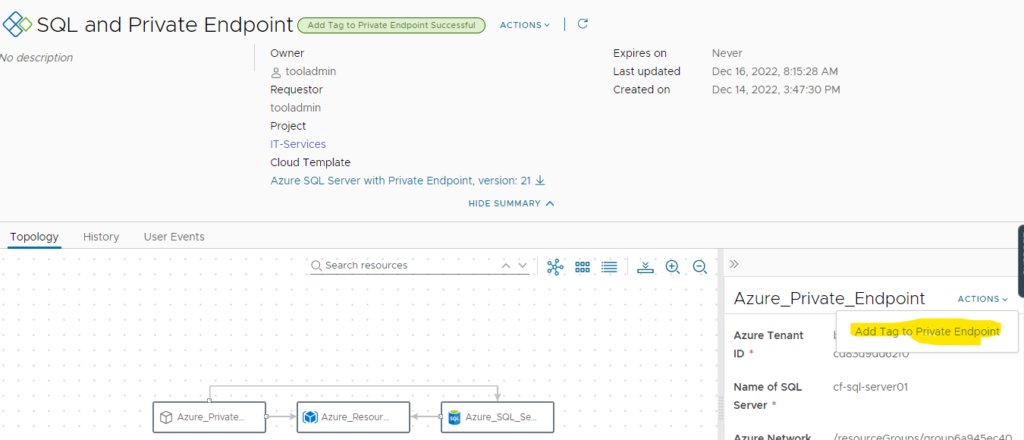
After execution it asks for a tag name and tag value to add to the private endpoint.

Once executed, the tag will show up in the Azure Private Endpoint resource.

Have fun!
- 1-node Kubernetes Template for CentOS Stream 9 in VCF Automation - 30. September 2024
- Aria Automation custom resources with dynamic types - 9. August 2024
- Database-as-a-Service with Data Services Manager and Aria Automation - 4. July 2024
