In one of my previous blogs, I explained how a network selection on blueprint request can be implemented:
https://www.vrealize.it/2020/06/25/vrealize-automation-network-selection-in-request-form/
As always there’s multiple ways to achieve goals. The above-mentioned blog is using custom properties to realize the network selection. This has the general advantage that the process could be used for other selections as well when modified and it doesn’t require constraint definitions on the project. However, it provides the risk that it can be overcome through direct API calls and also the network list a project has access to needs to be maintained in custom properties.
In this blog I will show a way how to use network constraints for the network selection. This will provide a more stream-lined method of mapping projects to network profiles.
Add REST Host to vRealize Orchestrator
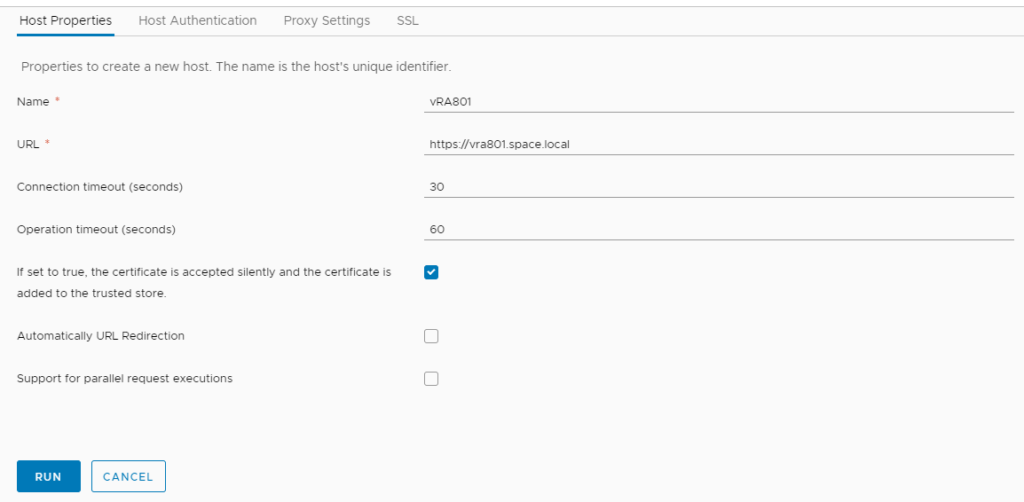
The integration needs to retrieve some information from vRA8 API, hence a vRA8 Rest Host needs to be added to vRO by running the OOTB workflow “Add a REST host” (see screenshots below). For vRA Cloud a different URL must be used. This is https://api.mgmt.cloud.vmware.com for accessing the US vRA Cloud platform. Please take a note of the name specified as it is required in the related Configuration Element.


Import Orchestrator action
Download the Orchestrator action for vRA8.
Now you must unzip and import the action package into vRO. I will not walk through all required steps for package/action import in this blog post.


Modify Configuration Elements
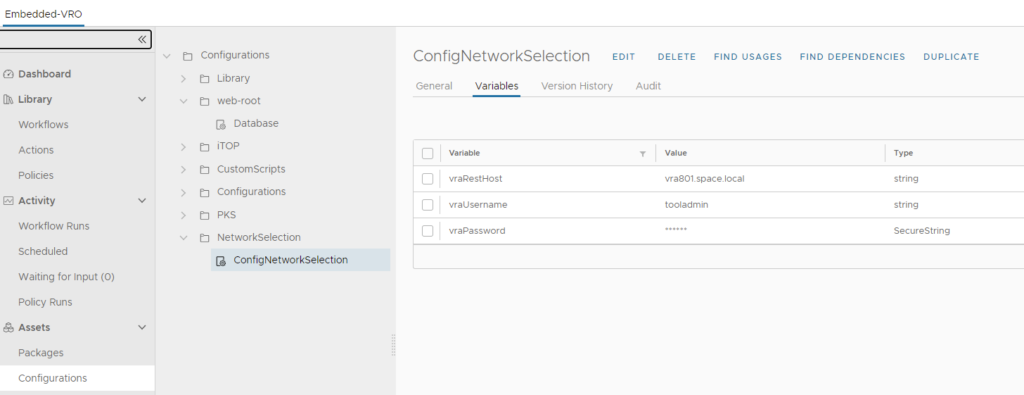
The package contains a configuration element called “ConfigNetworkSelection” in “NetworkSelection” tree. You need to update the values for the 3 variables listed with the data from your environment.

Create network profile and configure network constraint
The main principle in this implementation is the mapping of network profiles to projects. Each project will have a 1:1 relationship to a network profile. To make sure that the proper network profile is used, the network profile will be given a tag in form of “project:<project-name>”, see examples below.
![]()
In addition, we will be putting this tag as network constraint into the project itself. This will make sure that the project can only provision to networks that are part of the mapped network profile (no matter if through UI or API).

Within the network profile the single networks are added and tagged with the name that should appear in the request form drop down of the blueprint.

Create Blueprint
Find below a blueprint example you can use. Image/imageRef part must be modified. In general, you can use any of your existing blueprints. The most important part is adding the input property and proper constraint to the network section.
After creation, a new version of the blueprint must be created which is also released to the catalog. I will not dig deeper into how you share a blueprint in Service Broker. Please consult Service Broker documentation in case you are not familiar with it.
name: CentOS ServerformatVersion: 1inputs: select-network: type: string title: Select Networkresources: CentOS-VM-01: type: Cloud.vSphere.Machine properties: imageRef: TEMP-CentOS7-for-vRA2/snap-vRA8 cpuCount: 1 totalMemoryMB: 1024 networks: - network: '${resource.Cloud_vSphere_Network_1.id}' Cloud_vSphere_Network_1: type: Cloud.vSphere.Network properties: networkType: existing constraints: - tag: '${input.select-network}'
Enabling custom forms on the blueprint
vRealize Automation provides custom forms functionality. This allows to tailor the request form beyond what the Cloud Assembly blueprint can provide. Especially if external data needs to be included in the request form, the only means realizing it is by custom forms.

If the blueprint has been created correctly you should see a “Select Network” form element appear. For this element the suggested display type should be “Dropdown”.

In the “value” section you must select “external source” as “value source” and search for the action getNetworksFromProject. This action requires the projectID as input which is automatically provided by a field reference to “Project” when selected correctly.

Please make sure you click the “ENABLE” button in the top of the screen before saving the custom form modifications.
Testing the blueprint
If everything has been prepared properly you should be able to request the blueprint and see a “Select Network” field which lists the tags specified in project’s custom properties. By selecting a different project, the “Select Network” content should be updated accordingly. In case the project doesn’t have a network constraint with “project” key, the selection will stay empty. After provisioning you will see the VM being deployed in the correct network related to the selection done in request screen.

- 1-node Kubernetes Template for CentOS Stream 9 in VCF Automation - 30. September 2024
- Aria Automation custom resources with dynamic types - 9. August 2024
- Database-as-a-Service with Data Services Manager and Aria Automation - 4. July 2024

if multiple profile profiles are identified via the same networkprofiletagkey && networkprofiletagvalue, it doesn’t work. it does work only single network profile that contains the Tag from project network constraints. How to change the code logic to identify and read all the network profiles from the key/value (example: key-> project)?
Pingback: Update Network Fabric IP Info in Aria Automation using APIs - Cybersylum
Error – Action ‘getNetworksFromProject’ in module ‘com.vmware.customactions’ failed: referenceError: “myresthost” is not defined. (com.vmware.customactions/getNetworksFromProject#30);
Sir, I am getting above error when i open service catalog / click request