Aria Automation has out-of-the-box capabilities for an approval workflow. When implemented, users can approve requests within the Aria Automation interface. In addition, there’s many options to integrate 3rd party tools of different type into a provisioning process. A lot of our customers are asking for integration options into Atlassian Jira. Jira has multiple functionalities from logging incidents through requesting changes up to manage CMDB items. To demonstrate the integration capabilities this blog focusses on creating a change request which requires approval in the jira system before a provisioning process goes on in Aria Automation. This can be achieved by leveraging the event broker system in Aria Automation and running an Orchestrator workflow that talks to the jira system.
Preparations
Before beginning with the implementation, you must make sure that a jira account with API capabilities is available. In my case I decided to use an Atlassian cloud account which can be requested for free here. By default, there is an org-admins group (where the initial user belongs to) which could be leveraged for approvals going forward.
Apart from that an Aria Automation installation including Aria Orchestrator (Cloud Extensibility Proxy for SaaS) is required.
Once you get access to a jira system make sure there is a project you can use. If it’s a clean installation, you must create a project by yourself.

For later use we will need the project ID which can only be retrieved by API (at least for jira cloud).
To do this I’d recommend using postman and to create a get request to your page URL (https://<yourjirapage>.atlassian.net/rest/api/3/project as per below). Also, basic authentication method must be used with the proper credentials (username + api-key). Headers are required as well like shown in the screenshot.


Once executed you should see the ID of the project in the json output. If it is your first project of the organization, the ID should be 10000.
Next, create an API token for your user on this page and save it for later usage.
Import Orchestrator workflow and configure variables
There is an Orchestrator workflow I created for this use case which can be downloaded here.
Just import the workflow into your Orchestrator installation. It can be found in the “VMware custom –> Atlassian” tree going forward.
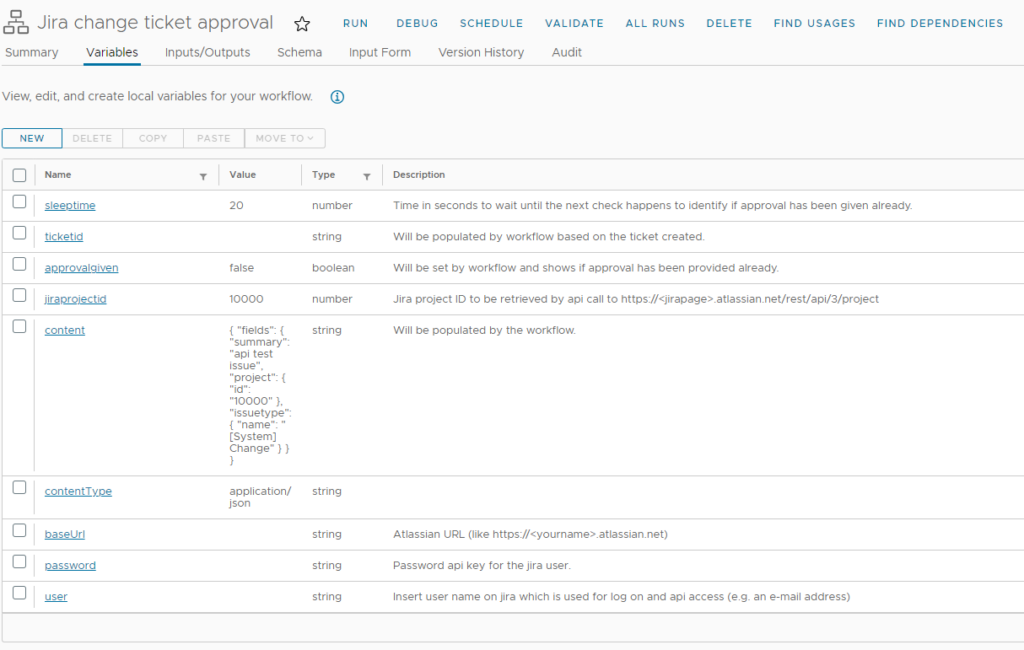
Before running the workflow, some variables must be set.

There are only 4 variables that must be set, all others are set by the workflow itself or pre-populated. Please note the description on each variable to get more insights:
user, password, baseUrl, jiraprojectid
Add workflow to Aria Automation subscription
The workflow is configured to use parameters coming from Aria Automation. It will be injected in the provisioning process and once executed it creates a jira change and waits for its approval to continue.
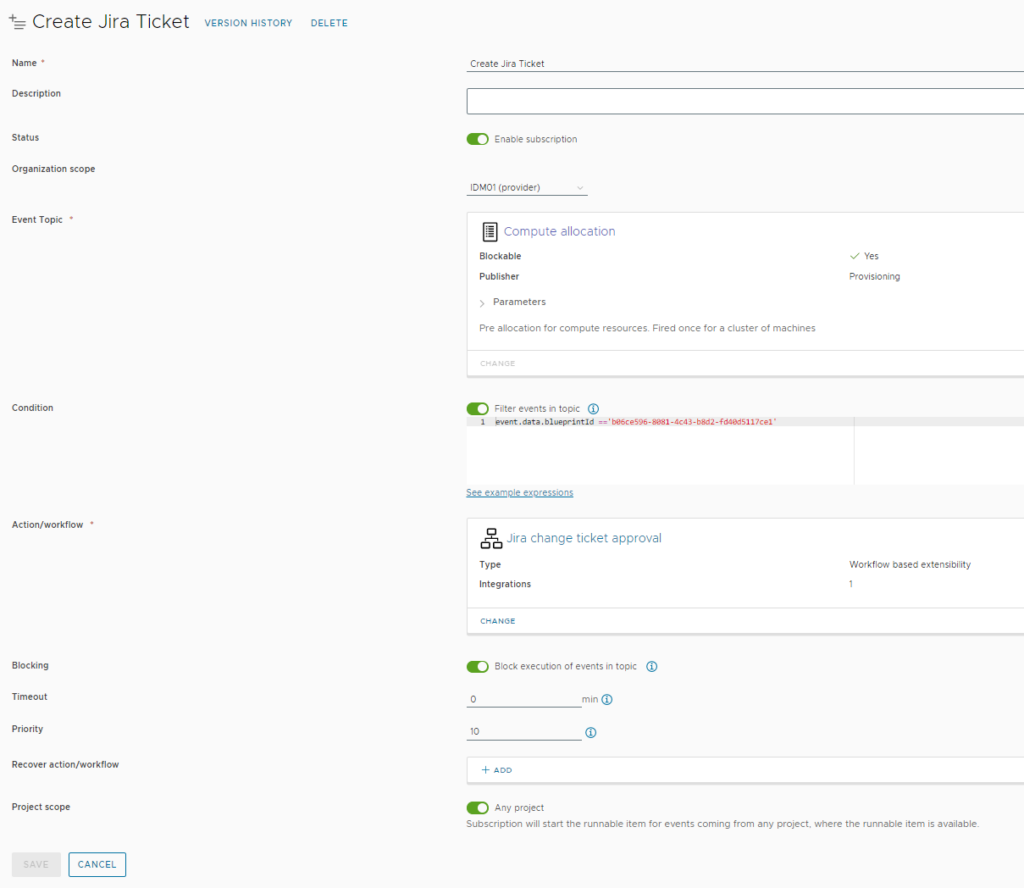
I will not go into the details of how to create an Aria Automation subscription. Please refer to the official documentation how to do this.
In a nutshell the subscription is created in the extensibility tab of the Assembler and needs configuration parameters like shown in the screenshot. The condition has been inserted to make sure the workflow will only be executed for a specific blueprint ID. It’s important to select the proper event topic (Compute allocation) and to mark the workflow as blocking. If it’s not set to blocking, the workflow will be executed asynchronously and not stop the provisioning process waiting for an approval.

Testing the procedure
Once all parameters above have been configured, the process can be tested. To do this, request your VM service from Assembler or the Service Broker catalog. After few seconds a change request will be created in the jira portal. Note, the summary of the change has been tailored to the request.

As long as the approval is not done, the provisioning request on Aria Automation will show as “in progress”.

Looking into the change details on jira, following page should appear:

Check if the “org-admins” group has been a set as approver groups.
To approve this request, you must change the status from “Review” to “Ready for approval” which will expose the Approve and Decline buttons.


Once the ticket is approved, the Aria Automation provisioning process will go on and finalize its deployment.
Have fun!
- 1-node Kubernetes Template for CentOS Stream 9 in VCF Automation - 30. September 2024
- Aria Automation custom resources with dynamic types - 9. August 2024
- Database-as-a-Service with Data Services Manager and Aria Automation - 4. July 2024


