
In this walktrough, I will explain how to use Antrea ClusterNetworkPolicy to isolate namespaces and individual pods within a Kubernetes Cluster.
Index
- About Antrea
- About Antrea ClusterNetworkPolicy
- Prerequisite
- My Test Setup
- Testing without Antrea Policy
- Enabling Antrea Policy
- Isolate DEV and PREPOD
- Isolate Pods within Namespace app1
- Isolate Pods within Namespace app2 (3Tier-App)
- Usage of the Emergency Tier
About Antrea
Antrea is a Kubernetes networking solution intended to be Kubernetes native. It operates at Layer3/4 to provide networking and security services for a Kubernetes cluster, leveraging Open vSwitch as the networking data plane.
More Details about Antrea can be found here: https://github.com/vmware-tanzu/antrea
About Antrea ClusterNetworkPolicy
Antrea ClusterNetworkPolicy gives you a fine-grained control to your Cluster Network and can co-exist with and complement the K8s NetworkPolicy.
Similar to VMware NSX, Antrea supports grouping Antrea Policy CRDs together in a tiered fashion to provide a hierarchy of security policies. In each tier you can control the policy order with a priority field.
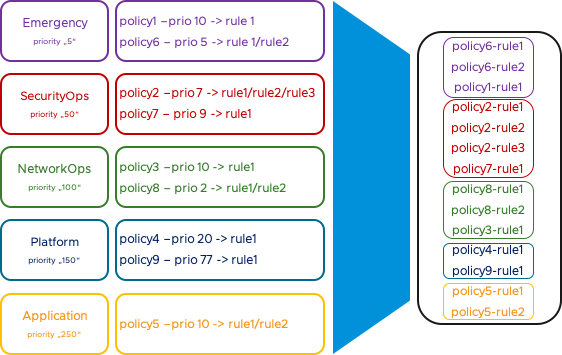
There are five static tiers in Antrea: Emergency -> SecurityOps -> NetworkOps -> Platform -> Application. Emergency has the highest precedence while Application has the lowest precedence.
This means: Policies in Emergency tier, will be placed on top of the firewall, while Policies in Application tier will be placed on the bottom of the firewall, but before standard K8S Policies. Inside a Tier the Policies will be sorted by the priority field. The Priority value can be in the range between 1 to 10000. A lower priority value indicates higher precedence.
A Policy includes one or many rules. Rules inside a Policy will be processed top to down.
In the following example there are two policies in tier “emergency”, policy1 with prio 10 and policy6 with prio 5. Policy6/rule1 will be processed first, because it has the highest precedence. Than policy6/rule2 followed by policy1/rule1. If all Policies from tier “Emergency” are processed, the next tier “SecurityOps” will be processed and so on.
Since Version 0.10.0 you have also the flexibility to create and delete your own Tiers. I will using in my demo the predefined Tiers.
More Information regarding Antrea Policy CRDs can be found here ->
https://github.com/vmware-tanzu/antrea/blob/master/docs/antrea-network-policy.md
Prerequisite
Before you can start, the following prerequisites must be meet:
- Kubernetes Cluster version >= 1.16
- Antrea version >= v0.10.1
You can use the Guide from Daniel Paul to setup K8S with Antrea -> https://www.vrealize.it/2020/09/15/installing-antrea-container-networking-and-avi-kubernets-operator-ako-for-ingress/
My Test Setup
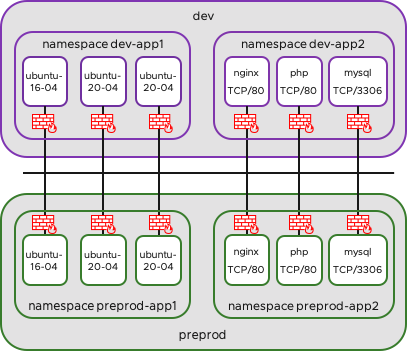
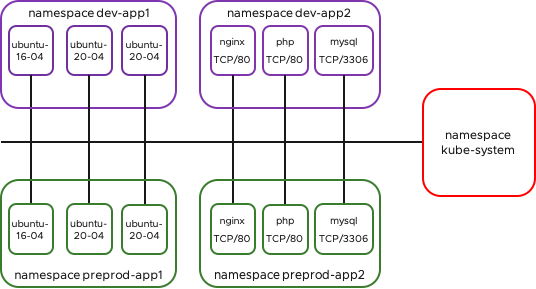
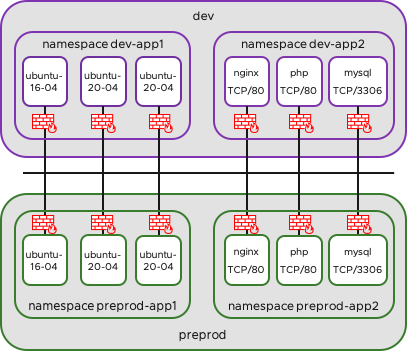
In my Kubernetes Cluster I have the environment Developement and Pre-Production. In each environment I have two Namespaces.
In app1 are some Ubuntu Servers for Testing: dev-app1 / preprod-app1
- 1x Ubuntu Server 16.04
- 2x Ubuntu Server 20.04
In app2 is a simple 3 Tier-App (WEB-APP-DB): dev-app2 / preprod-app2 (3tier-app)
- 1x nginx TCP/80 (NodePort)
- 1x php TCP/80 (ClusterIP)
- 1x mysql TCP/3306 (ClusterIP)
Of course you can create your own pods or you can download the .yaml files (including ns creation) from my github repo.
https://raw.githubusercontent.com/derstich/antrea-policy/master/dev-app1.yaml
https://raw.githubusercontent.com/derstich/antrea-policy/master/dev-app2.yaml
https://raw.githubusercontent.com/derstich/antrea-policy/master/preprod-app1.yaml
https://raw.githubusercontent.com/derstich/antrea-policy/master/preprod-app2.yaml
…or run the following kubectl commands on the Kubernetes Master if you have direct Internet access
kubectl apply -f https://raw.githubusercontent.com/derstich/antrea-policy/master/dev-app1.yaml

kubectl apply -f https://raw.githubusercontent.com/derstich/antrea-policy/master/dev-app2.yaml

kubectl apply -f https://raw.githubusercontent.com/derstich/antrea-policy/master/preprod-app1.yaml

kubectl apply -f https://raw.githubusercontent.com/derstich/antrea-policy/master/preprod-app2.yaml
Now we can check with the following command that all pods are up and running. And we will check also the IP from each pod. Because you need this information a lot of times you should make a screenshot from the IPs and pod Names.
kubectl get pods -A -o=custom-columns=NAMESPACE:.metadata.namespace,NAME:.metadata.name,STATUS:.status.phase,IP:.status.podIP,NODE:.spec.nodeNameYou should have a picture similar to this:
NAMESPACE      NAME                                 STATUS    IP             NODE
dev-app1       ubuntu-16-04-7f876959c6-j58h9        Running   10.10.2.75     k8snode1
dev-app1       ubuntu-20-04-6685fd8d5b-89tpf        Running   10.10.1.57     k8snode2
dev-app1       ubuntu-20-04-6685fd8d5b-dmh2n        Running   10.10.1.58     k8snode2
dev-app2       appserver-56f67fdd5b-b56rw           Running   10.10.1.59     k8snode2
dev-app2       mysql-66fdd6f455-jpft5               Running   10.10.2.77     k8snode1
dev-app2       nginx-569d88f76f-8gmxj               Running   10.10.2.76     k8snode1

---OUTPUT OMITTED---

preprod-app1   ubuntu-16-04-7f876959c6-fnbnh        Running   10.10.2.79     k8snode1
preprod-app1   ubuntu-20-04-6685fd8d5b-h59dr        Running   10.10.2.78     k8snode1
preprod-app1   ubuntu-20-04-6685fd8d5b-z4qv7        Running   10.10.1.60     k8snode2
preprod-app2   appserver-7f56f45669-rfrvt           Running   10.10.1.62     k8snode2
preprod-app2   mysql-66fdd6f455-sjkvb               Running   10.10.2.80     k8snode1
preprod-app2   nginx-569d88f76f-lnv8g               Running   10.10.1.61     k8snode2
We should check if we are able to access our 3Tier-App in namespace dev-app2 over the translated Port.
kubectl get svc -n dev-app2 nginx
NAME    TYPE       CLUSTER-IP     EXTERNAL-IP   PORT(S)        AGE
nginx   NodePort   10.101.31.36   <none>        80:31668/TCP   7m32s
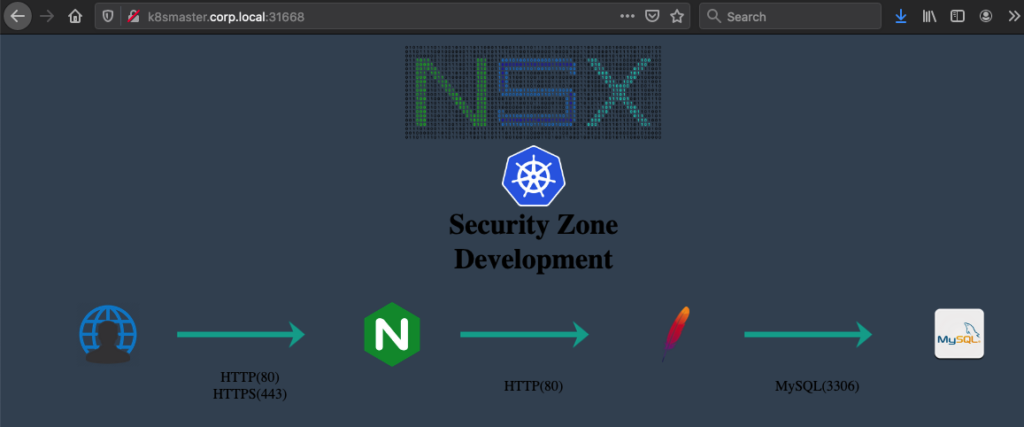
In my case the external Port for the Web Service nginx is 31668/TCP. So I will open a webpage with the DNS or IP from the Kubernetes Master.
And we do the same for our 3Tier-App in namespace preprod-app2
kubectl get svc -n preprod-app2 nginx
NAME    TYPE       CLUSTER-IP    EXTERNAL-IP   PORT(S)        AGE
nginx   NodePort   10.97.103.8   <none>        80:32698/TCP   6m37s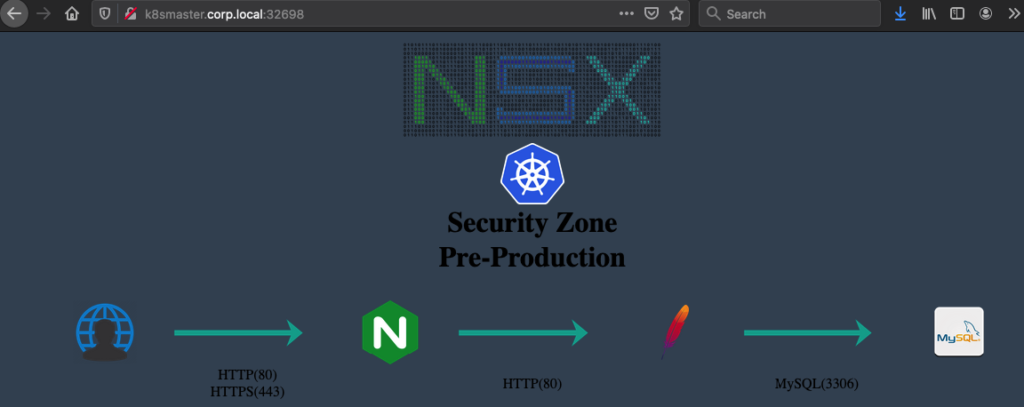
Testing without Antrea Policy
Let’s find out what we can reach from one Ubuntu-20.04 Server in namespace “dev-app1”. Do not use the Ubuntu-16.04 Server, because there are not all tools installed.
Open a Shell…
kubectl exec -it -n dev-app1 ubuntu-20-04-6685fd8d5b-89tpf -- /bin/bash…and do a portscan for the Network 10.10.0.0/22 and see what we can find with nmap.
nmap 10.10.0.0/22The order can be different, but you see the pods from kube-system and also the pods from the Applications. Thanks to coredns we will not only see the IP Address, we will also see the Name from each Pod. You will find a pod with the name *.mysql8-service.preprod-app2.svc.cluster.local. Because of the Name you can be sure that this is the MySQL Server in the preprod enviroment;-)
nmap 10.10.0.0/22
Starting Nmap 7.80 ( https://nmap.org ) at 2020-09-25 11:05 UTC
Nmap scan report for 10.10.0.1
Host is up (0.00044s latency).
Not shown: 999 closed ports
PORT   STATE SERVICE
22/tcp open  ssh

Nmap scan report for 10.10.1.1
Host is up (0.000026s latency).
Not shown: 999 closed ports
PORT   STATE SERVICE
22/tcp open  ssh
MAC Address: F6:8B:23:58:74:44 (Unknown)

Nmap scan report for 10-10-1-5.kube-dns.kube-system.svc.cluster.local (10.10.1.5)
Host is up (0.000025s latency).
Not shown: 997 closed ports
PORT     STATE SERVICE
53/tcp   open  domain
8080/tcp open  http-proxy
8181/tcp open  intermapper
MAC Address: 5A:78:B9:7A:82:80 (Unknown)

Nmap scan report for 10.10.1.58
Host is up (0.000026s latency).
All 1000 scanned ports on 10.10.1.58 are closed
MAC Address: EE:6D:7E:F0:EF:2B (Unknown)

Nmap scan report for 10-10-1-59.app-service.dev-app2.svc.cluster.local (10.10.1.59)
Host is up (0.000025s latency).
Not shown: 999 closed ports
PORT   STATE SERVICE
80/tcp open  http
MAC Address: A6:55:6E:D3:64:73 (Unknown)

---OUTPUT OMITTED---

Nmap scan report for 10-10-2-80.mysql8-service.preprod-app2.svc.cluster.local (10.10.2.80)
Host is up (0.0040s latency).
Not shown: 999 closed ports
PORT     STATE SERVICE
3306/tcp open  mysql

Nmap done: 1024 IP addresses (17 hosts up) scanned in 13.56 seconds
You can see that there is no Isolation within the cluster and you will be able to see all open Ports on all pods. Let’s assume that you find out the Password for the MySQL Database in the enviroment preprod. Because there is no rule to isolate the Namespaces you should be able to establish a connection between dev-enviroment and preprod-environmet.
mysql -h 10-10-2-80.mysql8-service.preprod-app2.svc.cluster.local -p
Enter password:.sweetpwd.

Welcome to the MySQL monitor.  Commands end with ; or \g.
Your MySQL connection id is 5
Server version: 5.6.49 MySQL Community Server (GPL)

Copyright (c) 2000, 2020, Oracle and/or its affiliates. All rights reserved.

Oracle is a registered trademark of Oracle Corporation and/or its
affiliates. Other names may be trademarks of their respective
owners.

Type 'help;' or '\h' for help. Type '\c' to clear the current input statement.

mysql>
I think we should enable AntreaPolicy and create some rules now;-)
Enabling Antrea Policy
As of writing this Blog AntreaPolicy is in alpha status and disabled on the Antrea .yaml. So we need to enable AntreaPolicy and NetworkPolicyStats first.
We need to edit the Antrea configmap. The Name starts with antrea-config-* and can be found under kube-system
kubectl get configmaps -n kube-system
NAME                                 DATA   AGE
antrea-ca                            1      85m
antrea-config-f4kt4bdh8t             3      85m
coredns                              1      17d
extension-apiserver-authentication   6      17d
kube-proxy                           2      17d
kubeadm-config                       2      17d
kubelet-config-1.18                  1      17d
Now we have the Name and can edit the configmap
kubectl edit configmap -n kube-system antrea-config-f4kt4bdh8tThere is one Section for antrea-agent.conf and one Section for antrea-controller.conf. You must make the changes in both sections. Search for AntreaPolicy and make your changes.
Make the following changes # AntreaPolicy: false to AntreaPolicy: true
and
# NetworkPolicyStats: false to NetworkPolicyStats: true
in the Section antrea-agent.conf and antrea-controller.conf
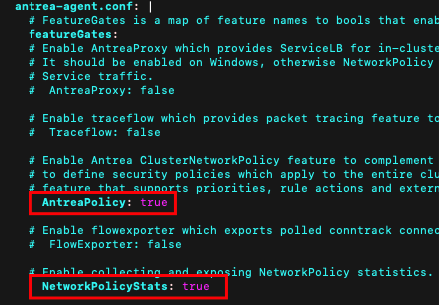
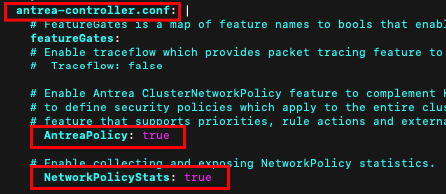
If you finished save the configuration (esc, :wq) and restart the Antrea pods. If you would like to delete all Pods in one shot you can use the –selector and choose app=antrea. This will delete the Agents and the controller.
kubectl delete pods -n kube-system --selector app=antrea
pod "antrea-agent-88s9b" deleted
pod "antrea-agent-hgcpn" deleted
pod "antrea-agent-ppqrj" deleted
pod "antrea-controller-5484b94f64-nq58x" deleted
Check if Controller and Agents are up and running
kubectl get pods -n kube-system --selector app=antrea
NAME                                 READY   STATUS    RESTARTS   AGE
antrea-agent-8wlrn                   2/2     Running   0          26s
antrea-agent-9s72h                   2/2     Running   0          15s
antrea-agent-vprbv                   2/2     Running   0          21s
antrea-controller-5484b94f64-958gq   1/1     Running   0          29s
It’s time to create create some Policies!
Isolate DEV and PREPROD
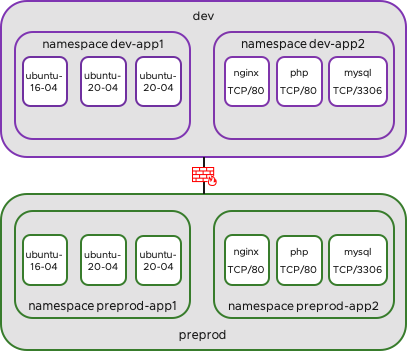
Normally there is no reason that any pod from DEV can talk to any pod from preprod. So we need to create two Policies to isolate them. Before we can do this we will Label the previously created namespaces. So we will label dev-app1/dev-app2 with label env:dev and preprod-app1/preprod-app2 with label env:preprod. We also label the namespace with its namespace name.
kubectl label ns dev-app1 env=dev ns=dev-app1
kubectl label ns dev-app2 env=dev ns=dev-app2
kubectl label ns preprod-app1 env=preprod ns=preprod-app1
kubectl label ns preprod-app2 env=preprod ns=preprod-app2
You should check if the Labels are set.
kubectl describe ns dev-app1
Name:         dev-app1
Labels:       env=dev
              ns=dev-app1
Annotations:  Status:  Active
Now we will create our first Policy in Tier “SecurityOps” to deny traffic from environment DEV to environment PREPROD (ingress). This policy will applied to PREPROD.
apiVersion: security.antrea.tanzu.vmware.com/v1alpha1
kind: ClusterNetworkPolicy
metadata:
  name: deny-dev-to-preprod
spec:
    priority: 100
    tier: SecurityOps
    appliedTo:
      - namespaceSelector:
          matchLabels:
            env: preprod
    ingress:
      - action: Drop
        from:
          - namespaceSelector:
              matchLabels:
                env: dev
With the priority we can decide the order of the Policies. The Policy will be applied to all Namespaces with the Label env=preprod and will Drop all traffic from Namespaces with the Label env=dev.
Before we apply the policy we will check if we are able to ping between preprod-app1 and dev-app1 and vice versa.
kubectl exec -n preprod-app1 ubuntu-20-04-6685fd8d5b-h59dr -- ping 10.10.1.57 -c 2
PING 10.10.1.57 (10.10.1.57) 56(84) bytes of data.
64 bytes from 10.10.1.57: icmp_seq=1 ttl=62 time=3.36 ms
64 bytes from 10.10.1.57: icmp_seq=2 ttl=62 time=0.829 ms

kubectl exec -n dev-app1 ubuntu-20-04-6685fd8d5b-89tpf -- ping 10.10.2.78 -c 2
PING 10.10.2.78 (10.10.2.78) 56(84) bytes of data.
64 bytes from 10.10.2.78: icmp_seq=1 ttl=62 time=2.48 ms
64 bytes from 10.10.2.78: icmp_seq=2 ttl=62 time=0.841 ms
After the Ping in both direction was successful we can now apply the Policy.
kubectl apply -f https://raw.githubusercontent.com/derstich/antrea-policy/master/deny-dev-to-preprod.yamlAfter we applied the policy you will be able to ping from preprod-app1 to dev-app1..
kubectl exec -n preprod-app1 ubuntu-20-04-6685fd8d5b-h59dr -- ping 10.10.1.57 -c 2
PING 10.10.1.57 (10.10.1.57) 56(84) bytes of data.
64 bytes from 10.10.1.57: icmp_seq=1 ttl=62 time=6.55 ms
64 bytes from 10.10.1.57: icmp_seq=2 ttl=62 time=0.788 ms
But you will not be able to ping from dev-app1 to preprod-app1 anymore.
kubectl exec -n dev-app1 ubuntu-20-04-6685fd8d5b-89tpf -- ping 10.10.2.78 -c 2
PING 10.10.2.78 (10.10.2.78) 56(84) bytes of data.

--- 10.10.2.78 ping statistics ---
2 packets transmitted, 0 received, 100% packet loss, time 1420ms
We will create a second Policy to deny traffic from PREPROD to DEV and apply also this Policy.
apiVersion: security.antrea.tanzu.vmware.com/v1alpha1
kind: ClusterNetworkPolicy
metadata:
  name: deny-preprod-to-dev
spec:
    priority: 101
    tier: SecurityOps
    appliedTo:
      - namespaceSelector:
          matchLabels:
            env: dev
    ingress:
      - action: Drop
        from:
          - namespaceSelector:
              matchLabels:
                env: preprod
kubectl apply -f https://raw.githubusercontent.com/derstich/antrea-policy/master/deny-preprod-to-dev.yamlWe will check the Policies before we try to ping again. You can see also the Order because of the Priorities.
kubectl get clusternetworkpolicies.security.antrea.tanzu.vmware.com
NAME                  TIER          PRIORITY   AGE
deny-dev-to-preprod   SecurityOps   100        27m
deny-preprod-to-dev   SecurityOps   101        18m
Let us try again to ping from PREPROD to DEV and vice versa. You will see that this will fail in both direction.
kubectl exec -n preprod-app1 ubuntu-20-04-6685fd8d5b-h59dr -- ping 10.10.1.57 -c 2
PING 10.10.1.57 (10.10.1.57) 56(84) bytes of data.

--- 10.10.1.57 ping statistics ---
2 packets transmitted, 0 received, 100% packet loss, time 1029ms

command terminated with exit code 1

kubectl exec -n dev-app1 ubuntu-20-04-6685fd8d5b-89tpf -- ping 10.10.2.78 -c 2
PING 10.10.2.78 (10.10.2.78) 56(84) bytes of data.

--- 10.10.2.78 ping statistics ---
2 packets transmitted, 0 received, 100% packet loss, time 1002ms

command terminated with exit code 1
But you will still be able to ping from dev-app1 to dev-app2 and also from preprod-app1 to preprod-app2
kubectl exec -n preprod-app1 ubuntu-20-04-6685fd8d5b-h59dr -- ping 10-10-2-80.mysql8-service.preprod-app2.svc.cluster.local -c 2
PING 10-10-2-80.mysql8-service.preprod-app2.svc.cluster.local (10.10.2.80) 56(84) bytes of data.
64 bytes from 10-10-2-80.mysql8-service.preprod-app2.svc.cluster.local (10.10.2.80): icmp_seq=1 ttl=64 time=2.16 ms
64 bytes from 10-10-2-80.mysql8-service.preprod-app2.svc.cluster.local (10.10.2.80): icmp_seq=2 ttl=64 time=0.528 ms

--- 10-10-2-80.mysql8-service.preprod-app2.svc.cluster.local ping statistics ---
2 packets transmitted, 2 received, 0% packet loss, time 1002ms
rtt min/avg/max/mdev = 0.528/1.344/2.160/0.816 ms

kubectl exec -n dev-app1 ubuntu-20-04-6685fd8d5b-89tpf -- ping 10-10-1-59.app-service.dev-app2.svc.cluster.local -c 2
PING 10-10-1-59.app-service.dev-app2.svc.cluster.local (10.10.1.59) 56(84) bytes of data.
64 bytes from 10-10-1-59.app-service.dev-app2.svc.cluster.local (10.10.1.59): icmp_seq=1 ttl=64 time=1.10 ms
64 bytes from 10-10-1-59.app-service.dev-app2.svc.cluster.local (10.10.1.59): icmp_seq=2 ttl=64 time=0.531 ms

--- 10-10-1-59.app-service.dev-app2.svc.cluster.local ping statistics ---
2 packets transmitted, 2 received, 0% packet loss, time 1001ms
rtt min/avg/max/mdev = 0.531/0.814/1.098/0.283 ms
Now we will check the Policy Hit Count
kubectl get antreaclusternetworkpolicystats.stats.antrea.tanzu.vmware.com
NAME                  SESSIONS   PACKETS   BYTES   CREATED AT
deny-dev-to-preprod   4          4         392     2020-09-25T13:06:33Z
deny-preprod-to-dev   2          2         196     2020-09-25T13:06:33Z
Congratulation! You isolated dev from preprod and vice versa:-) Now we will secure our Pods.
Isolate Pods within Namespace app1

In this example I will allow Traffic between Pods in dev-app1 and also between Pods in preprod-app1. All other Traffic will be blocked ingress. We labeled before the Namespaces so we can check the Label for namespace dev-app1 and use the Label ns=dev-app1
kubectl describe namespace dev-app1
Name:         dev-app1
Labels:       env=dev
              ns=dev-app1
Now we create a Policy to allow communiction within ns dev-app1 and deny any other ingress Traffic.
apiVersion: security.antrea.tanzu.vmware.com/v1alpha1
kind: ClusterNetworkPolicy
metadata:
  name: 10-allow-ns-dev-app1-dev-app1
spec:
    priority: 100
    tier: application
    appliedTo:
      - namespaceSelector:
          matchLabels:
            ns: dev-app1
    ingress:
      - action: Allow
        from:
          - namespaceSelector:
              matchLabels:
                ns: dev-app1
---
apiVersion: security.antrea.tanzu.vmware.com/v1alpha1
kind: ClusterNetworkPolicy
metadata:
  name: 11-drop-any-ns-dev-app1
spec:
    priority: 110
    tier: application
    appliedTo:
      - namespaceSelector:
          matchLabels:
            ns: dev-app1
    ingress:
      - action: Drop
        from:
          - namespaceSelector: {}
…and apply the policy. Be Aware that the deny policy should have a higher priority number, to avoid that traffic will be blocked by the deny policy.
kubectl apply -f https://raw.githubusercontent.com/derstich/antrea-policy/master/10-isolate-ns-dev-app1.yamlWe will do the same for ns preprod-app1
apiVersion: security.antrea.tanzu.vmware.com/v1alpha1
kind: ClusterNetworkPolicy
metadata:
  name: 20-allow-ns-preprod-app1-preprod-app1
spec:
    priority: 120
    tier: application
    appliedTo:
      - namespaceSelector:
          matchLabels:
            ns: preprod-app1
    ingress:
      - action: Allow
        from:
          - namespaceSelector:
              matchLabels:
                ns: preprod-app1
---
apiVersion: security.antrea.tanzu.vmware.com/v1alpha1
kind: ClusterNetworkPolicy
metadata:
  name: 21-drop-any-ns-preprod-app1
spec:
    priority: 130
    tier: application
    appliedTo:
      - namespaceSelector:
          matchLabels:
            ns: preprod-app1
    ingress:
      - action: Drop
        from:
          - namespaceSelector: {}
…and apply the policy
kubectl apply -f https://raw.githubusercontent.com/derstich/antrea-policy/master/20-isolate-ns-preprod-app1.yamlYou should be able to reach all Pods within the namespace but you will not be able to reach the pods from an other namespace.
Next we will isolate the 3Tier-App (ns app2)
Isolate Pods within Namespace app2 (3Tier-App)
In my next example I will secure the 3Tier-APP in namespace dev-app2 and also in preprod-app2 with one Policyset. I will allow following traffic:
- allow web-app (Port 80)
- allow app-db (Port 3306)
- deny all other access
First we need to check the available Labels on the Pods
kubectl describe pod -n dev-app2 nginx-569d88f76f-8gmxj
---OUTPUT-OMITTED---
Labels:       app=nginx
              kind=dev
              pod-template-hash=569d88f76f
              service=web
              type=internal

kubectl describe pod -n dev-app2 appserver-56f67fdd5b-b56rw
---OUTPUT-OMITTED---
Labels:       app=app
              kind=dev
              pod-template-hash=56f67fdd5b
              type=internal

kubectl describe pod -n dev-app2 mysql-66fdd6f455-jpft5
---OUTPUT-OMITTED---
Labels:       app=mysql8
              kind=dev
              pod-template-hash=66fdd6f455
              service=db
              type=internal
I will choose the Label app=xxx
I will use the Tier “application” to create the Policies and because I dropped all traffic between dev and preprod I will chose the podSelector without the namespaceSelector. Traffic from outside to the Webservers is allowed also if Namespaces are isolated. So I start with the Policy for WEB to APP.
apiVersion: security.antrea.tanzu.vmware.com/v1alpha1
kind: ClusterNetworkPolicy
metadata:
  name: 01-allow-web-app
spec:
    priority: 10
    tier: application
    appliedTo:
      - podSelector:
          matchLabels:
            app: app
    ingress:
      - action: Allow
        from:
          - podSelector:
              matchLabels:
                app: nginx
        ports:
          - protocol: TCP
            port: 80
kubectl apply -f https://raw.githubusercontent.com/derstich/antrea-policy/master/01-allow-web-app.yamlAs you can see I changed the tier to “application” and I use the podSelectors and Port Numbers. Next we will allow APP<->DB.
apiVersion: security.antrea.tanzu.vmware.com/v1alpha1
kind: ClusterNetworkPolicy
metadata:
  name: 02-allow-app-db
spec:
    priority: 20
    tier: application
    appliedTo:
      - podSelector:
          matchLabels:
            app: mysql8
    ingress:
      - action: Allow
        from:
          - podSelector:
              matchLabels:
                app: app
        ports:
          - protocol: TCP
            port: 3306
kubectl apply -f https://raw.githubusercontent.com/derstich/antrea-policy/master/02-allow-app-dbAnd now we deny all other traffic to the Pods in namespace dev-app2 and preprod-app2.
apiVersion: security.antrea.tanzu.vmware.com/v1alpha1
kind: ClusterNetworkPolicy
metadata:
  name: 03-deny-any-to-app2
spec:
    priority: 30
    tier: application
    appliedTo:
      - namespaceSelector:
          matchLabels:
                  ns: dev-app2
      - namespaceSelector:
          matchLabels:
                  ns: preprod-app2
    ingress:
      - action: Drop
        from:
          - namespaceSelector: {}
kubectl apply -f https://raw.githubusercontent.com/derstich/antrea-policy/master/03-deny-any-to-app2You should check now if you are still able to Access your 3Tier-App from a Web Browser.
Usage of the Emergency Tier
We will still be able to ping inside dev-app1 and preprod-app1 all Servers. With the emergency Tier we have the Option to isolate Single Servers or Groups in case it is needed. Assume that there is a vulnerability with an OS and you would like to isolate all Servers with this specific OS. In my example I will Isolate the Ubuntu Server 16.04.
We will check the IP Addresses in namespace dev-app1
kubectl get pods -n dev-app1 -o=custom-columns=NAME:.metadata.name,IP:.status.podIP
NAME                            IP
ubuntu-16-04-7f876959c6-j58h9   10.10.2.75
ubuntu-20-04-6685fd8d5b-89tpf   10.10.1.57
ubuntu-20-04-6685fd8d5b-dmh2n   10.10.1.58
…and preprod-app1
kubectl get pods -n preprod-app1 -o=custom-columns=NAME:.metadata.name,IP:.status.podIP
NAME                            IP
ubuntu-16-04-7f876959c6-fnbnh   10.10.2.79
ubuntu-20-04-6685fd8d5b-h59dr   10.10.2.78
ubuntu-20-04-6685fd8d5b-z4qv7   10.10.1.60
Now we can ping from one of the Ubuntu 20.04 Server the other Server within the Namespace
kubectl exec -n dev-app1 ubuntu-20-04-6685fd8d5b-89tpf -- ping 10.10.2.75 -c 2
PING 10.10.2.75 (10.10.2.75) 56(84) bytes of data.
64 bytes from 10.10.2.75: icmp_seq=1 ttl=62 time=1.52 ms
64 bytes from 10.10.2.75: icmp_seq=2 ttl=62 time=6.68 ms

kubectl exec -n dev-app1 ubuntu-20-04-6685fd8d5b-89tpf -- ping 10.10.1.58 -c 2
PING 10.10.1.58 (10.10.1.58) 56(84) bytes of data.
64 bytes from 10.10.1.58: icmp_seq=1 ttl=64 time=1.22 ms
64 bytes from 10.10.1.58: icmp_seq=2 ttl=64 time=0.490 ms
kubectl exec -n preprod-app1 ubuntu-20-04-6685fd8d5b-h59dr -- ping 10.10.2.79 -c 2
PING 10.10.2.79 (10.10.2.79) 56(84) bytes of data.
64 bytes from 10.10.2.79: icmp_seq=1 ttl=64 time=2.72 ms
64 bytes from 10.10.2.79: icmp_seq=2 ttl=64 time=0.647 ms
kubectl exec -n preprod-app1 ubuntu-20-04-6685fd8d5b-h59dr -- ping 10.10.1.60 -c 2
PING 10.10.1.60 (10.10.1.60) 56(84) bytes of data.
64 bytes from 10.10.1.60: icmp_seq=1 ttl=62 time=4.11 ms
64 bytes from 10.10.1.60: icmp_seq=2 ttl=62 time=1.45 msThe Label will be app=ubuntu-16-04
kubectl describe pod -n dev-app1 ubuntu-16-04-7f876959c6-j58h9
Name:         ubuntu-16-04-7f876959c6-j58h9
Namespace:    dev-app1
Priority:     0
Node:         k8snode1/172.24.99.21
Start Time:   Fri, 25 Sep 2020 10:41:21 +0000
Labels:       app=ubuntu-16-04
Lets’s create a Policy under emergency to deny traffic to Pods with the Label app=ubuntu-16-04.
apiVersion: security.antrea.tanzu.vmware.com/v1alpha1
kind: ClusterNetworkPolicy
metadata:
  name: 50-deny-any-pod-ubuntu16
spec:
    priority: 50
    tier: emergency
    appliedTo:
      - podSelector:
          matchLabels:
                  app: ubuntu-16-04
    ingress:
      - action: Drop
        from:
          - namespaceSelector: {}
kubectl apply -f https://raw.githubusercontent.com/derstich/antrea-policy/master/50-deny-any-pod-ubuntu16.yamlLet’s do the Pingtest again.
kubectl exec -n dev-app1 ubuntu-20-04-6685fd8d5b-89tpf -- ping 10.10.2.75 -c 2
PING 10.10.2.75 (10.10.2.75) 56(84) bytes of data.

--- 10.10.2.75 ping statistics ---
2 packets transmitted, 0 received, 100% packet loss, time 1001ms

command terminated with exit code 1

kubectl exec -n dev-app1 ubuntu-20-04-6685fd8d5b-89tpf -- ping 10.10.1.58 -c 2
PING 10.10.1.58 (10.10.1.58) 56(84) bytes of data.
64 bytes from 10.10.1.58: icmp_seq=1 ttl=64 time=0.859 ms
64 bytes from 10.10.1.58: icmp_seq=2 ttl=64 time=0.411 ms
kubectl exec -n preprod-app1 ubuntu-20-04-6685fd8d5b-h59dr -- ping 10.10.2.79 -c 2
PING 10.10.2.79 (10.10.2.79) 56(84) bytes of data.
--- 10.10.2.79 ping statistics ---
2 packets transmitted, 0 received, 100% packet loss, time 1012ms
command terminated with exit code 1
kubectl exec -n preprod-app1 ubuntu-20-04-6685fd8d5b-h59dr -- ping 10.10.1.60 -c 2
PING 10.10.1.60 (10.10.1.60) 56(84) bytes of data.
64 bytes from 10.10.1.60: icmp_seq=1 ttl=62 time=2.36 ms
64 bytes from 10.10.1.60: icmp_seq=2 ttl=62 time=1.06 msAs you can see, I am still able to reach the ubuntuserver 20.04 but I am not able to reach the ubuntuserver 16.04.
Because Emergency has the highest priority, the policy in application (allow any in ns-app1) has no Impact anymore.
Let’s have a look again to our created Policies
kubectl get clusternetworkpolicies.security.antrea.tanzu.vmware.com
NAME                                    TIER          PRIORITY   AGE
01-allow-web-app                        application   10         2d20h
02-allow-app-db                         application   20         2d17h
03-deny-any-to-app2                     application   30         2d17h
20-allow-ns-preprod-app1-preprod-app1   application   120        37m
21-drop-any-ns-preprod-app1             application   121        37m
50-deny-any-pod-ubuntu16                emergency     50         16m
deny-dev-to-prod                        SecurityOps   100        2d20h
deny-preprod-to-dev                     SecurityOps   101        2d22h
…and the hitcounts
kubectl get antreaclusternetworkpolicystats.stats.antrea.tanzu.vmware.com
NAME                                    SESSIONS   PACKETS   BYTES      CREATED AT
deny-preprod-to-dev                     2          2         196        2020-09-25T13:06:33Z
01-allow-web-app                        13         967695    94962909   2020-09-25T14:57:01Z
deny-dev-to-prod                        3          3         294        2020-09-25T15:13:14Z
02-allow-app-db                         1          232226    22757983   2020-09-25T18:07:07Z
20-allow-ns-preprod-app1-preprod-app1   2          4         392        2020-09-28T10:59:48Z
21-drop-any-ns-preprod-app1             7          7         686        2020-09-28T10:59:48Z
50-deny-any-pod-ubuntu16                2          2         196        2020-09-28T11:19:54Z
03-deny-any-to-app2 0 0 0 2020-09-25T18:05:59Z- VCF9 NSX-Edge Setup – What has changed - 11. July 2025
- VCF NSX-Edge setup from a network perspective - 2. June 2025
- VCF Workload Domain Setup from a network perspective - 2. June 2025
