Update: January 2021 update with current versions (Antrea v0.12.0 AKO 1.13 / Controller 20.1.3)
This post shows how to integrate Antrea Container Networking with NSX Advanced Load Balancer (NSX ALB) using AVI Kubernetes Operator (AKO)
This example shows integration of a single K8S cluster with NSX ALB. If you plan to integrate more than one please refer to official documentation.
Inital Environment
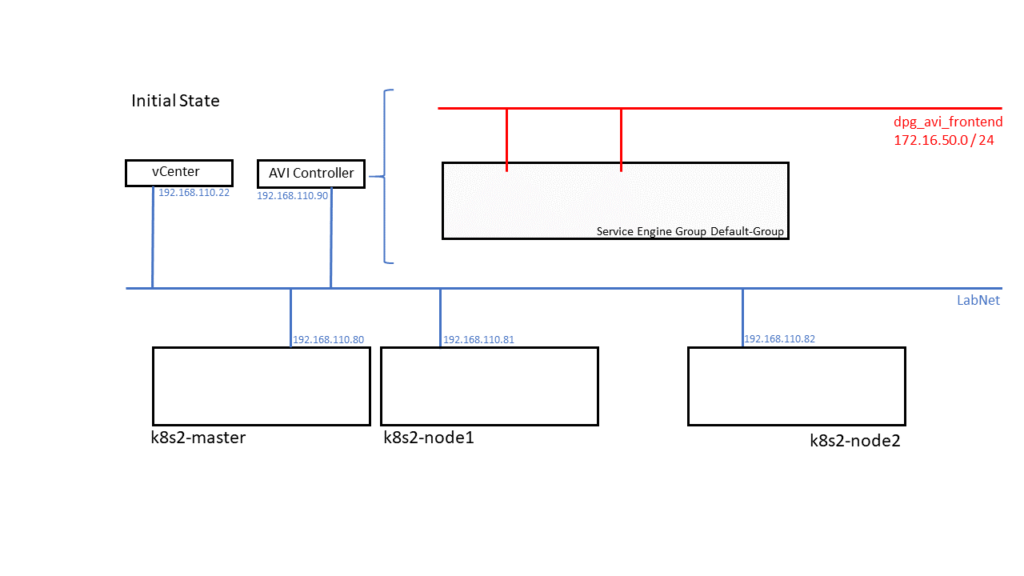
Architecture Overview
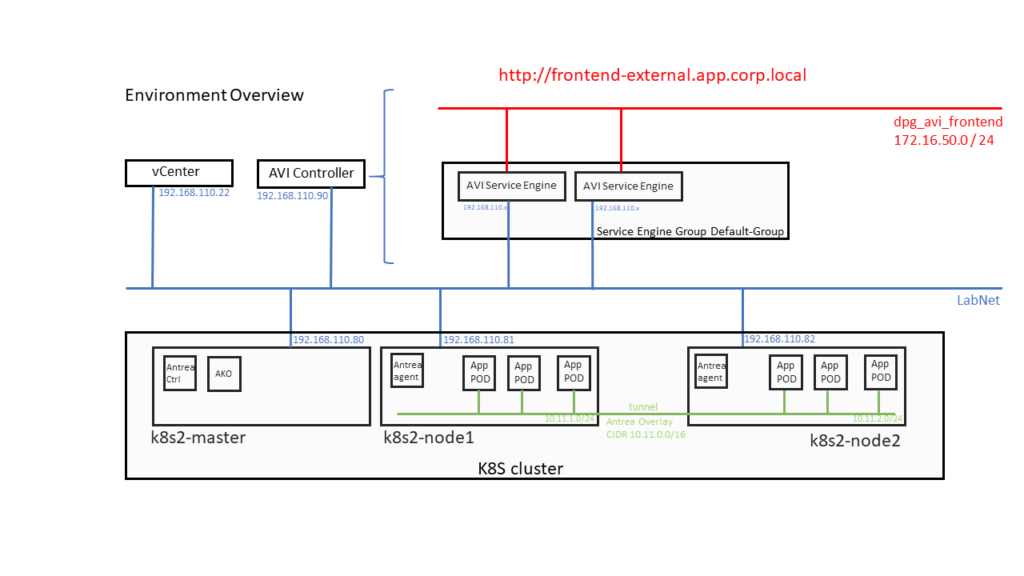
Prerequisits
3 Linux VMs (4 CPU, 4GB RAM, 25GB Storage), manged by vCenter, all networking on vSphere Distributed Port Group
Running NSX Advanced Load Balancer Controller (in my Environment Version 20.1.3).
Default-Cloud vCenter, Service Engine Group “Default-Group” properly configured. For Management Net “LabNet” and “dpg_avi_frontend” Subnets/IP Pools should be configured on AVI Controller.
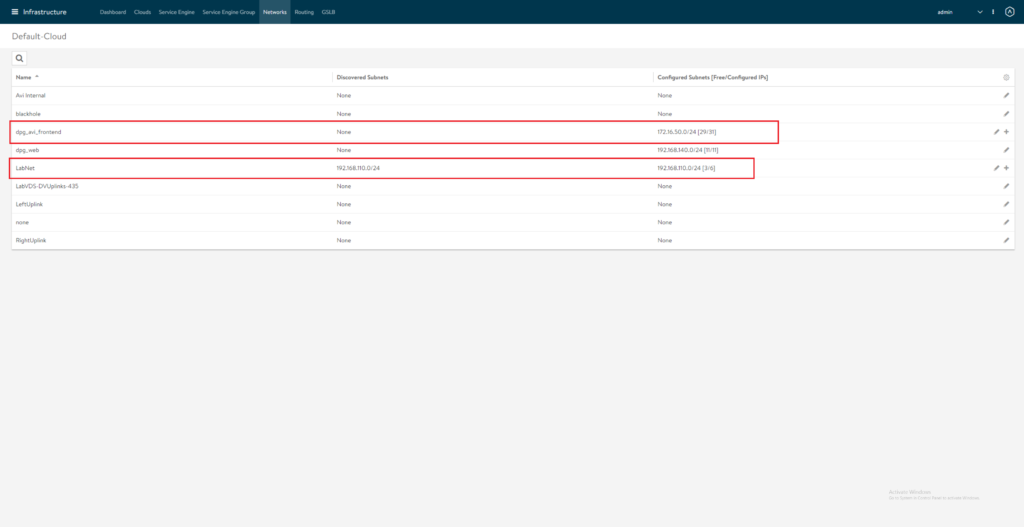
Linux Setup
Common Tasks for all three VMs. (you could think about doing it for one VM and clone it)
Install Ubuntu 18.04 (I just did a minimal install with OpenSSH Server)
Install without SWAP or delete SWAP later in /etc/fstab and reboot.
Additional packages needed:
vm@k8s2-master:~$: sudo apt-get install docker.io open-vm-tools apt-transport-https
Check Docker Status
vm@k8s2-master:~$: sudo systemctl status docker
If not already enabled just do so
vm@k8s2-master:~$ sudo systemctl enable docker.service
vm@k8s2-master:~$: docker version
If this gives you a “Got permission denied while trying to connect to the Docker daemon socket”
Your current user should get a member of the docker group:
vm@k8s2-master:~$: sudo usermod -a -G docker $USER
re-login, check with “groups” command if you’re now member of the group
Install Kubelet
vm@k8s2-master:~$: curl -s https://packages.cloud.google.com/apt/doc/apt-key.gpg | sudo apt-key add
vm@k8s2-master:~$: sudo touch /etc/apt/sources.list.d/kubernetes.list
vm@k8s2-master:~$: echo "deb http://apt.kubernetes.io/ kubernetes-xenial main" | sudo tee -a /etc/apt/sources.list.d/kubernetes.list
vm@k8s2-master:~$: sudo apt-get update
Currently latest AKO supported K8S version is 1.18 lets now install it
Find the latest 1.18 sub-version by
vm@k8s2-master:~$: apt-cache show kubelet | grep "Version: 1.18"
In my case this is 1.18.15-00
vm@k8s2-master:~$: sudo apt-get install -y kubelet=1.18.15-00 kubeadm=1.18.15-00 kubectl=1.18.15-00
protect k8s packages from automatic updates
vm@k8s2-master:~$: sudo apt-mark hold kubelet kubeadm kubectl
This finishes the common tasks for all VMs
Create K8S Cluster and deploy Antrea
On k8s2-master you now can run
vm@k8s2-master:~$: sudo kubeadm init --pod-network-cidr=10.11.0.0/16
Note the output after successful run. Now you can join the nodes by running the command from the output of your (!) “init” command on each of your nodes. My example:
vm@k8s2-node1:~$ sudo kubeadm join 192.168.110.80:6443 --token cgddsr.e9276hxkkds12dr1 --discovery-token-ca-cert-hash sha256:7548767f814c02230d9722d12345678c57043e0a9feb9aaffd30d77ae7b9d145
In case you lost the output of the “init” command here’s how to re-display it
vm@k8s2-master:~$ kubeadm token create --print-join-command
On k8s2-master allow your regular user to access the cluster:
vm@k8s2-master:~$ mkdir -p $HOME/.kube
vm@k8s2-master:~$ sudo cp -i /etc/kubernetes/admin.conf $HOME/.kube/config
vm@k8s2-master:~$ sudo chown $(id -u):$(id -g) $HOME/.kube/config
Check your Cluster. (“NotReady” can be okay, we haven’t configured NCP right now)
vm@k8s2-master:~$ kubectl get nodes
NAME STATUS ROLES AGE VERSION
k8s2-master NotReady master 5m48s v1.18.15
k8s2-node1 NotReady 2m48s v1.18.15
k8s2-node2 NotReady 2m30s v1.18.15
Deploy Antrea (Version 0.12.0) on master node:
vm@k8s2-master:~$ TAG=v0.12.0
vm@k8s2-master:~$ kubectl apply -f https://github.com/vmware-tanzu/antrea/releases/download/$TAG/antrea.yml
After some seconds all POD in kube-system namespace should be running:
vmw@k8s2-master:~$ kubectl get pods -A
NAMESPACE NAME READY STATUS RESTARTS AGE
kube-system antrea-agent-qqsqs 2/2 Running 0 111s
kube-system antrea-agent-r7jvl 2/2 Running 0 111s
kube-system antrea-agent-tglqq 2/2 Running 0 111s
kube-system antrea-controller-8656799c67-d7f6t 1/1 Running 0 111s
kube-system coredns-66bff467f8-6jh8w 0/1 Running 0 3m3s
kube-system coredns-66bff467f8-m9zbb 1/1 Running 0 3m3s
kube-system etcd-k8s2-master 1/1 Running 0 3m13s
kube-system kube-apiserver-k8s2-master 1/1 Running 0 3m13s
kube-system kube-controller-manager-k8s2-master 1/1 Running 1 3m13s
kube-system kube-proxy-5856k 1/1 Running 0 2m50s
kube-system kube-proxy-k2w8k 1/1 Running 0 3m3s
kube-system kube-proxy-ssbt6 1/1 Running 0 2m54s
kube-system kube-scheduler-k8s2-master 1/1 Running 1 3m13s
Nodes should be ready:
vm@k8s2-master:~$ kubectl get nodes
NAME STATUS ROLES AGE VERSION
k8s2-master Ready master 3m58s v1.18.15
k8s2-node1 Ready 3m24s v1.18.15
k8s2-node2 Ready 3m28s v1.18.15
Preparing AVI Controller
Edit / Create IPAM Profile as shown below

Edit / Create DNS Profile as shown below. My Domain name is corp.local. AKO will later add [servicename].[clustername].domain for your application.
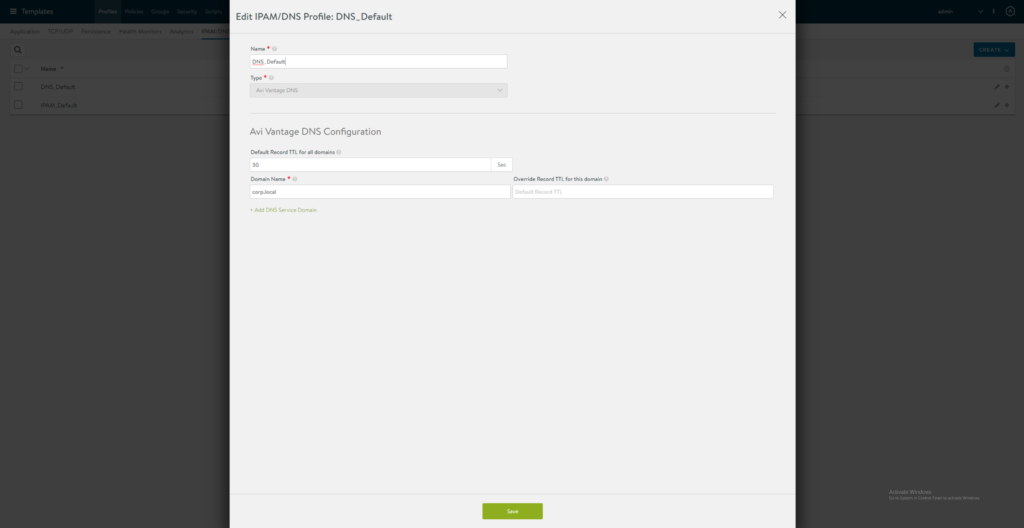
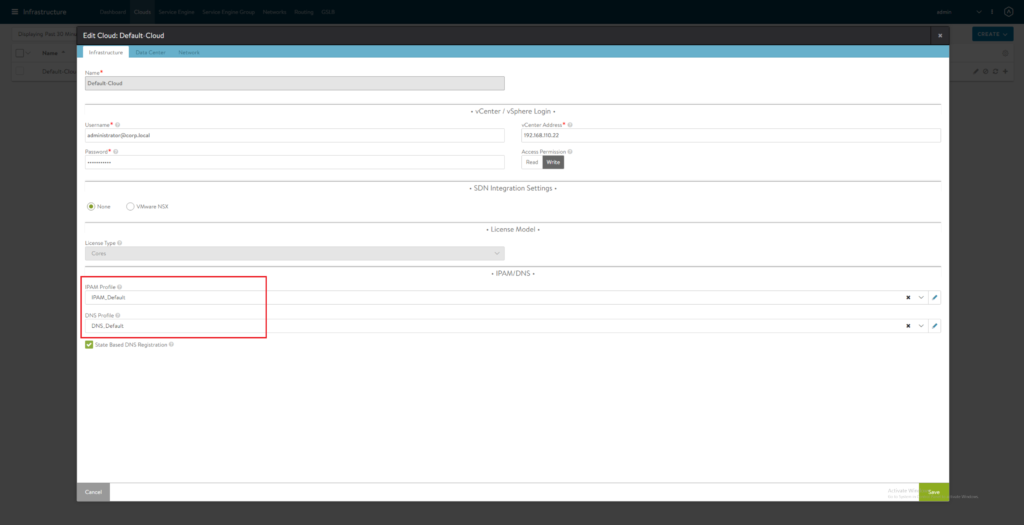
Configure vCenter Default Cloud. Select IPAM/DNS Profiles
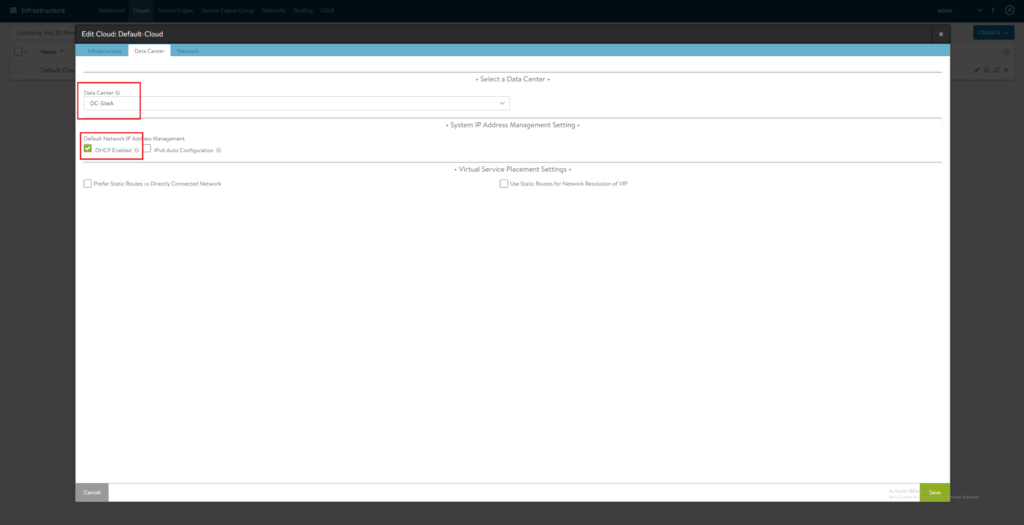
On Datacenter Tab select vCenter Datacenter and DHCP
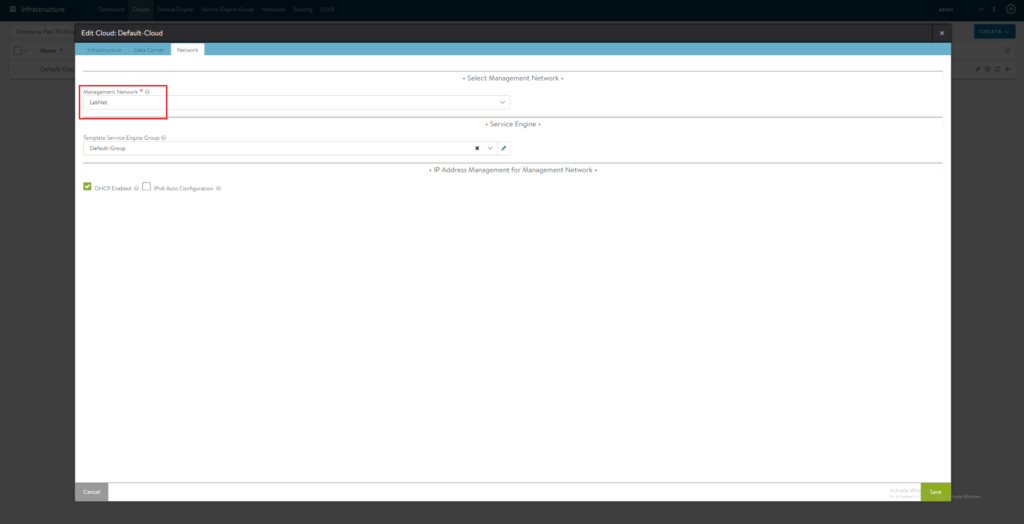
On Network Tab select Management Network
Installing AKO
All following steps will be done on master node.
Install helm
vm@k8s2-master:~$ sudo snap install helm --classic
helm 3.5.0 from Snapcrafters installed
Create avi-system namespace
vm@k8s2-master:~$ kubectl create ns avi-system
namespace/avi-system created
Add AKO incubator repository
vm@k8s2-master:~$ helm repo add ako https://avinetworks.github.io/avi-helm-charts/charts/stable/ako
Search for available charts
vm@k8s2-master:~$ helm search repo
NAME CHART VERSION APP VERSION DESCRIPTION
ako/ako 1.3.1 A helm chart for Avi Kubernetes Operator
Download values.yaml
vm@k8s2-master:~$ wget https://raw.githubusercontent.com/avinetworks/avi-helm-charts/master/charts/stable/ako/values.yaml
Edit values.yaml. Following settings I’ve changed: (replace with your own Controller IP / Credentials!!!
controllerVersion: “20.1.3”
shardVSSize: “SMALL”
clusterName: “k8s2”
subnetIP: “172.16.50.0”
subnetPrefix: “255.255.255.0”
networkName: “dpg_avi_frontend”
controllerHost: “192.168.110.90”
username: “admin”
password: “supersecretpassword1!”
Install AKO
vm@k8s2-master:~$ helm install ako/ako --generate-name --version 1.3.1 -f values.yaml --namespace=avi-system
Verify AKO is running:
vm@k8s2-master:~$ kubectl get pods -navi-system
NAME READY STATUS RESTARTS AGE
ako-0 1/1 Running 0 26s
Test your installation
Create app Namespace (important: Namespace will be later part of FQDN on Load Balancer! I’m using app.corp.local, see again AVI Controller DNS settings!)
vm@k8s2-master:~$ kubectl create ns app
namespace/app created
Deploy microservices-demo Application
vm@k8s2-master:~$ kubectl apply -n app -f https://raw.githubusercontent.com/GoogleCloudPlatform/microservices-demo/master/release/kubernetes-manifests.yaml
Check success
vm@k8s2-master:~$ kubectl get pods -n app
NAME READY STATUS RESTARTS AGE
adservice-5c9c7c997f-j2w7s 1/1 Running 0 3m57s
cartservice-6d99678dd6-5r9ln 1/1 Running 4 3m58s
checkoutservice-779cb9bfdf-ghtvb 1/1 Running 0 4m
currencyservice-5db6c7d559-66rs2 1/1 Running 0 3m58s
emailservice-5c47dc87bf-b5bwq 1/1 Running 0 4m
frontend-5fcb8cdcdc-dmt4c 1/1 Running 0 3m59s
loadgenerator-79bff5bd57-4wmfk 1/1 Running 4 3m58s
paymentservice-6564cb7fb9-4t4mr 1/1 Running 0 3m59s
productcatalogservice-5db9444549-b4vxt 1/1 Running 0 3m59s
recommendationservice-ff6878cf5-888hc 0/1 CrashLoopBackOff 4 3m59s
redis-cart-57bd646894-fngw4 1/1 Running 0 3m58s
shippingservice-f47755f97-lktpv 1/1 Running 0 3m58s
If after some minutes recommendationservice POD keeps crashing you need to disable LivenessProbe and ReadynessProbe at the recommendationservice deployment (just comment out). Reason of failing is missing connection to Google services.
vm@k8s2-master:~$ kubectl edit deployment recommendationservice -napp
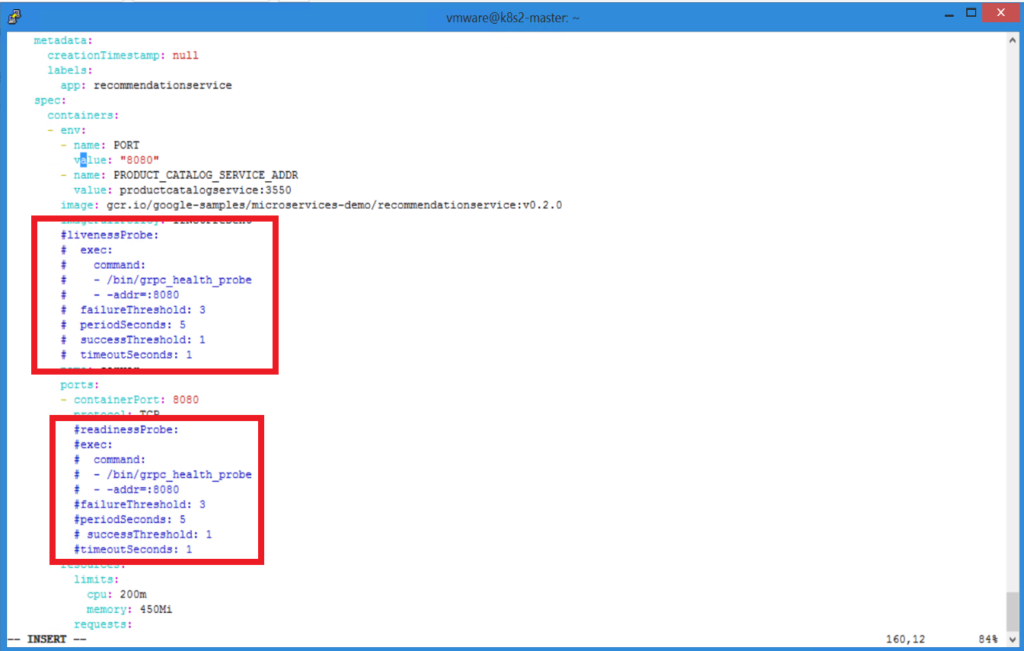
Now all pods shoud come up
vm@k8s2-master:~$ kubectl get pods -n app
NAME READY STATUS RESTARTS AGE
adservice-5c9c7c997f-j2w7s 1/1 Running 0 6m56s
cartservice-6d99678dd6-5r9ln 1/1 Running 4 6m57s
checkoutservice-779cb9bfdf-ghtvb 1/1 Running 0 6m59s
currencyservice-5db6c7d559-66rs2 1/1 Running 0 6m57s
emailservice-5c47dc87bf-b5bwq 1/1 Running 0 6m59s
frontend-5fcb8cdcdc-dmt4c 1/1 Running 0 6m58s
loadgenerator-79bff5bd57-4wmfk 1/1 Running 4 6m57s
paymentservice-6564cb7fb9-4t4mr 1/1 Running 0 6m58s
productcatalogservice-5db9444549-b4vxt 1/1 Running 0 6m58s
recommendationservice-6c4778748c-j787w 1/1 Running 0 42s
redis-cart-57bd646894-fngw4 1/1 Running 0 6m57s
shippingservice-f47755f97-lktpv 1/1 Running 0 6m57s
Service frontend-external should come up with LoadBalancer IP
vm@k8s2-master:~$ kubectl get service -napp
NAME TYPE CLUSTER-IP EXTERNAL-IP PORT(S) AGE
adservice ClusterIP 10.104.185.122 9555/TCP 47m
cartservice ClusterIP 10.101.107.103 7070/TCP 47m
checkoutservice ClusterIP 10.107.118.150 5050/TCP 47m
currencyservice ClusterIP 10.98.90.89 7000/TCP 47m
emailservice ClusterIP 10.109.93.51 5000/TCP 47m
frontend ClusterIP 10.102.40.190 80/TCP 47m
frontend-external LoadBalancer 10.99.117.80 172.16.50.100 80:32054/TCP 47m
paymentservice ClusterIP 10.101.191.253 50051/TCP 47m
productcatalogservice ClusterIP 10.109.45.69 3550/TCP 47m
recommendationservice ClusterIP 10.101.92.31 8080/TCP 47m
redis-cart ClusterIP 10.102.91.34 6379/TCP 47m
shippingservice ClusterIP 10.101.112.151 50051/TCP 47m
AVI Controller GUI should now show your newly deployed application

Create DNS Entry for “frontend-external.app.corp.local” / IP Adress and try accessing it on your Browser.

Congratulations. Successfully setup Antrea & AKO 🙂
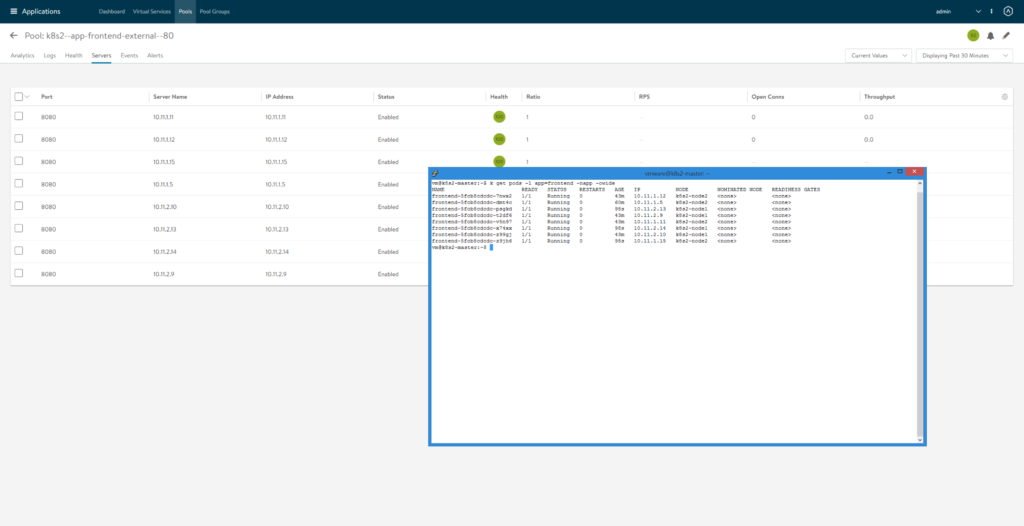
You could now try to scale your frontend POD and see automatical changes in AVI Pools.
Edit deployment frontend and set “replica” to 8
vm@k8s2-master:~$ kubectl scale --replicas 8 deployment/frontend -napp
Check AVI Pool. Note matching POD IP on Pool Servers.
vm@k8s2-master:~$ kubectl get pods -l app=frontend -napp -owide

Pingback: Securing you K8S-Network with Antrea Networking » vrealize.it - TechBlog VMware SDDC
Pingback: AKO with Antrea on Native K8s cluster with Ubuntu as workers | Software Defined Solutions
Pingback: Antrea to NSX-T Integration » vrealize.it - TechBlog VMware SDDC