


Deployment of a Kubernetes application into production requires a well-defined process. It is not only about the actual deployment but also about having the right test procedure in place as well as updating existing applications with new versions. In contrast to legacy applications where frequency of updates is rather low, modern containerized applications can have updates multiple times a day and typically will be done without actual downtime. The process of bringing updated versions of applications into production on a permanent base is called “continuous delivery (CD)”. On the other side of the story there’s “continuous integration (CI)” which more defines the process of the actual application development.
Codestream can manage the whole process for CI and CD (CI/CD) in fully automated way by its pipeline management capabilities. This blog however will only focus on the CD part.
For a better understanding how the full process will look like, please view the Deploying Kubernetes Applications with Codestream Video.
Codestream Smart templates
Codestream provides smart templates that automatically generate a CI and/or CD pipeline based on the customer environment and inputs. Customers do not need to do the heavy lifting of building a pipeline and finding proper syntax, variables, steps etc. As soon as the pipeline is generated, customers though can tailor it to their needs. This could mean adding additional steps for testing, adding manual approvals, changing the way of deployment and so on. All processes can be automated by API as well.

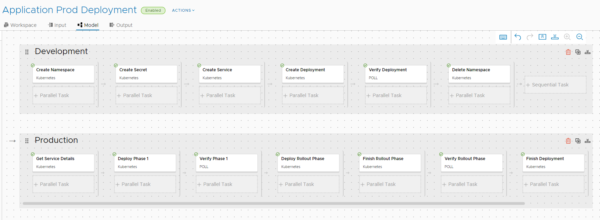
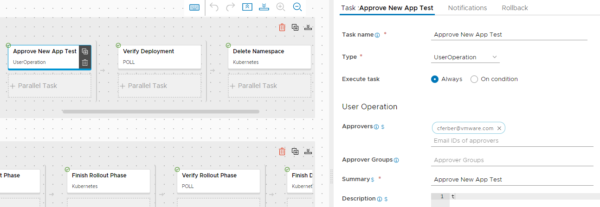
When a smart template has been executed properly for “continuous delivery” as in this example, below pipeline will be auto generated. The pipeline will have a two-staged process:
- Stage 1 (Development): The new version of the application is deployed onto a development Kubernetes cluster, the deployment is verified by an automated process and deleted afterwards. This makes sure it is ready for production.
- Stage 2 (Production): The new version of the application is deployed onto a production Kubernetes cluster. This follows the defined principles (canary, rolling upgrade, blue-green) based on the definition during the creation of the pipeline by the smart template. As soon as all tests have been passed, the application in the Kubernetes Cluster is updated completely to the new version.
How can this be done?
In this blog I will use a simple example of an application to demonstrate the process for a CD pipeline. You need following pre-requisites to do that:
- 2 Kubernetes Clusters
- You can either use your clusters of choice (I used version 1.18.2) or deploy new single node clusters by following this process with vRA: https://www.vrealize.it/2020/06/02/kubernetes-single-node-deployment/
- Each cluster must have a Kubernetes load balancer in place. This is automatically given for the linked single-node-deployment above. In case you want to deploy a load balancer manually, Metal-LB is a simple way to go.
- Kubernetes Clusters need to have internet access.
- Kubernetes yaml file similar structure as the cf-web-blue.yaml used here.
Step 1: Add Kubernetes Endpoints
Codestream needs to know about your Kubernetes cluster, hence endpoints must be added for both.
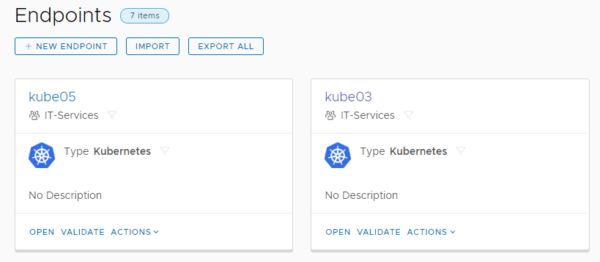
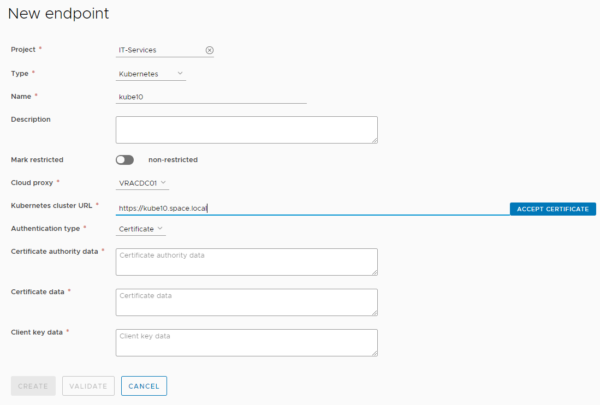
When adding a Kubernetes endpoint make sure you select the right project, select the cloud proxy for vRA Cloud environments (make sure it is pre-deployed). Data like Kubernetes cluster URL and the required certificates are stored in the config file of the ~/.kube directory of the user on the Kubernetes node. By default this is /root/.kube/config.
In some cases, the wizard might not work because of an issue with self-signed certificates. If that’s the case you will need to import an existing configuration by a yaml file. For reference find here an example file (unzip first) you can use for import. All values that need to be customized are marked with <<…>> and some explanation how to retrieve the values.
Step 2: Deploy application on production cluster
Before you do that, you must define which of the clusters is the production cluster. Make sure the cluster has a load balancer deployed. The smart template expects that the application is already running on the production cluster. This means you must deploy the application yaml manually and verify if the application is running. To do this download my example cf-web-blue.yaml and deploy it on the production cluster.
- ssh to Kubernetes master
- wget https://vrealize.it/wp-content/uploads/2024/10/cf-web-blue.zip
- unzip cf-web-blue.zip
- kubectl apply -f cf-web-blue.yaml
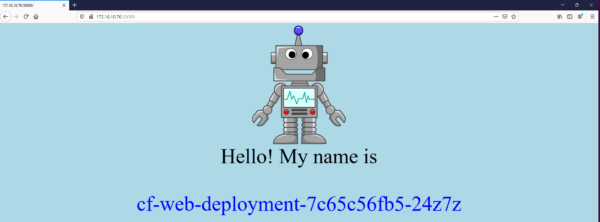
You can verify if the application is running properly by executing “kubectl get services”. This will show the ip address the load balancer is using for the application (172.16.0.76) as well as the related port (30089).
![]()
Now you can access the application by the URL https://172.16.10.76:30089 (modify with your values). As a result, you will see a simple web page with blue back ground that is load balanced (name is changing on refresh). In my environment this worked reliably with Firefox browser, Chrome seems to not update the page on all refreshes likely due to some caching.
Step 3: Create pipeline from smart template
- Download the cf-web-blue-zip file to your client and unzip
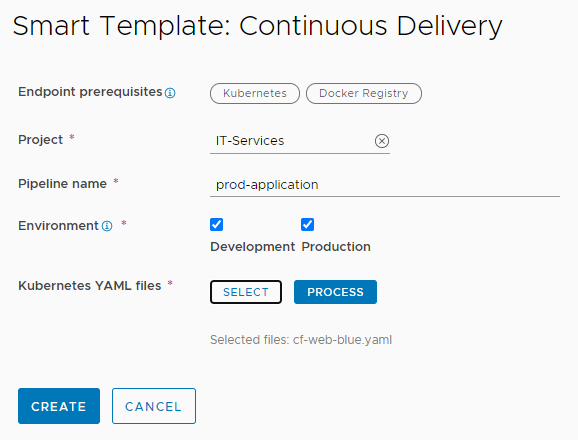
- Create new pipeline from smart template and select “Continuous Delivery”
- Select project, specify pipeline name, and select “Development” and “Production”
- Select downloaded yaml file and click “process”
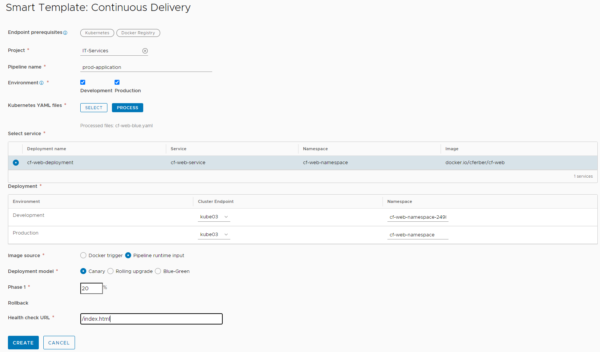
- Select the service to use (only one in this yaml)
- Select the right development and production cluster
- Use “pipeline runtime input” for image source (image will be specified on pipeline run with input question)
- Select the deployment model to be used. I will not walk through the differences between canary, rolling upgrade and blue-green deployment. There are sources on the web that explain these types more deeply. Depending on the selection the production pipeline will be created differently. In this example I am using canary deployment with 20%. This means before the whole production rollout is updated, 20% of the pods (2 in this case) will be updated with the new version. This is to test if there’s negative effects on production. As soon as the test has been passed, full rollout is invoked.
- Specify /index.html as health check URL. Actually, Codestream expects a JSON feedback from the application which my simple app does not deliver. Therefore, it’s irrelevant what you specify here, we will modify the resulting pipeline anyway.
- Create the pipeline
Step 4: Modify the pipeline
There are some few modifications on the pipeline needed to make it runs properly.
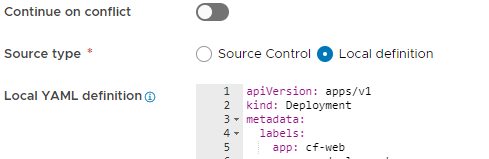
First make sure you walk through all steps of the production pipeline and exchange any occurrence of “apiVersion: extensions/v1beta1” by “apiVersion: apps/v1”. This is required because of a bug in Codestream that hard codes the api version in the production pipeline rather than using the right parameter from the yaml file.
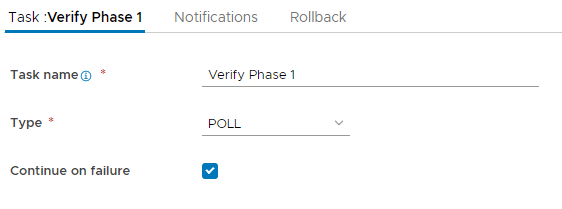
Second – and this is specific to my application – check the hook for “continue on failure” for all “Verify” phases. This is because my simple application does not provide proper JSON response, hence automated testing cannot be used.
Third I would recommend a UserOperation step before the “Verify” phases. This is not required, but if you want to follow what happens, the pipeline waits for your manual approval before it goes on with the next steps.
Step 5: Run pipeline
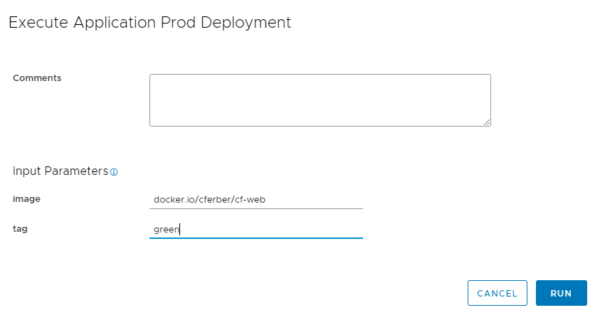
On pipeline run specify the proper input parameters. For image you will use “docker.io/cferber/cf-web” as per my example. Tag specifies the version of the application to be used for the deployment. My application supports “blue” and “green” as value. Assuming you used my yaml above for the manual deployment of the application in the production cluster, your production application should have a blue background. Hence, you should use “green” as input tag when running the pipeline.
Following steps should happen going forward on pipeline execution:
- 10 test pods of the “green” application will be deployed in the development cluster. You can check this by “watch kubectl get pods –all-namespaces”
- When first approval stops you can issue “kubectl get service –all-namespaces” to find out the IP and port (30089) to access the application. If test works fine you can approve this step.
- Next you will see 2 additional pods being deployed on the production cluster (check by “watch kubectl get pods –all-namespaces).
- Second approval stops and you can access your production web page. On browser refresh you still should see load balanced application, but now few systems will show green background while most of them will show blue background (10 vs 2).
- After approval the deployment is finalized, and all production should show green background afterwards.
Have fun!

- 1-node Kubernetes Template for CentOS Stream 9 in VCF Automation - 30. September 2024
- Aria Automation custom resources with dynamic types - 9. August 2024
- Database-as-a-Service with Data Services Manager and Aria Automation - 4. July 2024
Great content and very nice demo.
It explains perfectly and in a real life manner the usage of Code Stream.
Thanks